
Pull-Overs with Resistance Band
How to do Pull-Overs with Resistance Band?
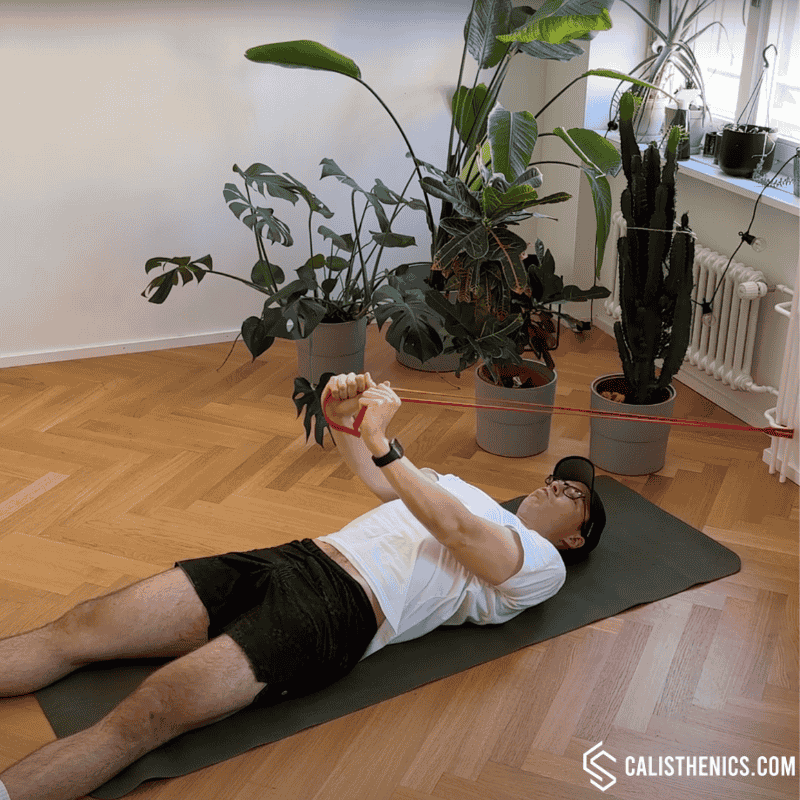
Resistance band pull-overs are an upper-body exercise that targets the lats, chest, and shoulders while also engaging the core. In this movement, the athlete lies on their back with a resistance band anchored to a stable point above their head and pulls the band down toward the hips, mimicking the movement of a dumbbell pull-over. This exercise is excellent for building back and shoulder strength, improving flexibility, and enhancing core stability.
Steps to Perform a Proper Resistance Band Pull-Over:
1. Anchor the Resistance Band:
• Secure the resistance band to a stable point behind and above your head (e.g., a door anchor or other sturdy fixture).
• Lie on your back on a mat with your head facing the anchor point.
2. Grip the Band and Set Up Your Position:
• Hold the ends of the resistance band with both hands, extending your arms overhead so that there’s slight tension in the band when your arms are fully extended.
• Position your feet flat on the floor with knees bent or keep your legs extended for a greater core challenge.
• Engage your core by pulling your belly button toward your spine to stabilize your lower back and keep it flat against the floor.
3. Pull the Band Toward Your Hips:
• Exhale as you engage your lats and pull the band down in a smooth, controlled motion toward your hips.
• Keep your arms straight or maintain a slight bend in the elbows, ensuring that the movement is controlled by your lats and shoulders, not by your arms alone.
4. Squeeze at the Bottom Position:
• When your hands are above your hips or thighs, hold for a brief moment and squeeze your lats and chest to maximize muscle engagement.
• Avoid letting your shoulders shrug or rise toward your ears; keep them pulled down and back.
5. Return to the Starting Position:
• Inhale as you slowly release the tension and bring your arms back overhead in a controlled manner.
• Stop just before your arms are fully extended back to the starting position to keep tension on the muscles.
6. Repeat the Movement:
• Perform the desired number of repetitions, keeping the movement slow and controlled throughout each rep.
Benefits of Resistance Band Pull-Overs
• Strengthens the Lats and Chest: This exercise engages both the back and chest muscles, helping to build strength and stability across the upper body.
• Improves Shoulder Flexibility: Pull-overs help enhance shoulder mobility and flexibility, making it a great movement for improving overhead range of motion.
• Enhances Core Stability: By engaging the core to stabilize the torso, this exercise builds core strength and stability, which is essential for maintaining proper form.
• Functional Upper Body Strength: Resistance band pull-overs mimic functional overhead pulling motions, translating to better performance in daily activities and sports.
• Low Impact on Joints: The use of a resistance band makes this a low-impact exercise, gentle on the joints while still effective for building muscle.
• Portable and Versatile: This exercise can be performed anywhere with a resistance band, making it an accessible choice for home workouts or travel.
• Engages Multiple Muscle Groups: Pull-overs target the lats, chest, shoulders, and core, making it an efficient full upper-body exercise.
Common Mistakes to Avoid
• Arching the Lower Back: Avoid letting your lower back lift off the floor. Keep your core tight and your back flat to prevent strain.
• Using Too Much Momentum: Focus on slow, controlled movements rather than swinging your arms. This ensures that the correct muscles are engaged and reduces the risk of injury.
• Locking Out the Elbows: Avoid locking your elbows fully; a slight bend helps reduce joint strain and keeps the tension on the muscles.
• Shrugging the Shoulders: Keep your shoulders down and avoid shrugging toward your ears, which can put stress on the neck and reduce the effectiveness of the exercise.
• Inconsistent Band Tension: Ensure the band remains under consistent tension throughout the movement to keep the muscles fully engaged. Adjust your position as needed.
Tips for the proper execution of Pull-Overs with Resistance Band
Keep the Core Tight: Engage your core to keep your lower back pressed against the floor, preventing arching during the movement.
Avoid Locking Out the Elbows: Maintain a slight bend in the elbows to prevent joint strain and keep the focus on your back and chest muscles.
Control the Movement: Perform both the pull and return phases slowly, keeping constant tension in the band to maximize muscle engagement.
Breathe Steadily: Exhale as you pull the band toward your hips and inhale as you return to the starting position. Controlled breathing helps maintain stability and focus.
Limit Shoulder Shrugging: Keep your shoulders down and relaxed, avoiding any shrugging that could reduce effectiveness and strain your neck.
Muscles worked when doing Pull-Overs with Resistance Band
Primary Muscles:
•Latissimus Dorsi (Lats): The largest muscles in the back are primarily engaged as you pull the band from overhead toward your hips.
•Pectorals (Chest): The chest muscles assist in controlling the downward pull and stabilizing the movement, especially in the final phase.
Secondary Muscles:
•Shoulders (Deltoids): The rear deltoids help stabilize and control the arm movement.
•Core: The abdominals engage to stabilize the torso and prevent the lower back from arching.
•Triceps: Assist in stabilizing the arms throughout the pull, especially as they resist the band’s tension.
•Lower Back: The erector spinae muscles help maintain proper spinal alignment and prevent lower back arching.
Primary Muscle(s):
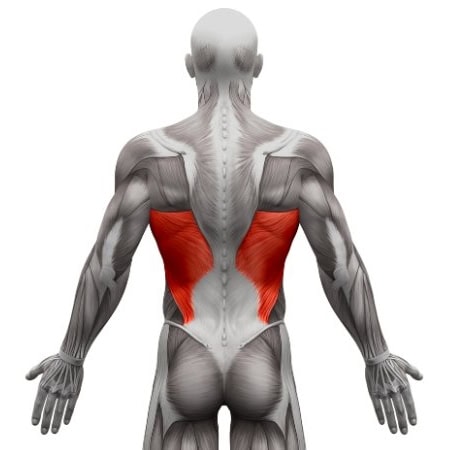
Lats
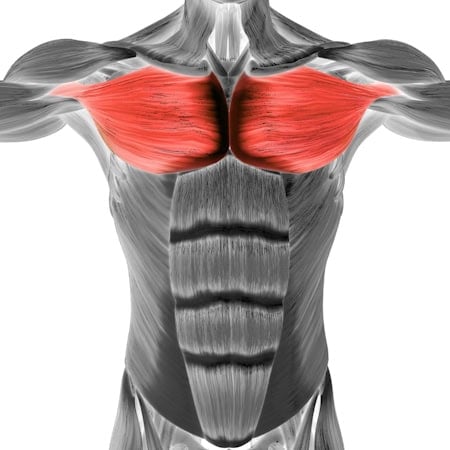
Middle chest
Secondary Muscle(s):

Abdominal
Equipment needed for Pull-Overs with Resistance Band

Adjust the difficulty of Pull-Overs with Resistance Band
How to make Pull-Overs with Resistance Band harder?
How to make Pull-Overs with Resistance Band easier?
How to make Pull-Overs with Resistance Band harder?
To make Pull-Overs with Resistance Band harder:
-
Use a Heavier Resistance Band: Increase the difficulty by using a band with more resistance, requiring more strength from your lats and chest.
-
Increase Time Under Tension: Slow down the movement, especially when returning to the starting position, to increase the duration of muscle engagement.
-
Add a Hold at the Bottom: Pause for 2-3 seconds when your hands are above your hips to intensify the contraction in the lats and chest.
-
Increase Repetitions or Sets: Perform additional repetitions or sets to further challenge your muscles and build endurance.
How to make Pull-Overs with Resistance Band easier?
To make Pull-Overs with Resistance Band easier:
-
Use a Lighter Resistance Band: Start with a band that provides less resistance to make the exercise more manageable, allowing you to focus on proper form.
-
Limit the Range of Motion: Instead of pulling the band all the way to your hips, pull only halfway to reduce the intensity.
-
Perform Fewer Repetitions: Begin with a smaller number of repetitions (e.g., 8-10) and gradually increase as your strength improves.