
Reverse Crunch to Candlestick
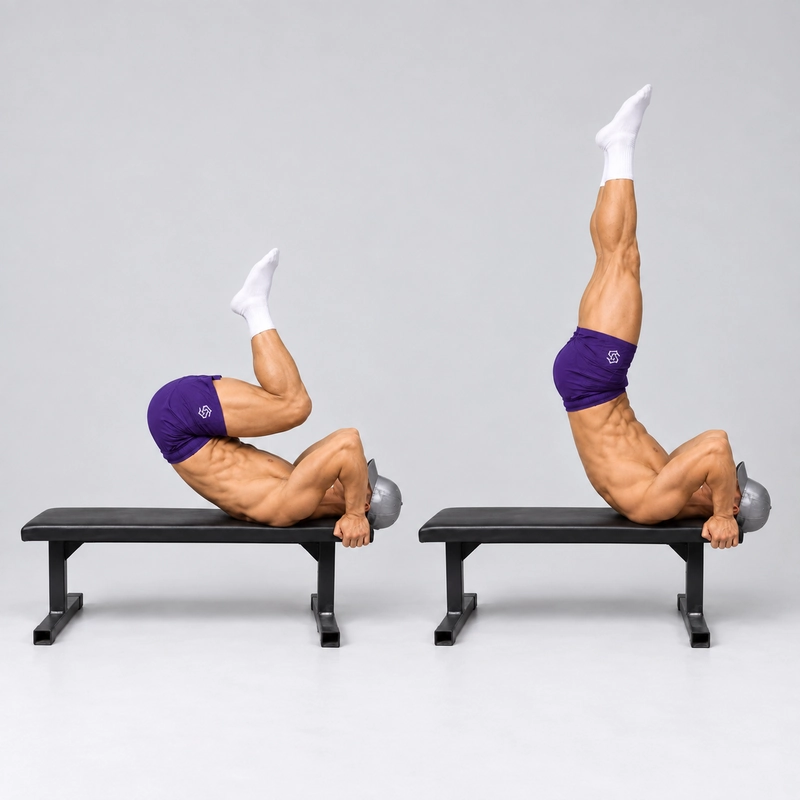
How to do Reverse Crunch to Candlestick?
The Reverse Crunch to Candlestick is a controlled floor exercise in which you curl the pelvis upward from lying, continue into a brief candlestick supported across the shoulders and upper back, then uncurl to the starting position. The main version begins with bent knees and finishes the raised position with the legs straight and together. Your palms remain on the floor beside the body to help support and balance the movement.
A conventional reverse crunch lifts the pelvis without requiring a complete inverted body shape. This version adds the candlestick endpoint described in CrossFit's candlestick instruction: the feet point toward the ceiling while the back of the shoulders supplies the supporting base. The exercise here starts lying and returns to lying, rather than rocking backward from standing and rolling up to stand.
It is also different from a Dragon Flag. A dragon flag keeps the trunk and legs connected as a long, comparatively rigid lever during the descent. In the Reverse Crunch to Candlestick, curling and uncurling the trunk are intentional, and there is no overhead grip or anchor.
What makes this more than a reverse crunch?
| Exercise | Defining action | Finish of a repetition |
|---|---|---|
| Reverse crunch | Lift and curl the pelvis toward the ribcage without requiring a straight-leg candlestick. | Return the pelvis to the floor. |
| Reverse Crunch to Candlestick | Continue the pelvic curl into a controlled, shoulder-supported top shape with the legs extended. | Uncurl to the original lying position. |
| Leg raise | Move the legs at the hips; a complete pelvic lift is not necessarily included. | Return the legs to the chosen starting height. |
| Candlestick roll-to-stand | Rock backward into the shape, then roll forward onto the feet. | Stand up. |
| Dragon flag | Control a long body lever using upper-back support and an overhead anchor. | Complete the prescribed rigid-body lowering and raising sequence. |
The important transition is the pelvic curl, not how quickly you can swing your feet overhead. If only the legs move and the pelvis stays down, you have not performed the exercise. If you throw the legs backward and rock onto the neck, reduce the range and return to a smaller curl.
Prepare the starting position
Use a level floor and a firm mat that cushions the back without making the shoulder contact unstable. Keep clear space around the head and legs. The head can rest lightly on the surface, but do not use it to push the body upward or balance on the neck.
First practise lying with the knees bent, keeping the ribs and pelvis organized while breathing. The Dead Bug provides a supported way to learn that control. A Hollow Body Hold offers related bracing practice, although the candlestick repetition adds deliberate spinal movement rather than holding one fixed shape.
You should be able to lift the pelvis a small amount and return it smoothly before attempting the higher endpoint. The American Council on Exercise's reverse-crunch instructions emphasize moving the pelvis toward the ribcage and controlling the return. They describe the reverse-crunch component, not a complete candlestick protocol.
How to do a Reverse Crunch to Candlestick
- Lie down and set the arms. Place the arms beside the torso with the palms flat and fingers comfortably directed toward the feet. Keep the head facing upward and the upper back supported. Do not place the hands under the lower back or grip an object behind the head in this main version.
- Bring the legs into the starting position. Lift the feet and bend the hips and knees to approximately 90 degrees, with the knees above the hips. Settle the lower back and pelvis on the mat. This is the start and finish position for each repetition.
- Begin with the pelvis. Exhale gently and curl the pelvis toward the ribcage, allowing the tailbone and lower back to lift. Keep the knees bent during this initial curl instead of kicking the feet away and snapping them back.
- Continue the lift under control. Press the palms into the floor as needed while the pelvis rises and contact moves toward the upper back and shoulders. Keep the movement smooth and centered rather than throwing yourself backward. If you cannot control the lift, stop at a smaller reverse crunch.
- Extend into the candlestick. As you establish stable shoulder and upper-back support, extend the knees and open the hips enough to bring the legs together toward the ceiling. Aim for a recognizable near-vertical shoulder-to-hip-to-foot line with a slight hollow shape if needed. Do not drive the feet beyond the head to force a more vertical position.
- Show a brief controlled top position. Pause for about one second while continuing to breathe. Keep the palms down and the supporting contact broad across the back of the shoulders and upper back. Keep the head facing upward; do not turn it, push through the skull or deliberately balance on the cervical spine. Height is secondary to comfortable support and control.
- Bend the knees for the return. Bring the knees back into a manageable tuck without pulling them forcefully onto the face or chest. This shortens the moving lever before you begin the uncurl.
- Uncurl back to the mat. Lower the trunk and pelvis progressively, keeping the shoulders supported as the rest of the back returns. Avoid dropping the hips or using the legs to bounce into the next repetition. A controlled return of roughly three seconds is a useful starting cue.
- Restore the start. Finish with the pelvis and lower back on the mat and the knees above the hips, still bent. Briefly reset before the next lift. Count one complete rise, controlled top and return as one repetition.
The emphasis is a smooth transfer onto the shoulder-supported base and back again. Beyond Movement's candlestick coaching likewise emphasizes controlled rolling and upper-back/shoulder support. Their drill uses a seated entry; this page deliberately uses a lying reverse-crunch entry.
Completion standard
- Begin and finish lying with the pelvis supported and the hips and knees bent.
- Initiate the rise by curling the pelvis, rather than only lifting the legs.
- Reach a recognizable candlestick with the legs straight and together, the hips raised and the feet directed toward the ceiling.
- Keep the arms beside the torso with the palms on the floor; modest supporting pressure is part of this version.
- Show a brief, controlled top position without resting the weight on the head or rolling onto the neck.
- Bend the knees and return through a smooth uncurl, without a hip drop, bounce or rocking finish.
- Count the repetition after returning to the starting position. A smaller pelvic curl or tucked endpoint is useful practice but should be logged as a regression.
A perfectly vertical line is not worth forcing. If achieving the candlestick requires uncomfortable neck pressure, uncontrolled momentum or a forced position, use the smaller-range regression. Do not keep adding height to make an incomplete repetition look complete.
Common mistakes
- Only moving the knees: focus on lifting and curling the pelvis; knee movement alone does not supply the full repetition.
- Throwing the legs overhead: keep the initial curl compact and extend the legs only after control of the raised position is established.
- Holding a large pike at the top: practise opening the hips gradually while the shoulders remain the supporting base. Do not solve it by pushing farther onto the neck.
- Turning the head while raised: keep your gaze upward and make adjustments only after returning to lying.
- Using the hands to prop the lower back: keep the chosen palms-down standard. A hand-supported shoulder stand is a different setup.
- Dropping the pelvis: shorten the lever with bent knees and slow the uncurl until the return is controlled.
- Rocking directly into the next lift: reset with the pelvis down so each repetition shows its own pelvic curl.
- Holding the breath: use a gentle exhale during the curl and keep breathing during the top position and return.
Sets, repetitions and progression
A practical starting option is 2 to 3 sets of 4 to 8 controlled repetitions, resting approximately 60 to 90 seconds between sets. Use a smooth lift, a brief top position and a deliberate return. These are adjustable coaching suggestions, not research-validated thresholds or a fixed mastery timeline.
Choose fewer repetitions if balance or support quality deteriorates. Develop a consistent endpoint and return before extending the pause or keeping the legs longer during the ascent. Do not increase the speed to get more repetitions.
For a separate long-lever pathway, the Dragon Flag Negative adds an overhead anchor and a different lowering task. It requires its own readiness and setup; completing this candlestick drill does not automatically establish dragon flag strength. If you prefer core training without the raised shoulder-supported position, the Kneeling Ab-Wheel Rollout trains anti-extension through another movement pattern, with its own range and support requirements.
Discomfort and when to stop
Stop if you feel neck pain, sharp back pain, dizziness, tingling or a loss of control. Return to lying rather than attempting to push through the raised position. If you have a neck or spinal condition, or have been advised to avoid inverted positions or spinal flexion, get appropriate individual guidance before practising this version. Recurrent symptoms need assessment rather than a different repetition target.
Frequently asked questions
Should the hands stay on the floor?
Yes. In this version, the palms remain beside the torso and can press for support. Keep that setup consistent when tracking progress. Moving the hands to the lower back or an overhead anchor changes the configuration.
Is this a lower-ab isolation exercise?
No. The abdominal wall controls the pelvis and trunk while other muscles organize the legs and support. The exercise is not a way to isolate a separate “lower-ab” muscle.
Do the legs have to stay straight throughout?
No. The main version uses bent knees during the entry and return, then straight legs at the candlestick endpoint. Keeping the legs longer during more of the repetition is a progression, not the starting requirement.
Tips for the proper execution of Reverse Crunch to Candlestick
Use a firm mat on a level floor so the upper back and shoulders have comfortable, stable support.
Start with the knees above the hips and both hips and knees bent, rather than swinging the feet from the floor.
Initiate by curling the pelvis toward the ribcage; moving the legs alone is not a reverse crunch to candlestick.
Keep the palms beside the torso and press into the floor as needed without propping the lower back with the hands.
Extend the legs toward the ceiling after establishing control of the raised position, rather than throwing them beyond the head.
Support the top position across the shoulders and upper back; do not push through the head or roll onto the neck.
Keep the head facing upward throughout the raised position and wait until lying down before turning or adjusting it.
Bend the knees before the return, then uncurl slowly enough to prevent the pelvis from dropping onto the mat.
Reset with the pelvis supported before each repetition instead of using a rebound or rocking run-up.
Count only a controlled rise to the straight-leg candlestick and return, and record smaller curls or tucked endpoints as regressions.
Muscles worked when doing Reverse Crunch to Candlestick
The Reverse Crunch to Candlestick combines active pelvic curling, a brief raised body shape and a controlled uncurl. The abdominal wall drives and controls the relationship between the pelvis and ribcage, while the arms, shoulders and legs help organize the support and endpoint.
Primary muscles
- Rectus abdominis: contributes to curling the pelvis toward the ribcage and controlling the trunk as it returns to the floor.
- Internal and external obliques: assist the pelvic curl and help keep the rise centered without unwanted twisting.
Secondary and stabilizing muscles
- Transversus abdominis and other trunk stabilizers: contribute to abdominal tension and control while the body changes shape.
- Hip flexors: position the thighs during the bent-knee start, tuck and return.
- Glutes and quadriceps: help organize hip extension and straight knees in the candlestick endpoint.
- Shoulder-girdle and arm muscles: help maintain upper-back support and palm pressure against the floor.
- Spinal stabilizers: coordinate with the abdominal wall as the trunk moves and settles into the raised shape.
This is not a lower-ab isolation movement, a neck-strength exercise or a measured test of muscle-activation percentages. The amount of palm assistance, leg position and endpoint changes the task; no fixed loading percentage is supplied.
Primary Muscle(s):

Abdominal
Secondary Muscle(s):

Oblique
Equipment needed for Reverse Crunch to Candlestick
No equipment found.
Adjust the difficulty of Reverse Crunch to Candlestick
Start by controlling the pelvic curl before adding height. Use a smaller reverse crunch or a tucked endpoint if you cannot reach a comfortable shoulder-supported candlestick. Progress by slowing the return, extending the top pause or keeping the legs longer during more of the movement. Keep the support position comfortable and the palms-down setup consistent; extra height is not progress if it creates neck pressure or an uncontrolled roll.
How to make Reverse Crunch to Candlestick harder?
How to make Reverse Crunch to Candlestick easier?
How to make Reverse Crunch to Candlestick harder?
To make Reverse Crunch to Candlestick harder:
-
Lengthen the controlled return to roughly four or five seconds while keeping the knees bent and the pelvis from dropping. Do not trade a slower descent for uncomfortable neck support at the top.
-
Extend the controlled candlestick pause to two or three seconds while continuing to breathe and keeping the legs organized. End the pause as soon as the support position or balance deteriorates.
-
Gradually keep the legs straighter during more of the ascent and return. Begin with the legs pointing upward rather than adding a low-leg swing, and retain the same smooth pelvic curl and shoulder-supported endpoint.
-
Gradually reduce how strongly you press through the palms while keeping the hands grounded and the same controlled range. Only reduce assistance if the shoulders and upper back remain the supporting base; do not replace palm support with pressure through the head or neck.
How to make Reverse Crunch to Candlestick easier?
To make Reverse Crunch to Candlestick easier:
-
Perform a small bent-knee reverse crunch: lift the pelvis a short distance, then return it slowly to the mat without attempting the full candlestick. Build a repeatable pelvic curl before adding the higher endpoint.
-
Keep the knees tucked during a smaller shoulder-supported lift and return. Stop before the position creates neck pressure or requires a kick. Record the tucked endpoint separately from the straight-leg candlestick standard.
-
Use gentle posterior pelvic tilts and controlled Dead Bug repetitions to practise rib-and-pelvis control while staying fully supported on the floor. This is preparation for the curl rather than a counted candlestick repetition.
