
Pull 8: Lat and Rhomboid Burner Workout with Shoulder Prehab
🎯 Workout Description:
This is a negative pull-up masterclass. You’ll be spending more time lowering—up to 5 seconds per rep—to build vertical pulling strength. Rows remain in the mix, but now with higher difficulty. Accessory work continues to protect your shoulders and build grip endurance.
👤 Who It’s For:
Athletes who can already control negatives for 3 seconds and want to stretch that to 5 seconds while maintaining excellent form.
🧰 Equipment Needed:
- Pull-up bar ▶️ check out the best Pull-Up Bars for calisthenics
- Both ▶️ Gymnastics rings and ▶️ these Dip Bars are great for bodyweight rows
Warm-Up
Goal: Activate the posterior chain and prep the body for slow, loaded eccentrics.
Format: Circuit – 2 rounds, no rest between exercises or rounds
-
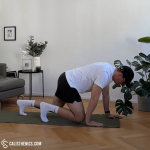
30 sec Bear Crawl
-
10x Scapula Rows
-
10x Reverse Snow Angels
Expect this warm-up to light up your back and shoulders. Focus on scapular retraction and controlled movement.

No muscle groups found for this post.
Tips
-
Move slowly and deliberately to avoid sudden movements.
-
Keep circles smooth and controlled—avoid jerky motions.
-
Breathe steadily and deeply to maximize relaxation and blood flow.
-
Gradually increase the range of motion as your joints warm up.
-
Perform each movement for 15-20 seconds, or until joints feel loosened.
-
Customize your routine slightly based on the specific demands of your workout.

Muscle group:

Tips
-
Keep the Core Tight: Engage your core throughout the movement to prevent your hips from lifting or sagging.
-
Minimize Hip Movement: The goal is to keep your hips stable, avoiding excessive side-to-side motion. This helps maximize core engagement and balance.
-
Small Steps: Take smaller, controlled steps to improve balance and coordination while keeping the movement fluid.
-
Controlled Breathing: Breathe steadily as you crawl, exhaling as you move each hand and foot forward, and inhaling as you stabilize. Proper breathing helps maintain core stability.
-
Hand and Shoulder Alignment: Keep your hands under your shoulders and ensure each step forward is controlled to reduce strain on your wrists and shoulders.


Tips
-
Keep your body in a rigid plank position to maximize stability.
-
Engage your lats throughout the movement to maintain control.
-
Perform the exercise slowly, focusing on mind-muscle connection.
-
If you’re new to scapular control, practice hanging scapular retractions first.
-
Use controlled breathing to maintain core engagement and stability.
-
Keep your neck neutral—avoid tucking or craning it forward.

Muscle group:

Tips
-
Keep Arms Straight but Not Locked: Maintain a slight bend in the elbows to reduce unnecessary joint strain.
-
Move in a Smooth, Controlled Manner: Avoid jerky or fast motions—slow, controlled reps activate muscles more effectively.
-
Focus on Squeezing the Shoulder Blades: Imagine pinching a pencil between your scapulae at the bottom of the movement.
-
Engage Your Core Throughout: Prevent excessive lumbar arching by keeping abs and glutes activated.
-
Keep a Steady Breathing Pattern: Inhale as you extend the arms forward, and exhale as you sweep them back.
-
Try Adding Light Weights for Progression: Holding small plates or wrist weights can increase resistance for added challenge.
Strength
Goal: Master controlled negatives and combine them with strict horizontal pulling.
Structure:
-
Superset A (3 rounds): A1 + A2, rest 90 sec
-
Set B (2 sets): Performed alone, rest 45 sec
🟦 Superset A:
-
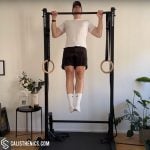
A1: Negative Pull-Ups – 3–4 reps with 5-second lower
-
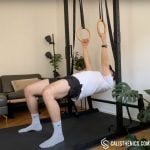
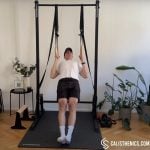
A2: Australian Pull-Ups (aka. Bodyweight Rows with Straight Legs) – 10 reps
→ Rest 90 sec after each round
🟩 Set B:
-
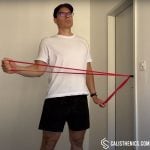
Resistance Band Rotator Cuff External Rotations – 12 reps per side
→ Rest 45 sec between sets
The slower the better—no fast dropping from the bar. Think: “control all the way down” like you’re moving through water.

Muscle group:

If you need to, then use a resistance band for assistance, but a thinner one than the last time.
Tips
-
Start with a descent of 3-5 seconds, gradually increasing to 6-8 seconds as you gain strength.
-
Engage your core and glutes throughout the movement to stabilize your body.
-
Breathe steadily—inhale at the top and exhale slowly during the descent.
-
Use a slight pause at the bottom before stepping back up to reinforce control.
-
Experiment with grip variations (neutral grip may feel more comfortable for some athletes).
-
Train consistently—negative pull-ups should be performed 2-3 times per week for optimal progress.

Tips
-
Maintain a neutral neck position to avoid strain.
-
Keep your wrists straight and aligned with your forearms.
-
Adjust grip width to target different areas of the back (wider for lats, narrower for biceps).
-
If using rings, rotate your grip naturally during the movement for better joint alignment.
-
Pause at the top for a brief second to maximize muscle engagement.
-
Gradually increase the difficulty by changing body position or adding weight.

Muscle group:

Tips
-
Keep your wrist neutral throughout the movement to prevent strain.
-
Use a light resistance band to prioritize control and full range of motion.
-
Place a rolled-up towel under your elbow to improve muscle activation and prevent compensation.
-
Focus on high reps (12-20) with slow, controlled movement rather than heavy resistance.
-
Maintain even tension in the band throughout the motion to avoid jerky movements.
HIIT Finisher
Goal: Add some dynamic leg work and core engagement under fatigue.
Format: 4 rounds – 45 sec work / 15 sec rest
→ Alternate:
-
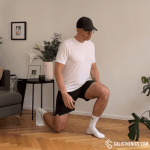
Walking Lunges
-
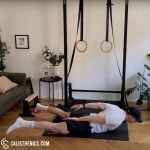
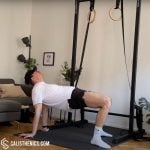
Tabletop Hold
→ 4 rounds = 10 minutes
The tabletop hold reinforces shoulder extension strength while your core fights to keep you stable. Don’t let the simplicity fool you—this will challenge your posture and coordination!


Tips
-
Maintain Upright Posture: Keep your torso upright and chest lifted throughout the movement. Avoid leaning forward or arching your back.
-
Step with Control: Focus on controlled, deliberate steps. Rushing the movement can lead to poor form and injury.
-
Knee Alignment: Ensure that your front knee stays aligned with your toes and doesn’t go past your toes as you lunge.
-
Push Through the Heel: When you push off to bring your back leg forward, drive through the heel of your front foot to engage your glutes and hamstrings effectively.
-
Engage Your Core: Keep your core engaged to help with balance and stability as you move forward.
-
Avoid Overstriding: Taking too large a step can cause your back leg to overstretch and may place unnecessary stress on your joints.

Muscle group:
Tips
-
Squeeze your glutes at the top to fully activate your posterior chain.
-
Look slightly upward to maintain neck alignment but avoid excessive tilting.
-
Engage your core to prevent lower back sagging.
-
If your wrists feel strained, try placing hands on yoga blocks or using fists instead of flat palms.
-
Perform dynamic reps by lowering and lifting the hips for added activation before holding the position statically.