
Hip-Height Incline Push-Up
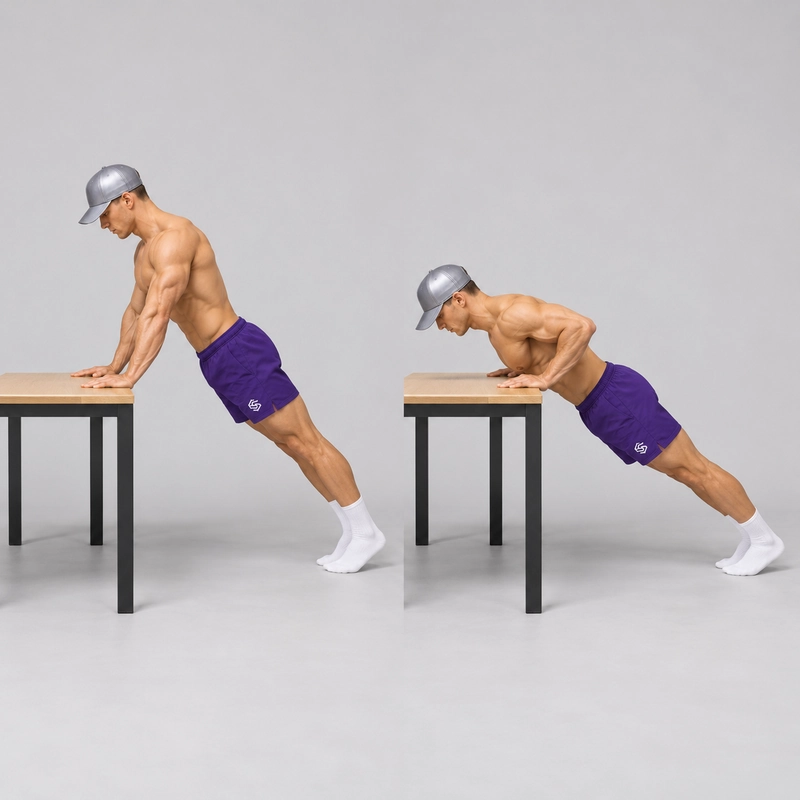
How to do Hip-Height Incline Push-Up?
The hip-height incline push-up is a push-up with both hands on a stable desk, counter or platform around hip height and both feet on the floor. Keep the legs straight and move your torso as one unit: bend the elbows to bring the chest toward the support, then press away until the arms are straight.
A hand-support height around 90 cm (35.4 in) is a practical reference, although your actual hip height and available furniture may differ. This is a useful middle step after wall push-ups and before a lower setup such as the knee-height incline push-up. Gradually lowering the hands helps you build toward a regular push-up on the floor while retaining straight legs and the same basic pressing pattern.
Hand elevation makes the pressing load more manageable than an otherwise comparable floor push-up. A force-platform study of push-up variations found lower peak hand-supported forces in its hands-elevated conditions than in regular push-ups. The researchers tested specific heights below 90 cm, so the study supports the general scaling principle rather than an exact bodyweight percentage for this hip-height setup.
The chest, triceps and front of the shoulders produce the press, while the trunk and legs hold the body line. If you want scheduled practice alongside other beginner exercises, use the beginner push-up workout plan and choose a support height that suits your current ability. The plan's title is not a guarantee that everyone reaches the same result in six weeks.
Equipment and Setup
Choose a rigid, stable desk, fixed counter or platform that can support your pushing force without sliding, tipping or folding. Avoid wheeled furniture, loose tabletops, glass surfaces and unsupported stacks of objects. Check stability before leaning your weight onto it.
- Support height: around hip height when standing beside it; approximately 90 cm (35.4 in) is a guide. Measure from the floor to the surface supporting the hands.
- Hand placement: palms approximately shoulder-width apart or slightly wider, at the same height, with enough surface for secure contact.
- Contact edge: smooth, rounded or firmly padded so the chest can approach the bottom target comfortably. Do not strike a sharp furniture edge.
- Foot position: feet approximately hip-width apart on a non-slip floor, far enough back to form a straight inclined body line.
- Space: enough room for your chest to travel toward the support between the hands without your face meeting it first.
Keep the support, hands and feet in the same positions during the set. A desk that is too low or high for the intended setup can still be useful for training, but record its actual height rather than calling every desk hip height.
Readiness and Warm-Up
First check that you can hold the inclined starting position briefly with straight arms, steady hips and comfortable hands and shoulders. If you immediately sag or cannot lower smoothly, start at a higher support or the wall.
Prepare with the joint warm-up routine, followed by a few easy presses at a higher support. Keep the warm-up comfortable and leave your arms fresh for the working sets.
How to Do a Hip-Height Incline Push-Up
- Set the hands. Place both palms securely on the support, approximately shoulder-width apart or slightly wider. Spread the fingers and choose a hand angle that allows comfortable wrist contact.
- Step back. Extend both legs and establish an inclined plank with the shoulders, hips and ankles in one line. Keep the toes/forefeet on the floor; the heels may lift naturally.
- Brace the body. Tighten the abdomen and glutes enough to keep the ribs and pelvis coordinated. Keep the knees straight without forcing them into hyperextension.
- Lower as one unit. Bend both elbows and bring the chest toward the support. Guide the elbows diagonally backward rather than directly sideways; roughly 30–45 degrees from the torso is a starting cue, not a compulsory angle.
- Reach the bottom target. Bring the chest gently to the agreed smooth or padded edge between the hands. Maintain the body line and keep the neck aligned instead of reaching with the chin.
- Press away. Push through both palms, extending the elbows while the shoulders and hips rise together. Do not throw the hips upward or push the furniture across the floor.
- Finish at straight arms. Return to the same inclined plank without forcing elbow hyperextension. Let the shoulder blades move around the rib cage rather than keeping them squeezed together throughout.
- Reset and repeat. Check the body line before the next descent. End the set when you cannot maintain the same depth, controlled finish and fixed contact positions.
Inhale during the descent and exhale during the press if that rhythm feels comfortable. A smooth descent of about two seconds is a useful practice cue; an extremely slow repetition is not required.
If the support edge prevents comfortable chest contact, change the support or use a clearly defined alternative depth target. Record that target and keep it consistent. A shallower practice repetition should not be counted as equivalent to the full-depth version.
What Counts as a Full Repetition?
A full repetition starts with straight elbows, reaches the same chest-depth target and finishes with straight elbows again.
- Both hands remain fixed on the same hip-height surface.
- The toes/forefeet remain in their original positions on the floor and both knees stay off the ground.
- The shoulders, hips and ankles stay aligned while lowering and pressing together.
- The chest reaches the agreed smooth or padded edge without bouncing or resting bodyweight on it.
- The press is controlled, with no separate hip thrust or chin reach.
Do not count a repetition if the depth is missing, the knees bend to assist, the hips sag or pike, the hands or feet shift, or the support moves. The heels do not have to remain flat: floor support comes through the toes/forefeet, unlike a heel-supported bodyweight row.
Common Mistakes and Corrections
Letting the Hips Sag
Reset the abdomen and glutes before lowering. Use a higher support or shorter set if you cannot keep the torso aligned.
Pressing the Hips Up First
Raise the shoulders and pelvis together. Folding at the hips to finish means the current set or support height is too demanding.
Leading With the Head
Keep the neck in line with the torso and direct the chest toward the target. Chin contact does not establish adequate chest depth.
Flaring the Elbows Directly Outward
Use moderate hand spacing and guide the elbows diagonally backward. Adjust for comfort rather than forcing an extreme wide or tightly tucked position.
Resting or Bouncing on the Desk
Make gentle contact and reverse under control. If you cannot press from the bottom, choose a higher support rather than using a bounce.
Changing Foot Position Mid-Set
Keep the original setup. Reset between sets if needed instead of stepping forward to make the remaining repetitions easier.
Using Unstable Furniture
Stop if the surface or its base moves. A piece of furniture that supports ordinary desk use is not automatically suitable for leaning bodyweight onto its edge.
How to Make It Easier
Raise the hand support or return to wall push-ups. The NHS wall press-up instructions provide an accessible example of a higher-support press with a straight back and controlled arm movement. They describe the wall version, rather than this exact desk setup.
You can also practise a brief inclined plank at the same surface before adding a comfortable small descent. Expand the range as control improves, recording partial-range practice separately.
Knee push-ups are another training option, but they change the support point and body length. They are not automatically easier than every hip-height incline. Choose the version that allows repeatable, comfortable full-range practice.
How to Progress Toward Floor Push-Ups
Build consistent repetitions at your current height, then lower the hand support in manageable steps. Knee-height incline push-ups provide a useful later stage before attempting full floor push-ups. Keep the legs straight and retain the same body-control and range criteria as the support becomes lower.
For the broader sequence of variations, use the push-up progression guide. Your next step should reflect your current range and control rather than a fixed calendar deadline.
Sets, Reps and Frequency
As a coaching starting point, perform 2–3 sets of 6–12 controlled repetitions with 60–120 seconds of rest. If six clean repetitions are too demanding, use a higher surface. Finish with roughly one or two clean repetitions in reserve.
Practise two or three times per week, allowing recovery between demanding pressing sessions. When you can repeat three sets of twelve full-depth repetitions across two sessions, try a slightly lower stable surface and rebuild the repetitions there.
These are coaching suggestions, not validated readiness cutoffs. A brief bottom pause or a slower descent can add challenge when no lower surface is available. Reducing the support height remains a direct way to progress the basic pushing task.
Keep the Setup Consistent When Retesting
Record the hand-support height, hand width, foot distance from the support, stance width and chest-depth target. Keep footwear, tempo and contact criteria consistent. A side-view recording helps check whether the chest and hips travel together.
The same height does not produce identical loading for every athlete. Do not assign a fixed bodyweight percentage or compare different support heights and depths as though they were the same test.
Comfort and When to Stop
Choose a height and hand position that allow controlled movement without pain. Stop for sharp pain, tingling, numbness or a moving support. Persistent symptoms warrant advice from a qualified healthcare professional. Elevating the hands is a training adjustment, not a diagnosis or an injury-rehabilitation prescription.
Hip-Height Incline Push-Up FAQ
How high should the surface be?
Approximately hip height when standing beside it. Around 90 cm (35.4 in) is a useful reference, but measure the actual hand-support height and choose a stable setup that permits the full movement.
Can I use a desk?
Yes, if it is rigid, stable and suitable for the direction of force. Avoid a desk that slides, tips, folds or has an unsuitable tabletop or sharp contact edge.
Do my knees or heels touch the floor?
The knees stay off the floor and the legs remain straight. Keep the toes/forefeet planted; the heels may lift naturally.
How is this different from a knee-height incline push-up?
This version supports the hands at hip height. A knee-height incline places them lower and generally increases the pressing demand when the other technique details are comparable. Neither version rests the knees on the ground.
Do incline push-ups work the chest?
Yes. The chest works with the triceps and front shoulders to press away from the surface. A higher support makes the load more manageable while preserving the basic pushing movement.
When should I lower the support?
When you can repeat your chosen sets with consistent depth, a straight body line and a controlled finish. Lower the height gradually and accept fewer repetitions while adapting to the new setup.
Tips for the proper execution of Hip-Height Incline Push-Up
Use a rigid, stable desk, counter or platform around hip height, approximately 90 cm (35.4 in), and check it before loading the edge.
Place both palms at the same height, approximately shoulder-width apart or slightly wider, with secure and comfortable hand contact.
Step back into a straight shoulder-to-ankle body line with both knees off the floor and toes/forefeet planted.
Brace the abdomen and glutes so the shoulders and hips lower and rise together without sagging or folding at the waist.
Guide the elbows diagonally backward rather than directly sideways, adjusting hand placement for comfort.
Bring the chest gently to the same smooth or firmly padded edge between the hands without resting or bouncing against it.
Keep the neck aligned with the torso; a chin reach does not replace the required chest depth.
Press evenly through both palms and return to straight elbows without forcing hyperextension.
Let the shoulder blades move naturally through the press instead of holding them rigidly squeezed together.
Keep hands and feet in their original positions and stop the set if the support moves or the depth and body line change.
Muscles worked when doing Hip-Height Incline Push-Up
The hip-height incline push-up trains the pressing muscles while the trunk and legs hold a straight inclined body position. Hand elevation makes the task more manageable than an otherwise comparable floor push-up, without removing the need for body alignment.
Main Pressing Muscles
- Pectoralis major: Helps move the upper arms during the press away from the support.
- Triceps brachii: Straightens the elbows.
- Anterior deltoids: Assist the shoulder movement during the press.
Supporting Muscles
- Serratus anterior and other shoulder-blade stabilizers: Help control the shoulder blades as they move around the rib cage.
- Abdominals, obliques and spinal stabilizers: Help keep the ribs and pelvis aligned.
- Glutes and thigh muscles: Help maintain hip position and straight legs.
- Forearm and hand muscles: Help maintain stable palm contact on the surface.
The exercise does not isolate a single part of the chest or establish an exact muscle-activation advantage over another push-up. Support height, body proportions, hand placement and range affect the task.
Primary Muscle(s):

Middle chest

Triceps
Secondary Muscle(s):

Anterior delt
Equipment needed for Hip-Height Incline Push-Up
No equipment needed for this exercise.
Adjust the difficulty of Hip-Height Incline Push-Up
Raise the hand support or use wall push-ups to reduce the challenge. Lower the support gradually toward knee height and then the floor as strength and control improve. A short bottom pause or slower lowering can add challenge at the same height. Keep hand placement, foot position, body alignment and chest-depth target consistent when comparing results.
How to make Hip-Height Incline Push-Up harder?
How to make Hip-Height Incline Push-Up easier?
How to make Hip-Height Incline Push-Up harder?
To make Hip-Height Incline Push-Up harder:
-
Lower the hand support in manageable steps toward a knee-height incline, retaining straight legs and the same controlled chest-depth criterion.
-
Take three seconds to lower before pressing smoothly back to straight elbows, using unchanged hand and foot positions.
-
Take three seconds to lower before pressing smoothly back to straight elbows, using unchanged hand and foot positions.
How to make Hip-Height Incline Push-Up easier?
To make Hip-Height Incline Push-Up easier:
-
Use a higher stable hand support to create a more upright incline while maintaining straight legs and controlled full-range pressing.
-
Perform wall push-ups with comfortable hand placement and a controlled straight-body movement.
-
Practise a brief straight-arm hold at the same incline, then add a small controlled descent and gradually expand the range. Record partial repetitions separately.
