
Band-Assisted Ring Muscle-Up
How to do Band-Assisted Ring Muscle-Up?
What is the Band-Assisted Ring Muscle-Up?
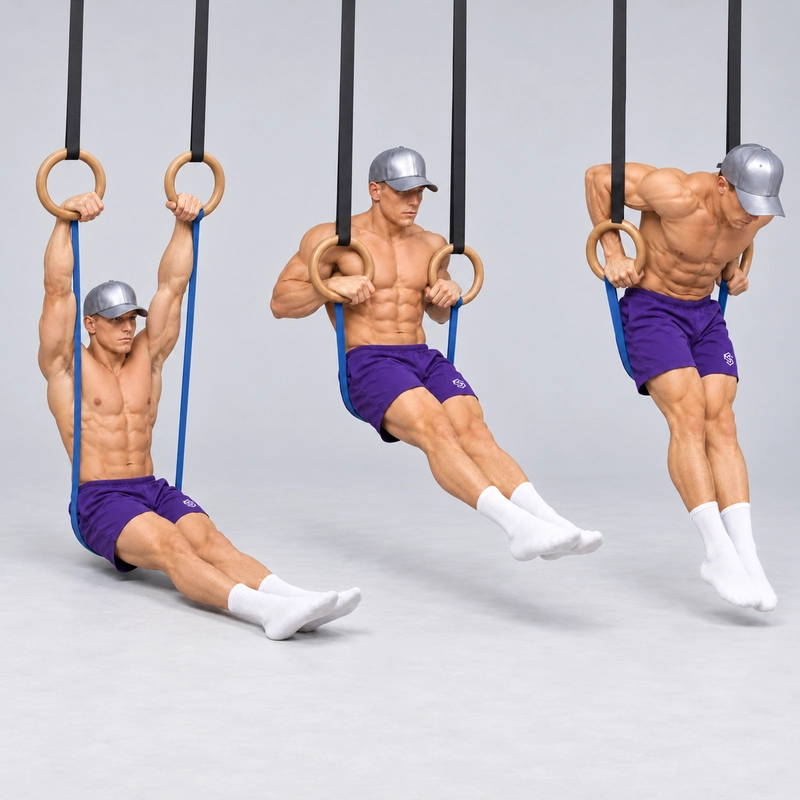
The Band-Assisted Ring Muscle-Up uses a resistance band to help you connect a high ring pull, the turnover above the hands and a dip to straight-arm support. In the main version on this page, loop one end of a long closed-loop band onto one ring and retain the free end against the opposite ring with that gripping hand. Sit into the band span beneath your buttocks and hips, then perform the full movement with controlled elastic assistance.
The dip press is part of the repetition. Pull the rings towards your lower chest, bring both shoulders over the hands into the bottom of the dip, then press until both elbows straighten. A turnover without the press is partial practice, rather than a completed band-assisted muscle-up.
This version scales the Ring Muscle-Up while keeping the feet free from the floor during the working rep. It differs from the Feet-Assisted Ring Muscle-Up, where the feet provide help from the floor, and the Feet-Elevated Assisted Ring Muscle-Up, where straight legs rest on a plyo box. Those variations let you adjust assistance through leg pressure; the band provides help according to its stretch and attachment geometry.
It also differs from the Ring Muscle-Up Transition. That drill isolates the turnover near the top of the pull. Here, you begin below the rings with extended elbows and connect the pull, turnover and press.
CrossFit’s muscle-up development guide includes low-ring banded muscle-ups with the band beneath the hips. This page explains the seated attachment requested for this exercise and uses a controlled, non-kipping technique.
What the band helps with
The band shares the load while you practise coordinating the pulling and pushing phases. It can make a complete muscle-up manageable before you can perform the same sequence without assistance, but it does not automatically fix a slipping false grip, an early turnover or an unstable dip.
Assistance is not a fixed percentage of your bodyweight. It depends on the band, its working length, how much it stretches and where it is anchored and contacts your body. With a seated ring-to-ring sling, the band ends move with the rings, so the support changes differently from a band fixed overhead beneath a foot.
Select enough assistance to perform the entire ascent and a controlled return. If the band launches you past the pull, twists your hips or pulls you out of a balanced support, the setup needs adjustment. A useful band lets you contribute throughout the movement rather than replacing the ascent with a bounce.
Main setup: band beneath the hips
- Rings: suspend both rings from a secure overhead structure using their normal straps. Set them at equal height and check the anchors, straps and buckles. The resistance band assists the athlete; it does not replace the ring suspension straps.
- Band: use a long closed-loop resistance band appropriate for assisted bodyweight exercise. Inspect it for cuts, splitting, worn areas or damaged attachment surfaces. Follow its manufacturer’s attachment and stretch limits.
- First ring: loop the band onto one ring using a compatible attachment that stays seated under load. A loop-through attachment is commonly used; do not substitute an improvised knot or fitting that the equipment is not intended to accommodate.
- Opposite ring: bring the free loop across and hold it against the other ring with the hand that also grips that ring. Keep a secure closed hand grip. The free end is hand-retained, not independently locked onto the second ring.
- Seat: position the connecting span beneath your buttocks and hips. Keep it centred rather than letting it slide towards the lower back, abdomen or one thigh.
- Height and space: arrange the rings so you can sit into the band with naturally extended elbows, clear the feet during the pull and reach support above the hands. Also leave a practical supported way to enter and exit.
Load the band gradually while your feet can still support you. Check that the first attachment remains seated and the free end cannot slide through your gripping hand. If retaining the band prevents a secure ring grip or workable false grip, use another suitable attachment rather than attempting the rep with a compromised hand position.
The hand-retained end must stay secured throughout the pull, turnover, dip and return. Do not open that hand to adjust the band while it is loaded. Return your feet to stable support, transfer your weight off the sling and let the band relax before releasing it. A loaded band can recoil if it slips.
You may bend the knees to clear the floor. Straight legs are not required for this version. Once the working repetition starts, keep the feet clear and avoid pushing off the floor or kicking to cross the transition.
Other common band attachment options
Two familiar alternatives are a ring-to-ring hip sling with both ends secured through a suitable arrangement, and a long band anchored overhead with a foot or knee in the lower loop. Another documented variation loops the band onto one ring and supports a foot in its free end. These arrangements change the support point and loading; they are not interchangeable with the seated setup.
- Ring-to-ring sling with both ends secured: the band still supports the hips, but an appropriate attachment retains each end instead of relying on one gripping hand. Use an arrangement compatible with the equipment and confirm that it does not interfere with the hands or ring movement. This is an attachment category, not a recommendation to improvise hardware or knots.
- Overhead-anchored foot or knee loop: the band is attached to a suitable fixed overhead anchor, with a foot or knee supported in the lower loop. The rings remain suspended on their own straps. Allow room for the band to travel without rubbing the face, catching the rings or pulling you off-centre. Changing between foot and knee support changes the band’s working length and assistance.
- One-ring-to-foot assistance: one end is attached to a ring and a foot rests in the free loop, as shown in StrengthLog’s ring muscle-up guide. Because support comes from one side, check the pulling path and balance carefully. This is not the main seated technique demonstrated here.
The underlying overhead-band principle is also illustrated by the Band Chin-Up, although that exercise does not include a muscle-up turnover or dip. Do not assume a band arrangement that works for a pull-up automatically clears every phase of a ring muscle-up.
The Progrm’s ring muscle-up tutorial describes retaining a band at the opposite ring for assisted dips. That supports the attachment context, not a claim that its kipping muscle-up instructions are the technique used on this page.
Grip and readiness
Use a false grip for the controlled assisted version. Place the ring across the heel of the hand near the wrist crease, roll the wrist above it and close the hand securely. Keep the ring supported through the base of the palm during the pull rather than allowing it to slide down into the fingers.
The Ring False Grip Hang helps you learn the grip position; use foot support while first establishing it. The False Grip Pull-up develops the related pulling component. Neither has to be an unsupported test before you try an appropriately assisted drill.
You should be able to control the assisted high pull, enter a manageable bottom-of-dip position and press from it with the selected assistance. Practise Feet Assisted Ring Dips if the deep pressing position is unfamiliar. A supported Ring Support Hold helps you prepare the straight-arm finish.
A fixed pull-up or dip count does not establish readiness for every band setup. Choose assistance based on grip security, a symmetrical turnover, a controllable press and a planned return. If those are not available together, work on the components before combining them.
How to do the Band-Assisted Ring Muscle-Up
- Prepare the attachment. Check the rings and band, loop the band onto one ring and retain its free end against the opposite ring with that gripping hand. Establish the false grip without trapping a fold that prevents secure hand contact.
- Sit into the band gradually. With stable foot support available, settle the band beneath the buttocks and hips. Transfer weight slowly, check that the seat stays centred and confirm that neither band end moves unexpectedly.
- Establish the pulling start. Extend the elbows naturally below the rings, keep the shoulders engaged and bring the feet clear. Bend the knees if needed. Begin from a settled position with the band already loaded, without a downward bounce.
- Pull the rings to the lower chest. Bend both elbows and bring the torso upwards while keeping the rings close. Maintain the false grip and guide the body towards the space between the rings. Do not finish the pull at chin height and try to climb over from there.
- Turn over together. As you reach sufficient pulling height, bring the chest and both shoulders forward over the hands while the elbows move behind the torso. Keep the rings near the sides of the chest. Make this a connected movement rather than a one-arm scramble.
- Control the bottom of the dip. Arrive above the hands with bent elbows and active shoulders. Keep the hips seated in the band. Allow the wrists to move naturally towards palm support while retaining the ring grip and the free band end.
- Press to support. Push down through both rings until the elbows straighten. Stabilise the rings beside the hips with the torso controlled. The dip press is required; a dramatic ring turnout is not.
- Lower under control. Bend the elbows into the dip, reverse the turnover with the rings close and lower into the assisted pulling start. Restore the false grip without releasing the hand-retained band end. Avoid dropping into the band or using its rebound for the next rep.
- Reset or dismount. Rebuild the same settled start for another rep. To finish the set, return to stable foot support, remove your weight from the band and let it relax before releasing the free end or stepping out.
What counts as a repetition?
One completed ascent begins below the rings with naturally extended elbows and moves through a high pull, a symmetrical turnover and a dip to stable straight-arm support. The band assists beneath the hips, both hands remain secure and the feet do not push off the floor.
A controlled descent is the standard return for this exercise. If you cannot reverse the movement without dropping or losing the retained end, use a planned supported exit and practise the return separately before attempting consecutive reps.
A chest-high pull without a turnover, a transition without the press or a rep with a leg launch should be recorded as different practice. A band-assisted completion is also distinct from an unassisted strict ring muscle-up, even if the visible technique is controlled.
Technique mistakes and corrections
Using the band as a launch
Dropping into the sling before pulling adds rebound and can carry you through positions you cannot control. Start with steady tension, pull deliberately and settle between repetitions. Use a more suitable band if assistance is so strong that you cannot regulate the ascent.
Turning over before the pull is high enough
Moving the shoulders forward while the rings are still near the face can leave you underneath the hands. Pull towards the lower chest, keep the rings close and connect the turnover from that higher position. Regress to assisted high pulls and transition practice if one side repeatedly climbs first.
Letting the rings spread
Wide rings make the turnover and press harder to control. Guide them alongside the chest and keep the hands near the torso in the dip. Do not compensate by forcing the elbows behind you or dropping the shoulders between widely separated rings.
Losing the seat position
A band drifting onto one thigh changes the line of support and can rotate the body. Lower with control and unload before adjusting it. Do not reach down or open the retaining hand to reposition a loaded band mid-rep.
Forgetting the free end is hand-retained
Holding the ring securely and retaining the band are simultaneous requirements in this setup. If the band begins to slide, return to support and unload. Do not continue because the first end is attached: that does not secure the second end.
Skipping the dip finish
Getting the shoulders above the hands completes the turnover, not the full muscle-up. Use enough assistance to press to support, or practise the turnover separately and label it as a partial drill.
Keeping the wrists frozen
Retain secure ring contact, but let the wrist position adapt as the load changes from pulling to pressing. Do not release and regrip during the turnover, and do not force an uncomfortable wrist angle merely to preserve the appearance of the starting false grip.
Dropping on the return
The band does not make an uncontrolled descent a useful negative. Lower through the dip and turnover deliberately, or finish with a planned supported exit. Repeated drops can also displace the seat or retained end.
Choosing assistance and progressing
Use the least assistance that lets you repeat the complete sequence with secure hands, a centred sling and a controlled press and return. “Less help” is not progress if it introduces a one-sided turnover or removes the dip finish.
Compare bands within the same product range and attachment arrangement. Colour alone does not identify assistance across brands, and a nominal resistance range is not a measurement of support during your rep. Keep the band model, ring spacing, attachment and seating position consistent when comparing sessions.
Reduce assistance in small steps when the current version is repeatable. Changing the support point from hips to foot or knee also changes the exercise geometry, so log it as a setup change rather than assuming it is equivalent to a lighter band.
Band work is one tool for practising the connected movement. Keep developing the false-grip pull and dip separately, and use feet-assisted transition work when you need precise control over the support at the turnover. Bands do not guarantee a first unassisted muscle-up by a particular date.
Programming
Practise after gradual wrist, shoulder and ring preparation while coordination is fresh. An example starting dose is three to four sets of one to three controlled repetitions, resting around two minutes or longer when needed. Start with fewer attempts if the attachment or turnover is new.
These are coaching suggestions, not a validated protocol. End the set before the grip slips, the band moves, the turnover becomes uneven or the press loses control. Short successful practice sets are more useful for this purpose than repeated failed ascents.
Record the band model, attachment method, ring height and spacing, support point, completed reps and quality of the return. This gives you a more meaningful comparison than recording band colour or reps alone.
Frequently asked questions
Do I sit on the band or stand in it?
The main version uses a seat beneath the buttocks and hips. Foot- and knee-supported arrangements are alternatives with different assistance geometry; do not switch between them without resetting the attachment and testing the load.
Do I have to use a false grip?
Use it for the controlled version taught here. It helps connect pulling to support without an open-hand regrip. Other muscle-up styles can use different grips, but they are not the main technique described on this page.
Is the dip optional?
No. This page describes a full band-assisted muscle-up, so the ascent finishes at straight-arm support. A turnover into the bottom of the dip is a useful partial drill and should be logged separately.
Can my feet touch the floor?
Yes during setup and dismount. Keep them clear during the main working rep. If you push through the floor, you have added foot assistance and changed the repetition standard.
Does the band provide most help at the bottom?
That often describes a band fixed overhead beneath a foot, because its stretch commonly decreases as the body rises. Do not assume the same assistance curve for a sling attached between moving rings. Its tension and upward support depend on the relationship between the rings and the hips.
What if I can turn over but cannot press?
Choose assistance that also supports the dip, or practise assisted dips separately. Do not count a bottom-of-dip arrival as a completed muscle-up or force a fatigued press from an uncontrolled position.
How do I release the hand-held end?
First return your feet to stable support, transfer your weight off the band and let it relax. Only then release the end. Never open the retaining hand while the band is supporting you.
Tips for the proper execution of Band-Assisted Ring Muscle-Up
Inspect the band and ring attachments before loading them. Keep both normal ring suspension straps in place; the resistance band assists your body rather than suspending the rings.
Keep the free band end retained against the opposite ring with that gripping hand. It is not independently fixed, so do not open the hand while the band is loaded.
Sit into the band gradually with foot support available. Centre it beneath the buttocks and hips, then lift the feet clear only after the attachment and grip feel secure.
Establish a false grip that stays secure while you retain the band. If the band fold compromises your ring grip, unload and use a suitable alternative attachment.
Start with the elbows naturally extended and steady band tension. Avoid a downward bounce, leg kick or push from the floor to launch the ascent.
Pull the rings towards the lower chest before turning over. Keep them close rather than trying to move above the hands from a chin-height pull.
Bring both shoulders over the hands together. If one elbow climbs first, increase assistance or practise the high pull and turnover separately.
Finish with a controlled dip to straight-arm support. Reaching the bottom of the dip completes the turnover but does not complete this muscle-up.
Lower deliberately through the dip and reverse turnover. Do not drop into the band or rely on its rebound for the next repetition.
Unload before adjusting or releasing the band. Return your feet to stable support, take your weight off the sling and let it relax before opening the retaining hand.
Muscles worked when doing Band-Assisted Ring Muscle-Up
The Band-Assisted Ring Muscle-Up combines upper-body pulling and pushing while the band shares the load. It still requires the athlete to coordinate the rings and control the transition; assistance does not remove those tasks.
- Latissimus dorsi and upper back: contribute to pulling the torso towards the rings and guiding them close to the body.
- Biceps and other elbow flexors: bend the elbows during the pull. The forearm and hand muscles help retain the false grip, and one hand must also retain the free band end in the main setup.
- Chest, triceps and anterior deltoids: contribute to the dip press from bent-arm support to the required straight-arm finish.
- Shoulder and scapular stabilisers: help control the independently moving rings through the pull, turnover, press and return.
- Abdominals and other trunk muscles: help limit unwanted swinging and rotation while the hips remain supported by the band.
During the descent, the upper body controls the reverse sequence. Brief pauses add holding demands, but the main exercise is dynamic. These are qualitative movement roles, not measured activation rankings for this exact seated attachment. The amount of loading depends on assistance, geometry and execution.
Primary Muscle(s):

Lats

Lower chest
Secondary Muscle(s):

Biceps

Triceps
Equipment needed for Band-Assisted Ring Muscle-Up
Adjust the difficulty of Band-Assisted Ring Muscle-Up
Adjust band assistance while keeping the seated setup, full dip finish and controlled return consistent. Use enough help for a secure grip and symmetrical turnover, then reduce it gradually. Changing from hip support to foot or knee support changes the geometry, so record that as a setup change. A partial transition is a useful regression, but it is not a completed repetition of this exercise.
How to make Band-Assisted Ring Muscle-Up harder?
How to make Band-Assisted Ring Muscle-Up easier?
How to make Band-Assisted Ring Muscle-Up harder?
To make Band-Assisted Ring Muscle-Up harder:
-
Progress to a less assistive band while keeping ring spacing, attachment, seat position and the full movement standard consistent. Restore the previous assistance if the false grip slips, the turnover becomes uneven or the dip disappears.
-
Add a short controlled pause in the bottom of the dip before pressing. Keep the shoulders supported, the band centred and the free end retained; avoid pausing in a collapsed position.
-
Slow the descent through the dip and reverse turnover while keeping control of both rings and the band. Reduce the set size if needed, and do not prolong a negative after grip security begins to fail.
-
Progress towards an unassisted strict Ring Muscle-Up when the pull, turnover, press and return are available without the band. Remove and unload the band before changing versions, and treat the unassisted attempt as a separate progression rather than releasing assistance mid-rep.
How to make Band-Assisted Ring Muscle-Up easier?
To make Band-Assisted Ring Muscle-Up easier:
-
Use a band that provides more suitable assistance within the same seated attachment arrangement. Test it gradually with foot support available, and choose a level that helps the dip as well as the pull without launching or twisting you.
-
Practise the components separately: assisted false-grip high pulls, controlled turnovers and supported ring dips. Return to the connected movement when each phase and its return are manageable; component drills do not count as full muscle-up reps.
-
Use low-ring feet-assisted practice when you need to control assistance directly through the legs. Unload and remove the band before changing setups, and log the feet-assisted drill separately from the seated band-assisted version.
