
Incline Pike Push-Up
How to do Incline Pike Push-Up?
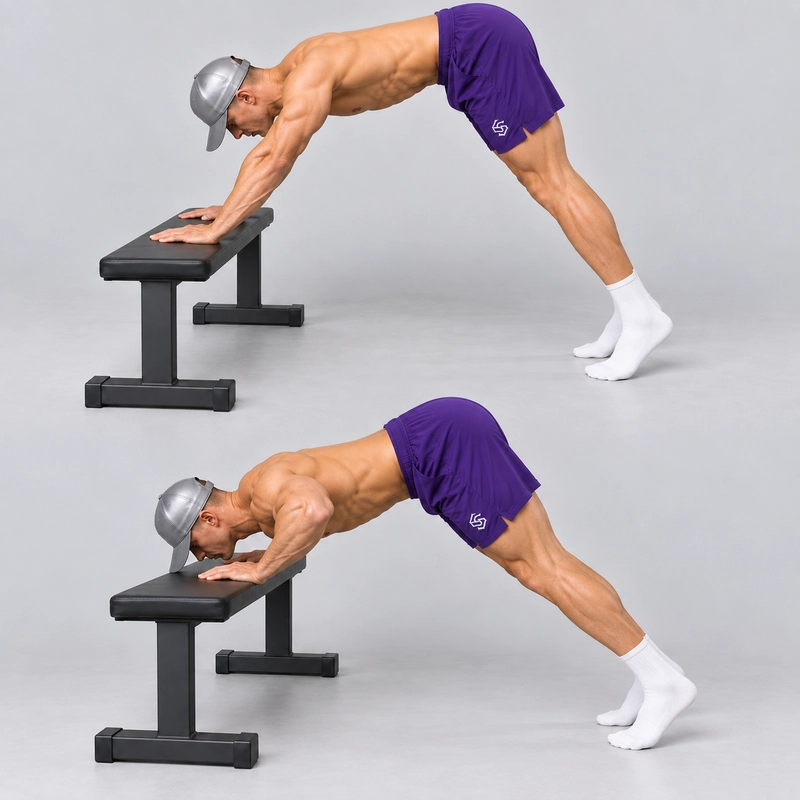
The incline pike push-up is a hands-elevated pike press performed on a stable workout bench around knee height. Place both palms on the bench, keep both feet on the floor and lift your hips into an inverted-V shape. Bend the elbows to bring the head toward the bench top, then press back to straight arms while keeping the hips raised.
Use this variation when you want to learn the head path and shoulder press before attempting floor pike push-ups. The elevated surface gives you a clear, reachable bottom target while your feet provide support. Choose a position that lets you complete the press without dropping the hips or pushing off with the legs.
Start with a bench approximately 40–50 cm (15.7–19.7 in) high, adapting that reference to your knee height and the available equipment. Here, “incline” means hands raised. Putting the feet on the bench creates a different variation.
Research provides useful context for changing support height: a study of forces in push-up variations measured lower peak hand-supported forces in its hands-elevated conditions than in regular push-ups. It examined conventional two-arm push-ups, not pike presses. Treat this bench setup as a practical regression to test, rather than assigning it a measured percentage of bodyweight; torso angle and foot position still matter.
What Makes This Bench Version Different?
The continuous bench top supports flat palms and provides a head-depth reference at approximately the same level as the hands. Your goal is to learn a complete press to that surface, then repeat the pattern on progressively lower suitable supports.
The pike push-up on parallettes uses a neutral handle grip and can allow the head below hand level. That is a different grip and range-of-motion option. This bench version does not involve lowering the head beside the bench toward the floor.
Although it uses a similar support height to the knee-height incline push-up, the body shape and target differ. An incline push-up keeps the body in an inclined straight line and lowers the chest. In this exercise, the hips remain the highest point and the head approaches the bench.
Choose a Bench That Leaves Room for the Head
Use a stationary, rigid workout bench on a level, non-slip floor. Lock any adjustment mechanism and test the bench with increasing two-hand pressure before starting. The top must stay horizontal and resist sliding, rocking or tipping as you lean toward it.
Place the palms roughly shoulder-width apart with the whole contact area supported. Leave space beyond the hand line, away from your feet, for the head to descend. The hands and head target should form a small triangle when viewed from above.
A bench can be the right height and still be too narrow for your proportions. Check the planned bottom position before loading it. If there is no room for both secure palms and the head target, choose a wider stable bench or suitable box with the same intended height. Do not tuck the head directly between the palms or aim beyond a far edge to make an unsuitable bench work.
Firm upholstery is acceptable if it provides secure palm pressure and a clear depth marker. Avoid a top that lets the hands sink, rotate or slide. A thin, secured pad can make light head contact more comfortable; record its thickness if it raises the target. Do not add loose cushions beneath the hands or stack unstable objects to adjust height.
Find a Pike Position You Can Actually Press From
Prepare the wrists with comfortable movements from the wrist warm-up routine. Then place both hands on the bench and take a short straight-arm hold with the feet on the floor.
Walk the feet toward the bench in small steps as you fold at the hips. Keep the hips higher than the shoulders and hands, with the torso reaching toward the bench rather than forming a straight plank. The heels may rise; flat heels are not a repetition requirement.
Straight knees are the reference setup when comfortable. If hamstring tension prevents you from raising the hips with a controlled spine, use a modest, fixed knee bend. Label that adjustment in your training log. Bending the knees can make the position accessible without necessarily reducing the arm load, so do not treat it as guaranteed strength assistance.
Before adding repetitions, confirm that you can keep the elbows straight and actively push away from the bench. The existing incline pike hold on handles is a related static drill; for preparation specific to this page, practise a short hold on your actual bench. A hold develops familiarity but does not prove that you can press from the bottom.
How to Do an Incline Pike Push-Up
- Set the contact points. Place both palms on the stable bench at approximately shoulder width. Identify a head target on the top, slightly beyond the line between the hands and away from the feet.
- Raise the hips. Keep both forefeet on the floor and fold into a pike. Select a foot distance that preserves the raised hips while allowing a controlled repetition.
- Establish the start. Straighten the elbows and push the bench away. Keep the neck comfortable and the trunk controlled; do not squeeze the shoulder blades permanently together.
- Lower the head toward the target. Bend the elbows while the head and shoulders travel forward and down. Let the elbows follow a comfortable backward-diagonal path rather than spreading directly sideways.
- Preserve the pike. Keep the hips high and the feet planted. Avoid turning the descent into a chest-first incline push-up or bending and extending the knees to drive the movement.
- Reach the bench-level endpoint. Bring the top of the head to a gentle touch on the defined surface or to the agreed visible endpoint just above it. Keep the arms supporting you; do not rest weight on the head or neck.
- Press along the return path. Push through both palms, extend the elbows together and guide the head back between the upper arms as you rise.
- Finish with active straight arms. Return to the original pike position and push tall through the shoulders. Keep the feet and hands in the same places before the next descent.
- Exit deliberately. At the top, walk the feet back to reduce the pike, then step closer to the bench and release the hands once balanced. Do not drop onto the target after a failed press.
Start with a smooth descent of about two seconds and a controlled return. Breathe in as you lower and out as you press if comfortable. The bottom is a change of direction under arm support, not a headstand or a pause resting on the skull.
Define a Complete Bench Repetition
Set the endpoint before counting. Light contact with the bench top or a thin secured pad makes depth easier to reproduce. If contact is inappropriate, use a filmed side-view endpoint just above the same surface and record that standard.
- Hands stay at the recorded bench height and both feet remain on the floor.
- The elbows start straight, bend through the chosen range and finish straight.
- The head reaches the defined bench-level target without a bounce or neck loading.
- The hips remain raised; the movement does not become a straight-body chest press.
- Foot distance and the chosen knee position remain consistent throughout the set.
- Both arms complete the return without leg drive or shifting the equipment.
A raised target that stops the descent early is a useful partial-range adjustment, but record it separately from bench-surface depth. A systematic review of range of motion in resistance training found that strength adaptations partly reflect the range trained and tested. That supports keeping your endpoint consistent; it does not establish a universal depth standard for this bench exercise.
Fix the Pattern Before Adding Repetitions
- Your chest reaches the bench first. Reset with a clearer hip fold and a visible head target. If the hips keep falling, choose a more manageable setup.
- The head drops between the hands or toward an edge. Reposition the palms and target on a surface with sufficient space. Do not solve missing bench depth by bending the neck farther.
- The legs straighten suddenly to launch the press. End the set and use fewer repetitions or an easier setup. Keep a bent-knee adjustment fixed rather than turning it into leg drive.
- You reach depth but cannot press back up. Increase the support height on suitable equipment or temporarily reduce the range with a stable target. Retain control of the descent.
- You complete more reps by walking the feet away. Treat that as a changed setup, not an improvement at the original position. Rebuild the set with fixed contacts.
- The hands slide or the bench moves. Stop and correct the apparatus or surface before doing another set.
A First Bench-Pike Session
Try two or three sets of four to eight controlled repetitions, resting around 90–120 seconds or longer if needed. Choose a setup where you can finish each set with another clean repetition available, rather than testing failure with the head near the bench.
Train the movement once or twice a week initially, adjusting for the shoulder pressing already in your programme. Bench pike work can replace a harder pike variation for that session rather than simply adding more sets to it. These numbers are practical coaching starting points, not research-validated requirements for this exercise.
Log the bench height, head-target height, hand spacing, foot distance, knee position and completed repetitions. A short side-view recording should show whether the head reaches the same depth and the hips remain raised. Keep these conditions steady while adding repetitions.
Progress From the Bench to the Floor
Once three sets of eight controlled repetitions are repeatable across two sessions, consider testing a lower stable hand support. This is a practical checkpoint, not a compulsory qualifying score. Change the height first, then find a workable pike at that height and expect fewer repetitions.
Use a lower bench or a suitable lower box with room for the same hand-and-head arrangement. Recheck the target and record the new foot distance. Do not chase an identical hip angle or assume that equal repetition counts represent equal loads across different heights.
When the next manageable support is the floor, practise the floor version with a clear floor-level head target and a small number of controlled reps. Keep bench sets available while learning that new setup.
Later, select a different progression for a clear purpose. The feet-elevated pike push-up on parallettes changes the lower-body support and uses handles. The wall-facing handstand push-up adds a fully inverted position and its own entry and exit skills. Neither is an automatic next step after a single successful bench set.
Incline Pike Push-Up Questions
Should my hands or feet be on the bench?
Your hands go on the bench and both feet stay on the floor. Feet on the bench with hands lower is a feet-elevated pike configuration, which this page does not demonstrate.
Should my head go down to the floor?
No. The endpoint here is the bench top or its defined target, close to hand level. Reaching the floor beside the bench would add a different depth and an unsupported head path.
Do I need straight knees and flat heels?
Use straight knees when you can preserve the pike comfortably. A consistent slight knee bend is an acceptable recorded adjustment. The heels do not have to stay flat, and the knees should not pump during the press.
Is a higher bench always easier?
A higher hand support often provides a useful regression, but foot distance, torso angle and target depth also change the demand. Test the complete repetition and record the setup rather than judging difficulty from height alone.
Does this replace handstand practice?
It develops a pike pressing pattern with floor-supported feet. Balance, inverted alignment and safe entry and exit need their own practice if your goal includes handstands.
When to End the Set
Stop when you lose the pike, miss the depth target, need leg drive or cannot return to straight arms. Also stop for pain, dizziness, insecure hand contact or equipment movement. Choose a controllable setup before continuing; persistent symptoms warrant individual assessment.
Tips for the proper execution of Incline Pike Push-Up
Measure the bench top: approximately 40–50 cm (15.7–19.7 in) is a knee-height guide, not a compulsory height.
Keep both hands on the bench and both feet on the floor throughout the repetition.
Choose a bench top with room for two secure palms and a head target slightly beyond the hand line, away from the feet.
Fold at the hips and keep them raised so the head leads the descent instead of the chest.
Let the heels rise if needed; use a fixed slight knee bend when straight knees prevent a controlled pike.
Move the head forward and down toward the bench-level target without craning the neck or aiming beyond an edge.
Let the elbows travel along a comfortable backward-diagonal path rather than flaring directly sideways.
Treat head contact as a light depth marker while the arms keep supporting the body; do not rest or bounce on the head.
Finish with straight elbows and active shoulders, keeping the hands, feet and knee position unchanged.
Improve repetitions at one recorded setup before lowering the hand support, and rebuild the range at each new height.
Muscles worked when doing Incline Pike Push-Up
The incline pike push-up trains shoulder-led pressing with the palms elevated and the feet providing floor support. The hips stay flexed, so the torso approaches an overhead pressing position rather than the straight-body position of a conventional incline push-up.
Main Pressing Muscles
- Anterior deltoids: contribute to moving the upper body through the pike press and controlling the descent.
- Triceps brachii: control elbow bending and extend the elbows during the return to straight-arm support.
- Lateral deltoids: assist the shoulder action and upper-arm control, depending on the pressing angle.
Assisting and Stabilizing Muscles
- Serratus anterior and trapezius: guide the shoulder blades and support upward rotation and active elevation as you press tall.
- Rotator-cuff muscles: stabilize the shoulders while the upper arms change position under load.
- Upper pectoralis major: can assist the press, with its contribution affected by torso angle.
- Abdominals, obliques and spinal stabilizers: control the trunk and help prevent an uncontrolled arch or collapse.
- Forearm and hand muscles: maintain palm pressure and wrist stability against the bench top.
- Lower-body muscles: maintain the chosen knee position and foot contact while the hips remain folded.
A stretch in the back of the legs is not proof that the hamstrings are the exercise's main strength target. Adjust knee position if that tension prevents the intended shoulder press. No exercise-specific activation percentages or claims that this bench version isolates a particular muscle are supplied.
Primary Muscle(s):

Anterior delt
Secondary Muscle(s):
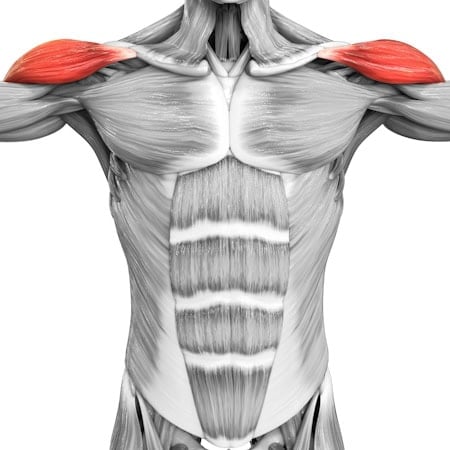
Lateral delt

Triceps
Equipment needed for Incline Pike Push-Up
No equipment found.
Adjust the difficulty of Incline Pike Push-Up
Scale this bench pike press by changing one factor at a time: the hand-support height, the recorded head target, the foot position or the tempo. Keep the hips raised and the feet on the floor. Begin with a complete controllable repetition, then lower the hands on suitable equipment as your pressing improves. Knee bending can solve a mobility limitation without necessarily reducing arm load. Feet elevation and deeper pressing on parallettes are separate progressions.
How to make Incline Pike Push-Up harder?
How to make Incline Pike Push-Up easier?
How to make Incline Pike Push-Up harder?
To make Incline Pike Push-Up harder:
-
Move the hands to a lower stable support with sufficient room for the same head path, then rebuild full repetitions before progressing toward the floor pike push-up.
-
Take about three seconds to lower to the same bench-level target while keeping the hips raised and the foot position fixed.
-
Pause briefly just above the bottom target under arm support, then press without resting on the head or driving through the legs.
-
Test a slightly closer foot position that brings the torso more upright and increases shoulder loading while preserving comfortable control. Record it as a new setup rather than changing position mid-set.
How to make Incline Pike Push-Up easier?
To make Incline Pike Push-Up easier:
-
Use a higher stable bench or suitable box with enough top surface for the palms and head target. Re-establish a controllable pike with feet on the floor and record the new height.
-
Reduce the descent using a firm secured head target on the bench. Keep arm support throughout, record the added target height and gradually restore bench-surface depth.
-
Practise short straight-arm pike holds on the same bench before adding a small number of controlled presses. Count holds separately from completed repetitions.
