
Zero to 10 Push-Ups in 6-Weeks Beginner Calisthenics Workout Plan
Push-ups are one of the most fundamental exercises in calisthenics—and for good reason. They build functional upper body strength, improve core control, and develop the chest, triceps, and shoulders without requiring any equipment. But doing push-ups correctly—with full range of motion, proper tension, and good alignment—is something many people overlook or struggle to build from scratch.
This program was created to fix that.
Whether you’re a total beginner who has never done a push-up, someone returning to training after a break, or just tired of doing half-reps with bad form, the Zero to 10 Push-Ups plan is your structured path to clean, confident push-ups.
What to Expect from This Program
This is a 6-week progressive calisthenics plan designed to help you build the strength, control, and technique needed to perform 10 strict push-ups in a row with proper form.
Expect to:
- Improve your chest, triceps, and shoulder strength
- Learn and reinforce correct push-up technique
- Develop muscular endurance and control
- Strengthen your core and improve posture
- Build up from wherever you are—no ego, no shortcuts
You’ll train just 2 times per week, and each session is only 25–30 minutes, making it perfect to do alongside other fitness routines or as a standalone habit-building program.
Why Push-Ups Matter
Push-ups are a foundational bodyweight movement that translates into everything—from everyday tasks to advanced calisthenics skills. They:
- Build upper body and core strength using your own bodyweight
- Require no equipment (so you can train anywhere)
- Are scalable and measurable (so you can progress or regress as needed)
- Improve your ability to do other movements like dips, planks, handstands, and even posture control
Learning to do push-ups with perfect form is a gateway to mastering your body.
Who This Program Is For
This plan was designed specifically for:
- Total beginners who can’t yet do a push-up, or can only manage a few with poor form
- Anyone looking to build muscle and tone in the chest, arms, and shoulders
- People returning to fitness after time off and need a structured ramp-up
- Older adults who want to maintain upper body strength and joint health🔗
- Anyone tired of winging it and ready for a proven, no-fluff approach
Pre-Requisites
To start this program, you don’t need to be able to do a full push-up yet.
If you:
- Can’t do a push-up at all
- Can do some, but not 10 full push-ups in a row with good form
- Feel like your form breaks down quickly
Then this program is exactly where you need to begin.
How the Program Works
The Zero to 10 Push-Ups plan follows the principle of progressive overload—meaning each week, the workouts gradually become more challenging as your body adapts and gets stronger.
Structure Overview:
- 6 Weeks
- 12 Workouts (2 per week)
- Each session is about 25–30 minutes
- Each workout includes:
- Warm-Up – Joint prep, dynamic movement, and shoulder activation
- Strength Section – A 3-exercise superset focused on pushing strength (chest, triceps, shoulders)
- Finisher – A 5-minute core and posture circuit to reinforce stability and control
What Kind of Exercises Are Included?
You’ll progress through:
- Resistance band movements to build initial muscle activation
- Regressed push-up variations (wall, incline, knee, negative)
- Push-up modifiers (pause push-ups, slow-motion, cobra push-ups)
- Triceps-specific work (dips, extensions, diamond variations)
- Core and static holds to reinforce full-body tension
Each week builds on the last, so whether you’re starting from zero or working up from knee push-ups, you’ll know exactly how and when to progress.
Ready to Start?
No guesswork, no equipment required, and no more half-reps. This is your step-by-step roadmap to clean, confident push-ups.
Let’s get to work—and build something strong.
Week 1
- Workout #1
- Workout #2
Warm-Up7 min
-
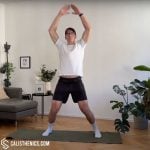
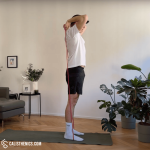
1 round: Joint warm-up routine
-
2 rounds (no rest):
-
20 sec Jumping Jacks
-
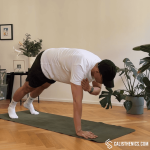
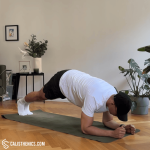
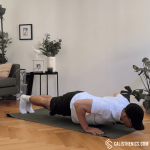
12 Plank Shoulder Taps (or Kneeling Shoulder Taps)
-


No muscle groups found for this post.
Tips
-
Move slowly and deliberately to avoid sudden movements.
-
Keep circles smooth and controlled—avoid jerky motions.
-
Breathe steadily and deeply to maximize relaxation and blood flow.
-
Gradually increase the range of motion as your joints warm up.
-
Perform each movement for 15-20 seconds, or until joints feel loosened.
-
Customize your routine slightly based on the specific demands of your workout.

Muscle groups:


Tips
-
Keep your movements light and bouncy, not stiff or stompy.
-
Maintain a steady breathing rhythm, especially in longer sets.
-
Engage your core to support posture and absorb shock.
-
Land on the balls of your feet and roll through the foot gently to protect your knees.
-
Scale the speed based on your fitness goal—slower for warm-up, faster for conditioning.
-
Stay relaxed in the shoulders and arms, avoiding unnecessary tension.


Tips
-
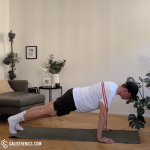
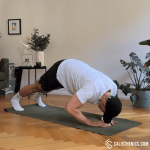
Core Engagement: Keep your core tight throughout the entire movement. This is key to minimizing any rotation or movement in your hips and torso as you lift each hand.
-
Hip Stability: Focus on keeping your hips level and preventing them from swaying side to side. A wider stance with your feet can provide better stability as you progress.
-
Slow and Controlled: Perform the shoulder taps slowly and with control to maximize core engagement and prevent losing form.
-
Breathing: Breathe steadily throughout the exercise. Inhale as you prepare to lift your hand, and exhale as you tap your shoulder. Controlled breathing will help stabilize your core and prevent fatigue.
Strength15 min
Structure: Superset format — Perform A1, rest 30 sec, then A2, rest 30 sec, then A3. Rest 60 sec after the full round. Repeat for 3 sets total.
-
A1: Resistance Band Front Pushes – 15 reps
-
A2: Resistance Band Triceps Extensions – 15 reps per arm
-
A3: Resistance Band Chest Flys – 12 reps
Focus on slow tempo and full range. This is about activation, not speed.


Muscle group:

Tips
-
Secure Band Position: Ensure the band is securely positioned across your upper back and won’t slip during the exercise.
-
Engage the Core: Keep your core tight to stabilize your torso, preventing any leaning or arching of the back.
-
Avoid Locking Elbows: Avoid fully locking your elbows at the end of the push to keep constant tension on the muscles.
-
Controlled Movements: Perform the exercise slowly, especially when returning to the starting position, to fully engage the muscles.
-
Breathe Steadily: Exhale as you push forward, and inhale as you return to the starting position, maintaining a steady rhythm and control.

Muscle group:

Tips
-
Secure Band Position: Ensure the band is securely anchored under your feet and doesn’t slip during the exercise.
-
Keep Elbows Pointed Up: Avoid letting your elbows drift outward; keep them close to your head to target the triceps effectively.
-
Engage the Core: Maintain core engagement to prevent arching your back as you press the band overhead.
-
Controlled Movement: Focus on a slow, controlled motion, especially when lowering the band, to keep the triceps under tension.
-
Breathe Steadily: Exhale as you extend your arms up, and inhale as you lower them back down, maintaining a steady rhythm and control.


Muscle group:
Tips
-
Keep Elbows Slightly Bent: Avoid fully extending or locking your elbows to protect your joints and maintain tension in the chest.
-
Engage the Core: Keep your core tight to prevent arching your back, helping to stabilize your torso and improve posture.
-
Focus on the Chest Squeeze: Concentrate on squeezing your chest as your hands come together to maximize muscle activation.
-
Controlled Movement: Move slowly and avoid using momentum; focus on a controlled return to the starting position to keep constant tension.
-
Breathe Steadily: Exhale as you bring your arms together, and inhale as you open them back, maintaining a steady rhythm.
Finisher5 min
Format: 30 sec each, alternate exercises for 5 minutes
-
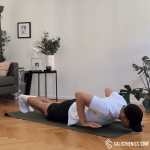
Elbow Plank (or Knee Plank)
-
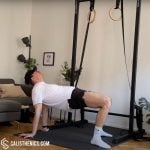
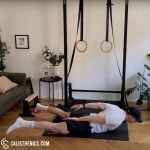
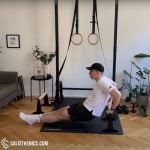
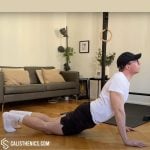
Tabletop Hold (or Reverse Plank)
→ Total: 5 sets = ~5 minutes

Tips
-
Straight Body Line: Ensure your body forms a straight line from your head to your heels. Avoid raising or lowering your hips too much, as this can compromise form.
-
Core Engagement: Keep your core muscles tight throughout the entire exercise. This helps stabilize your spine and prevents your hips from sagging or arching.
-
Elbow Positioning: Your elbows should be directly under your shoulders, creating a strong base of support. This will also help engage your shoulders and reduce strain.
-
Steady Breathing: Focus on controlled, deep breaths. Inhale through your nose and exhale through your mouth, which helps stabilize your core and manage endurance.
-
Avoid Tension in the Neck: Keep your neck neutral by looking down at the floor to prevent any tension or strain in the neck.

Muscle group:

Tips
-
Squeeze your glutes at the top to fully activate your posterior chain.
-
Look slightly upward to maintain neck alignment but avoid excessive tilting.
-
Engage your core to prevent lower back sagging.
-
If your wrists feel strained, try placing hands on yoga blocks or using fists instead of flat palms.
-
Perform dynamic reps by lowering and lifting the hips for added activation before holding the position statically.
Warm-Up7 min
-
1 round: Joint warm-up routine
-
2 rounds (no rest):
-
20 sec Jumping Jacks
-
12 Plank Shoulder Taps (or Kneeling Shoulder Taps)
-
No muscle groups found for this post.
Tips
-
Move slowly and deliberately to avoid sudden movements.
-
Keep circles smooth and controlled—avoid jerky motions.
-
Breathe steadily and deeply to maximize relaxation and blood flow.
-
Gradually increase the range of motion as your joints warm up.
-
Perform each movement for 15-20 seconds, or until joints feel loosened.
-
Customize your routine slightly based on the specific demands of your workout.
Muscle groups:
Tips
-
Keep your movements light and bouncy, not stiff or stompy.
-
Maintain a steady breathing rhythm, especially in longer sets.
-
Engage your core to support posture and absorb shock.
-
Land on the balls of your feet and roll through the foot gently to protect your knees.
-
Scale the speed based on your fitness goal—slower for warm-up, faster for conditioning.
-
Stay relaxed in the shoulders and arms, avoiding unnecessary tension.
Tips
-
Core Engagement: Keep your core tight throughout the entire movement. This is key to minimizing any rotation or movement in your hips and torso as you lift each hand.
-
Hip Stability: Focus on keeping your hips level and preventing them from swaying side to side. A wider stance with your feet can provide better stability as you progress.
-
Slow and Controlled: Perform the shoulder taps slowly and with control to maximize core engagement and prevent losing form.
-
Breathing: Breathe steadily throughout the exercise. Inhale as you prepare to lift your hand, and exhale as you tap your shoulder. Controlled breathing will help stabilize your core and prevent fatigue.
Strength: Wall Work Superset15 min
Structure: Superset format — Perform A1, rest 30 sec, then A2, rest 30 sec, then A3. Rest 60 sec after the full round. Repeat for 3 sets total.
-
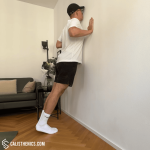
A1: Wall Push-Ups – 10–12 reps
-
A2: Resistance Band Triceps Extensions – 15 reps
-
A3: Resistance Band Front Pushes – 15 reps
Focus on controlled form. Keep your elbows at about 45°, and your core braced during wall push-ups.

Muscle groups:
Tips
-
Core Engagement: Keep your core tight throughout the movement to maintain proper alignment and avoid straining your lower back.
-
Hand Placement: Your hands should be slightly wider than shoulder-width apart to allow for better chest engagement. If you feel shoulder discomfort, adjust the position of your hands slightly.
-
Elbow Positioning: Keep your elbows close to your body or at a slight angle to prevent shoulder strain and engage the triceps more effectively.
-
Body Angle: The further you stand from the wall, the more challenging the exercise becomes. Adjust your distance from the wall based on your fitness level.
-
Controlled Movement: Lower yourself slowly and push back up with control. Avoid rushing through the movement, as this reduces the effectiveness of the exercise.
Muscle group:
Tips
-
Secure Band Position: Ensure the band is securely anchored under your feet and doesn’t slip during the exercise.
-
Keep Elbows Pointed Up: Avoid letting your elbows drift outward; keep them close to your head to target the triceps effectively.
-
Engage the Core: Maintain core engagement to prevent arching your back as you press the band overhead.
-
Controlled Movement: Focus on a slow, controlled motion, especially when lowering the band, to keep the triceps under tension.
-
Breathe Steadily: Exhale as you extend your arms up, and inhale as you lower them back down, maintaining a steady rhythm and control.
Muscle group:
Tips
-
Secure Band Position: Ensure the band is securely positioned across your upper back and won’t slip during the exercise.
-
Engage the Core: Keep your core tight to stabilize your torso, preventing any leaning or arching of the back.
-
Avoid Locking Elbows: Avoid fully locking your elbows at the end of the push to keep constant tension on the muscles.
-
Controlled Movements: Perform the exercise slowly, especially when returning to the starting position, to fully engage the muscles.
-
Breathe Steadily: Exhale as you push forward, and inhale as you return to the starting position, maintaining a steady rhythm and control.
Finisher: Hollow & Superman5 min
Format: Alternate exercises for 30s work / 15s rest for 3 rounds
-
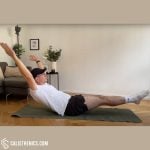
Hollow Body Rocks (or Tuck Hollow Body Rocks)
-
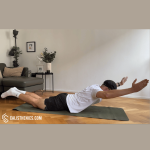
Superman Rocks (or Superman Pulses)
→ Total: 3 sets = ~5 minutes

Muscle group:
Tips
-
Engage Your Core Fully: Ensure your abs remain tight to maintain proper form and control throughout the movement.
-
Avoid Using Momentum: The rocking motion should come from controlled engagement of your core, not from swinging your arms or legs.
-
Press Your Lower Back Into the Floor: Keep your lower back in contact with the ground to prevent strain and maximize core engagement.
-
Start Slow: If you’re new to the exercise, perform small, controlled rocks and gradually increase the range of motion.
-
Breathe Steadily: Don’t hold your breath; steady breathing helps maintain tension and focus.

Muscle group:
Tips
-
Maintain a Strong Arch: Focus on keeping your chest and legs lifted off the ground throughout the movement. Your body should remain in a solid arch shape, with tension in your back, glutes, and shoulders.
-
Engage Your Core: Although this exercise primarily targets the posterior chain, keeping your core engaged will help stabilize your body and maintain balance during the rocking motion.
-
Controlled Movement: Avoid jerking or using momentum. The rocking should be slow and controlled, driven by muscle engagement rather than swinging
-
Breathing: Breathe steadily throughout the movement. Exhale as you rock forward and inhale as you rock backward. This will help you maintain control and endurance.
Week 2
- Workout #3
- Workout #4
Warm-up: Ramp-Up Circuit7 min
-
1 round: Joint warm-up routine
-
2 rounds (no rest):
-
20 sec Jumping Jacks
-
12 Plank Shoulder Taps (or Kneeling Shoulder Taps)
-
No muscle groups found for this post.
Tips
-
Move slowly and deliberately to avoid sudden movements.
-
Keep circles smooth and controlled—avoid jerky motions.
-
Breathe steadily and deeply to maximize relaxation and blood flow.
-
Gradually increase the range of motion as your joints warm up.
-
Perform each movement for 15-20 seconds, or until joints feel loosened.
-
Customize your routine slightly based on the specific demands of your workout.
Muscle groups:
Tips
-
Keep your movements light and bouncy, not stiff or stompy.
-
Maintain a steady breathing rhythm, especially in longer sets.
-
Engage your core to support posture and absorb shock.
-
Land on the balls of your feet and roll through the foot gently to protect your knees.
-
Scale the speed based on your fitness goal—slower for warm-up, faster for conditioning.
-
Stay relaxed in the shoulders and arms, avoiding unnecessary tension.
Tips
-
Core Engagement: Keep your core tight throughout the entire movement. This is key to minimizing any rotation or movement in your hips and torso as you lift each hand.
-
Hip Stability: Focus on keeping your hips level and preventing them from swaying side to side. A wider stance with your feet can provide better stability as you progress.
-
Slow and Controlled: Perform the shoulder taps slowly and with control to maximize core engagement and prevent losing form.
-
Breathing: Breathe steadily throughout the exercise. Inhale as you prepare to lift your hand, and exhale as you tap your shoulder. Controlled breathing will help stabilize your core and prevent fatigue.
Strength: Incline Initiation15 min
Structure: Superset format — A1 → 30s rest → A2 → 30s rest → A3 → 60s rest between rounds
3 total rounds
-
A1: Incline Push-Ups – 8–10 reps
-
A2: Resistance Band Triceps Extensions – 15 reps
-
A3: Resistance Band Chest Flys – 12 reps
Choose an incline height that allows you to perform full-range reps with control.


Muscle groups:
Choose an incline height that allows you to perform full-range reps with control.
Tips
-
Core Engagement: Keep your core tight to prevent your hips from sagging or rising too high. This ensures proper body alignment and protects your lower back.
-
Hand Placement: Your hands should be placed directly under your shoulders. Adjust the width based on comfort, but ensure that your elbows don’t flare out too much.
-
Body Positioning: Ensure that your body forms a straight line from your head to your heels throughout the exercise. Engage your glutes and quads to maintain this alignment.
-
Controlled Movement: Lower yourself slowly to engage your muscles fully and avoid rushing through the reps.
-
Breathing: Inhale as you lower yourself and exhale as you push back up. Proper breathing helps maintain strength and stability.
Muscle group:
Tips
-
Secure Band Position: Ensure the band is securely anchored under your feet and doesn’t slip during the exercise.
-
Keep Elbows Pointed Up: Avoid letting your elbows drift outward; keep them close to your head to target the triceps effectively.
-
Engage the Core: Maintain core engagement to prevent arching your back as you press the band overhead.
-
Controlled Movement: Focus on a slow, controlled motion, especially when lowering the band, to keep the triceps under tension.
-
Breathe Steadily: Exhale as you extend your arms up, and inhale as you lower them back down, maintaining a steady rhythm and control.
Muscle group:
Tips
-
Keep Elbows Slightly Bent: Avoid fully extending or locking your elbows to protect your joints and maintain tension in the chest.
-
Engage the Core: Keep your core tight to prevent arching your back, helping to stabilize your torso and improve posture.
-
Focus on the Chest Squeeze: Concentrate on squeezing your chest as your hands come together to maximize muscle activation.
-
Controlled Movement: Move slowly and avoid using momentum; focus on a controlled return to the starting position to keep constant tension.
-
Breathe Steadily: Exhale as you bring your arms together, and inhale as you open them back, maintaining a steady rhythm.
Finisher: Hold & Reach5 min
Format: Alternate exercises for 3 rounds (30s on / 15s off)
-
Elbow Plank (or Knee Plank)
-
Tabletop Hold (or Reverse Plank)
→ 3 sets total = ~5 minutes
Tips
-
Straight Body Line: Ensure your body forms a straight line from your head to your heels. Avoid raising or lowering your hips too much, as this can compromise form.
-
Core Engagement: Keep your core muscles tight throughout the entire exercise. This helps stabilize your spine and prevents your hips from sagging or arching.
-
Elbow Positioning: Your elbows should be directly under your shoulders, creating a strong base of support. This will also help engage your shoulders and reduce strain.
-
Steady Breathing: Focus on controlled, deep breaths. Inhale through your nose and exhale through your mouth, which helps stabilize your core and manage endurance.
-
Avoid Tension in the Neck: Keep your neck neutral by looking down at the floor to prevent any tension or strain in the neck.
Muscle group:
Tips
-
Squeeze your glutes at the top to fully activate your posterior chain.
-
Look slightly upward to maintain neck alignment but avoid excessive tilting.
-
Engage your core to prevent lower back sagging.
-
If your wrists feel strained, try placing hands on yoga blocks or using fists instead of flat palms.
-
Perform dynamic reps by lowering and lifting the hips for added activation before holding the position statically.
Warm-up7 min
-
1 round: Joint warm-up routine
-
2 rounds (no rest):
-
20 sec Jumping Jacks
-
12 Plank Shoulder Taps (or Kneeling Shoulder Taps)
-
No muscle groups found for this post.
Tips
-
Move slowly and deliberately to avoid sudden movements.
-
Keep circles smooth and controlled—avoid jerky motions.
-
Breathe steadily and deeply to maximize relaxation and blood flow.
-
Gradually increase the range of motion as your joints warm up.
-
Perform each movement for 15-20 seconds, or until joints feel loosened.
-
Customize your routine slightly based on the specific demands of your workout.
Muscle groups:
Tips
-
Keep your movements light and bouncy, not stiff or stompy.
-
Maintain a steady breathing rhythm, especially in longer sets.
-
Engage your core to support posture and absorb shock.
-
Land on the balls of your feet and roll through the foot gently to protect your knees.
-
Scale the speed based on your fitness goal—slower for warm-up, faster for conditioning.
-
Stay relaxed in the shoulders and arms, avoiding unnecessary tension.
Tips
-
Core Engagement: Keep your core tight throughout the entire movement. This is key to minimizing any rotation or movement in your hips and torso as you lift each hand.
-
Hip Stability: Focus on keeping your hips level and preventing them from swaying side to side. A wider stance with your feet can provide better stability as you progress.
-
Slow and Controlled: Perform the shoulder taps slowly and with control to maximize core engagement and prevent losing form.
-
Breathing: Breathe steadily throughout the exercise. Inhale as you prepare to lift your hand, and exhale as you tap your shoulder. Controlled breathing will help stabilize your core and prevent fatigue.
Strength: Wall Volume Builder15 min
Structure: Superset format — A1 → 30s rest → A2 → 30s rest → A3 → 60s rest between rounds
3 total rounds
-
A1: Wall Push-Ups – 12–15 reps
-
A2: Resistance Band Triceps Extensions – 15 reps
-
A3: Resistance Band Scapula Push-Ups – 10–12 reps
Focus on smooth movement and controlled reps—no bouncing at the wall.
Muscle groups:
Focus on smooth movement and controlled reps—no bouncing at the wall.
Tips
-
Core Engagement: Keep your core tight throughout the movement to maintain proper alignment and avoid straining your lower back.
-
Hand Placement: Your hands should be slightly wider than shoulder-width apart to allow for better chest engagement. If you feel shoulder discomfort, adjust the position of your hands slightly.
-
Elbow Positioning: Keep your elbows close to your body or at a slight angle to prevent shoulder strain and engage the triceps more effectively.
-
Body Angle: The further you stand from the wall, the more challenging the exercise becomes. Adjust your distance from the wall based on your fitness level.
-
Controlled Movement: Lower yourself slowly and push back up with control. Avoid rushing through the movement, as this reduces the effectiveness of the exercise.
Muscle group:
Tips
-
Secure Band Position: Ensure the band is securely anchored under your feet and doesn’t slip during the exercise.
-
Keep Elbows Pointed Up: Avoid letting your elbows drift outward; keep them close to your head to target the triceps effectively.
-
Engage the Core: Maintain core engagement to prevent arching your back as you press the band overhead.
-
Controlled Movement: Focus on a slow, controlled motion, especially when lowering the band, to keep the triceps under tension.
-
Breathe Steadily: Exhale as you extend your arms up, and inhale as you lower them back down, maintaining a steady rhythm and control.


If too difficult, try without the band.
Tips
-
Keep the Arms Straight: Avoid bending your elbows; the movement should come from the shoulder blades, not the arms.
-
Focus on Scapular Movement: Concentrate on retracting and protracting the shoulder blades rather than pushing with your arms.
-
Engage the Core: Keep your core tight to maintain stability and prevent your hips from sagging or lifting.
-
Controlled Movement: Perform the movement slowly, especially when retracting and protracting the scapulae, to fully activate the shoulder stabilizers.
-
Breathe Steadily: Inhale as you retract your shoulder blades, and exhale as you protract, maintaining a steady rhythm and focus.
Finisher: Climbers & Snow Angels5 min
Format: Alternate for 3 rounds (30s each / 15s rest)
-
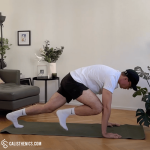
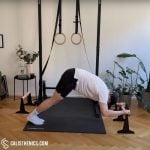
Mountain Climbers
-
Reverse Snow Angels

Tips
-
Core Engagement: Focus on keeping your core engaged throughout the exercise to prevent your hips from rising or sagging.
-
Controlled Breathing: Breathe steadily as you alternate legs. Exhale as you drive each knee forward, and inhale as you extend each leg back.
-
Keep the Hips Level: Avoid letting your hips move up or down too much; maintain a level position to keep the focus on your core.
-
Controlled Speed: Start with a slow, controlled pace to ensure proper form, then gradually increase your speed as you feel more stable.
-
Hand and Shoulder Alignment: Keep your hands directly under your shoulders to ensure proper alignment and avoid putting excess strain on your wrists.

Muscle group:
Tips
-
Keep Arms Straight but Not Locked: Maintain a slight bend in the elbows to reduce unnecessary joint strain.
-
Move in a Smooth, Controlled Manner: Avoid jerky or fast motions—slow, controlled reps activate muscles more effectively.
-
Focus on Squeezing the Shoulder Blades: Imagine pinching a pencil between your scapulae at the bottom of the movement.
-
Engage Your Core Throughout: Prevent excessive lumbar arching by keeping abs and glutes activated.
-
Keep a Steady Breathing Pattern: Inhale as you extend the arms forward, and exhale as you sweep them back.
-
Try Adding Light Weights for Progression: Holding small plates or wrist weights can increase resistance for added challenge.
Week 3
- Workout #5
- Workout #6
Warm-Up: Push-Up Prep Circuit7 min
-
1 round: Joint warm-up routine
-
2 rounds (no rest):
-
20 sec Jumping Jacks
-
12 Plank Shoulder Taps (or Kneeling Shoulder Taps)
-
No muscle groups found for this post.
Tips
-
Move slowly and deliberately to avoid sudden movements.
-
Keep circles smooth and controlled—avoid jerky motions.
-
Breathe steadily and deeply to maximize relaxation and blood flow.
-
Gradually increase the range of motion as your joints warm up.
-
Perform each movement for 15-20 seconds, or until joints feel loosened.
-
Customize your routine slightly based on the specific demands of your workout.
Muscle groups:
Tips
-
Keep your movements light and bouncy, not stiff or stompy.
-
Maintain a steady breathing rhythm, especially in longer sets.
-
Engage your core to support posture and absorb shock.
-
Land on the balls of your feet and roll through the foot gently to protect your knees.
-
Scale the speed based on your fitness goal—slower for warm-up, faster for conditioning.
-
Stay relaxed in the shoulders and arms, avoiding unnecessary tension.
Tips
-
Core Engagement: Keep your core tight throughout the entire movement. This is key to minimizing any rotation or movement in your hips and torso as you lift each hand.
-
Hip Stability: Focus on keeping your hips level and preventing them from swaying side to side. A wider stance with your feet can provide better stability as you progress.
-
Slow and Controlled: Perform the shoulder taps slowly and with control to maximize core engagement and prevent losing form.
-
Breathing: Breathe steadily throughout the exercise. Inhale as you prepare to lift your hand, and exhale as you tap your shoulder. Controlled breathing will help stabilize your core and prevent fatigue.
Strength: Controlled Descent15 min
Structure: Superset format — A1 → 30s rest → A2 → 30s rest → A3 → 60s rest between rounds
3 total rounds
-
A1: Negative Push-Ups (3–5 sec lower) – 5–6 reps
-
A2: Bench Dips – 10–12 reps
-
A3: Incline Push-Ups – 8–10 reps
The goal is clean, slow lowering in A1. Rest your knees on the floor between reps if needed.

Muscle group:
3–5 sec lowering phase The goal is clean, slow lowering. Rest your knees on the floor between reps if needed.
Tips
-
Focus on Eccentric Movement: The primary focus is on the slow lowering (eccentric) phase. Aim for 3-5 seconds of controlled lowering to maximize muscle engagement.
-
Core Engagement: Keep your core tight throughout the movement to maintain proper body alignment and prevent sagging hips.
-
Elbow Positioning: Keep your elbows close to your body or at a slight 45-degree angle. This will reduce strain on the shoulders and engage the triceps more effectively.
-
Controlled Movements: Don’t rush the descent. The slower the movement, the greater the benefit for building muscle strength.
-
Breathing: Inhale as you lower your body slowly, and exhale as you reset to the starting position.

Tips
-
Keep your chest lifted and shoulder blades squeezed back.
-
Move slowly and with control, especially during the lowering phase.
-
Stop when your upper arms are parallel to the ground—deeper is not better.
-
Try squeezing your triceps at the top of each rep for a stronger contraction.
-
Warm up the shoulders and triceps before performing high-rep or weighted variations.
-
Place a weight plate or dumbbell on your lap for added challenge (advanced).
Muscle groups:
Tips
-
Core Engagement: Keep your core tight to prevent your hips from sagging or rising too high. This ensures proper body alignment and protects your lower back.
-
Hand Placement: Your hands should be placed directly under your shoulders. Adjust the width based on comfort, but ensure that your elbows don’t flare out too much.
-
Body Positioning: Ensure that your body forms a straight line from your head to your heels throughout the exercise. Engage your glutes and quads to maintain this alignment.
-
Controlled Movement: Lower yourself slowly to engage your muscles fully and avoid rushing through the reps.
-
Breathing: Inhale as you lower yourself and exhale as you push back up. Proper breathing helps maintain strength and stability.
Finisher: Static Power5 min
Format: Alternate 30s on / 15s off, 3 rounds
-
Elbow Plank (or Knee Plank)
-
Tabletop Hold (or Reverse Plank)
Tips
-
Straight Body Line: Ensure your body forms a straight line from your head to your heels. Avoid raising or lowering your hips too much, as this can compromise form.
-
Core Engagement: Keep your core muscles tight throughout the entire exercise. This helps stabilize your spine and prevents your hips from sagging or arching.
-
Elbow Positioning: Your elbows should be directly under your shoulders, creating a strong base of support. This will also help engage your shoulders and reduce strain.
-
Steady Breathing: Focus on controlled, deep breaths. Inhale through your nose and exhale through your mouth, which helps stabilize your core and manage endurance.
-
Avoid Tension in the Neck: Keep your neck neutral by looking down at the floor to prevent any tension or strain in the neck.
Muscle group:
Tips
-
Squeeze your glutes at the top to fully activate your posterior chain.
-
Look slightly upward to maintain neck alignment but avoid excessive tilting.
-
Engage your core to prevent lower back sagging.
-
If your wrists feel strained, try placing hands on yoga blocks or using fists instead of flat palms.
-
Perform dynamic reps by lowering and lifting the hips for added activation before holding the position statically.
Warm-Up: Shoulder Lock Prep7 min
-
1 round: Joint warm-up routine
-
2 rounds (no rest):
-
20 sec Jumping Jacks
-
12 Plank Shoulder Taps (or Kneeling Shoulder Taps)
-
No muscle groups found for this post.
Tips
-
Move slowly and deliberately to avoid sudden movements.
-
Keep circles smooth and controlled—avoid jerky motions.
-
Breathe steadily and deeply to maximize relaxation and blood flow.
-
Gradually increase the range of motion as your joints warm up.
-
Perform each movement for 15-20 seconds, or until joints feel loosened.
-
Customize your routine slightly based on the specific demands of your workout.
Muscle groups:
Tips
-
Keep your movements light and bouncy, not stiff or stompy.
-
Maintain a steady breathing rhythm, especially in longer sets.
-
Engage your core to support posture and absorb shock.
-
Land on the balls of your feet and roll through the foot gently to protect your knees.
-
Scale the speed based on your fitness goal—slower for warm-up, faster for conditioning.
-
Stay relaxed in the shoulders and arms, avoiding unnecessary tension.
Tips
-
Core Engagement: Keep your core tight throughout the entire movement. This is key to minimizing any rotation or movement in your hips and torso as you lift each hand.
-
Hip Stability: Focus on keeping your hips level and preventing them from swaying side to side. A wider stance with your feet can provide better stability as you progress.
-
Slow and Controlled: Perform the shoulder taps slowly and with control to maximize core engagement and prevent losing form.
-
Breathing: Breathe steadily throughout the exercise. Inhale as you prepare to lift your hand, and exhale as you tap your shoulder. Controlled breathing will help stabilize your core and prevent fatigue.
Strength: Lock & Push15 min
Structure: Superset format — A1 → 30s rest → A2 → 30s rest → A3 → 60s rest between rounds
3 total rounds
-
A1: Incline Push-Ups – 10 reps
-
A2: Triceps Extensions on Parallettes or Bench – 8–10 reps
-
A3: Resistance Band Chest Flys – 12 reps
Maintain clean form and full extension in every triceps rep—this will directly improve your ability to push out the last few push-up reps.
Muscle groups:
Tips
-
Core Engagement: Keep your core tight to prevent your hips from sagging or rising too high. This ensures proper body alignment and protects your lower back.
-
Hand Placement: Your hands should be placed directly under your shoulders. Adjust the width based on comfort, but ensure that your elbows don’t flare out too much.
-
Body Positioning: Ensure that your body forms a straight line from your head to your heels throughout the exercise. Engage your glutes and quads to maintain this alignment.
-
Controlled Movement: Lower yourself slowly to engage your muscles fully and avoid rushing through the reps.
-
Breathing: Inhale as you lower yourself and exhale as you push back up. Proper breathing helps maintain strength and stability.

Muscle group:
Tips
-
Keep elbows in a fixed position—only the forearms should move.
-
Start with partial range of motion if full reps feel too difficult.
-
Engage your abs and glutes like a moving plank to maintain body tension.
-
Slow the eccentric (lowering) phase to increase triceps activation.
-
Use a wall, towel, or mat to stabilize the parallette if needed.
-
Perform after push-ups or dips to isolate and burn out the triceps.
Muscle group:
Tips
-
Keep Elbows Slightly Bent: Avoid fully extending or locking your elbows to protect your joints and maintain tension in the chest.
-
Engage the Core: Keep your core tight to prevent arching your back, helping to stabilize your torso and improve posture.
-
Focus on the Chest Squeeze: Concentrate on squeezing your chest as your hands come together to maximize muscle activation.
-
Controlled Movement: Move slowly and avoid using momentum; focus on a controlled return to the starting position to keep constant tension.
-
Breathe Steadily: Exhale as you bring your arms together, and inhale as you open them back, maintaining a steady rhythm.
Finisher: Rock & Roll5 min
Format: Alternate 30s work / 15s rest, 3 rounds
-
Hollow Body Rocks (or Tuck Hollow Body Rocks)
-
Superman Rocks (or Superman Pulses)
Muscle group:
Tips
-
Engage Your Core Fully: Ensure your abs remain tight to maintain proper form and control throughout the movement.
-
Avoid Using Momentum: The rocking motion should come from controlled engagement of your core, not from swinging your arms or legs.
-
Press Your Lower Back Into the Floor: Keep your lower back in contact with the ground to prevent strain and maximize core engagement.
-
Start Slow: If you’re new to the exercise, perform small, controlled rocks and gradually increase the range of motion.
-
Breathe Steadily: Don’t hold your breath; steady breathing helps maintain tension and focus.
Muscle group:
Tips
-
Maintain a Strong Arch: Focus on keeping your chest and legs lifted off the ground throughout the movement. Your body should remain in a solid arch shape, with tension in your back, glutes, and shoulders.
-
Engage Your Core: Although this exercise primarily targets the posterior chain, keeping your core engaged will help stabilize your body and maintain balance during the rocking motion.
-
Controlled Movement: Avoid jerking or using momentum. The rocking should be slow and controlled, driven by muscle engagement rather than swinging
-
Breathing: Breathe steadily throughout the movement. Exhale as you rock forward and inhale as you rock backward. This will help you maintain control and endurance.
Week 4
- Workout #7
- Workout #8
Warm-Up: Posture Activator7 min
-
1 round: Joint warm-up routine
-
2 rounds (no rest):
-
20 sec Jumping Jacks
-
12 Plank Shoulder Taps (or Kneeling Shoulder Taps)
-
No muscle groups found for this post.
Tips
-
Move slowly and deliberately to avoid sudden movements.
-
Keep circles smooth and controlled—avoid jerky motions.
-
Breathe steadily and deeply to maximize relaxation and blood flow.
-
Gradually increase the range of motion as your joints warm up.
-
Perform each movement for 15-20 seconds, or until joints feel loosened.
-
Customize your routine slightly based on the specific demands of your workout.
Muscle groups:
Tips
-
Keep your movements light and bouncy, not stiff or stompy.
-
Maintain a steady breathing rhythm, especially in longer sets.
-
Engage your core to support posture and absorb shock.
-
Land on the balls of your feet and roll through the foot gently to protect your knees.
-
Scale the speed based on your fitness goal—slower for warm-up, faster for conditioning.
-
Stay relaxed in the shoulders and arms, avoiding unnecessary tension.
Tips
-
Core Engagement: Keep your core tight throughout the entire movement. This is key to minimizing any rotation or movement in your hips and torso as you lift each hand.
-
Hip Stability: Focus on keeping your hips level and preventing them from swaying side to side. A wider stance with your feet can provide better stability as you progress.
-
Slow and Controlled: Perform the shoulder taps slowly and with control to maximize core engagement and prevent losing form.
-
Breathing: Breathe steadily throughout the exercise. Inhale as you prepare to lift your hand, and exhale as you tap your shoulder. Controlled breathing will help stabilize your core and prevent fatigue.
Strength: Release & Push15 min
Structure: Superset format — A1 → 30s rest → A2 → 30s rest → A3 → 60s rest between rounds
3 total rounds
-
A1: Hand-Release Push-Ups – 5–6 reps
-
A2: Bench Dips – 12–15 reps
-
A3: Incline Push-Ups – 8–10 reps

Muscle groups:
Tips
-
Full Body Control: Engage your core and glutes to maintain a straight line from your head to your heels during both the lowering and lifting phases.
-
Elbow Positioning: Keep your elbows close to your body to reduce shoulder strain and to focus on the triceps and chest.
-
Hand Release Focus: Ensure you fully lift your hands off the ground at the bottom of each rep to reset and engage the muscles from the start of each push-up.
-
Breathing: Inhale as you lower yourself, and exhale as you push back up. Controlled breathing helps maintain stability and power throughout the movement.
-
Consistent Tempo: Perform the movement slowly and with control, focusing on the full range of motion rather than rushing through the reps.
Tips
-
Keep your chest lifted and shoulder blades squeezed back.
-
Move slowly and with control, especially during the lowering phase.
-
Stop when your upper arms are parallel to the ground—deeper is not better.
-
Try squeezing your triceps at the top of each rep for a stronger contraction.
-
Warm up the shoulders and triceps before performing high-rep or weighted variations.
-
Place a weight plate or dumbbell on your lap for added challenge (advanced).
Muscle groups:
Tips
-
Core Engagement: Keep your core tight to prevent your hips from sagging or rising too high. This ensures proper body alignment and protects your lower back.
-
Hand Placement: Your hands should be placed directly under your shoulders. Adjust the width based on comfort, but ensure that your elbows don’t flare out too much.
-
Body Positioning: Ensure that your body forms a straight line from your head to your heels throughout the exercise. Engage your glutes and quads to maintain this alignment.
-
Controlled Movement: Lower yourself slowly to engage your muscles fully and avoid rushing through the reps.
-
Breathing: Inhale as you lower yourself and exhale as you push back up. Proper breathing helps maintain strength and stability.
Finisher: Static & Strong5 min
Format: Alternate 30s on / 15s off, 3 rounds
-
Elbow Plank (or Knee Plank)
-
Tabletop Hold (or Reverse Plank)
Tips
-
Straight Body Line: Ensure your body forms a straight line from your head to your heels. Avoid raising or lowering your hips too much, as this can compromise form.
-
Core Engagement: Keep your core muscles tight throughout the entire exercise. This helps stabilize your spine and prevents your hips from sagging or arching.
-
Elbow Positioning: Your elbows should be directly under your shoulders, creating a strong base of support. This will also help engage your shoulders and reduce strain.
-
Steady Breathing: Focus on controlled, deep breaths. Inhale through your nose and exhale through your mouth, which helps stabilize your core and manage endurance.
-
Avoid Tension in the Neck: Keep your neck neutral by looking down at the floor to prevent any tension or strain in the neck.
Muscle group:
Tips
-
Squeeze your glutes at the top to fully activate your posterior chain.
-
Look slightly upward to maintain neck alignment but avoid excessive tilting.
-
Engage your core to prevent lower back sagging.
-
If your wrists feel strained, try placing hands on yoga blocks or using fists instead of flat palms.
-
Perform dynamic reps by lowering and lifting the hips for added activation before holding the position statically.
Warm-Up: Explosive Activation7 min
-
1 round: Joint warm-up routine
-
2 rounds (no rest):
-
20 sec Jumping Jacks
-
12 Plank Shoulder Taps (or Kneeling Shoulder Taps)
-
No muscle groups found for this post.
Tips
-
Move slowly and deliberately to avoid sudden movements.
-
Keep circles smooth and controlled—avoid jerky motions.
-
Breathe steadily and deeply to maximize relaxation and blood flow.
-
Gradually increase the range of motion as your joints warm up.
-
Perform each movement for 15-20 seconds, or until joints feel loosened.
-
Customize your routine slightly based on the specific demands of your workout.
Muscle groups:
Tips
-
Keep your movements light and bouncy, not stiff or stompy.
-
Maintain a steady breathing rhythm, especially in longer sets.
-
Engage your core to support posture and absorb shock.
-
Land on the balls of your feet and roll through the foot gently to protect your knees.
-
Scale the speed based on your fitness goal—slower for warm-up, faster for conditioning.
-
Stay relaxed in the shoulders and arms, avoiding unnecessary tension.
Tips
-
Core Engagement: Keep your core tight throughout the entire movement. This is key to minimizing any rotation or movement in your hips and torso as you lift each hand.
-
Hip Stability: Focus on keeping your hips level and preventing them from swaying side to side. A wider stance with your feet can provide better stability as you progress.
-
Slow and Controlled: Perform the shoulder taps slowly and with control to maximize core engagement and prevent losing form.
-
Breathing: Breathe steadily throughout the exercise. Inhale as you prepare to lift your hand, and exhale as you tap your shoulder. Controlled breathing will help stabilize your core and prevent fatigue.
Strength: Overload & Extend15 min
Structure: Superset format — A1 → 30s rest → A2 → 30s rest → A3 → 60s rest between rounds
3 total rounds
-
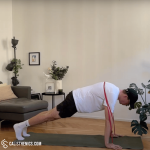
A1: Resistance Band Push-Ups – 6–8 reps
-
A2: Triceps Extensions on Parallettes – 8–10 reps
-
A3: Cobra Push-Ups – 6–8 reps
In band push-ups, focus on a fast but controlled push from the bottom—this builds power where it counts.

Muscle group:
Tips
-
Position the Band Securely: Make sure the band is positioned across your upper back, so it won’t slip or move during the exercise.
-
Engage the Core: Keep your core tight to prevent your hips from sagging, which maintains a straight body line.
-
Controlled Movements: Perform the exercise slowly and with control, especially when lowering your body to the ground.
-
Avoid Flaring Elbows: Keep your elbows at a 45-degree angle to your body to protect your shoulders and engage the chest effectively.
-
Breathing: Inhale as you lower down, and exhale as you press back up, maintaining a steady rhythm and focus.
Muscle group:
Tips
-
Keep elbows in a fixed position—only the forearms should move.
-
Start with partial range of motion if full reps feel too difficult.
-
Engage your abs and glutes like a moving plank to maintain body tension.
-
Slow the eccentric (lowering) phase to increase triceps activation.
-
Use a wall, towel, or mat to stabilize the parallette if needed.
-
Perform after push-ups or dips to isolate and burn out the triceps.

Muscle groups:
Tips
-
Maintain smooth, steady breathing, inhaling as you lower and exhaling as you press upward.
-
Gradually increase your range of motion over time as spinal flexibility improves.
-
Keep your palms evenly pressed into the floor to avoid uneven shoulder activation.
-
Engage your core and lightly activate your glutes to prevent excessive lower-back arching.
-
Start slowly, emphasizing quality over quantity or speed.
Finisher: Coordination Core5 min
Format: Alternate 30s work / 15s rest, 3 rounds
-
Mountain Climbers
-
Reverse Snow Angels
Tips
-
Core Engagement: Focus on keeping your core engaged throughout the exercise to prevent your hips from rising or sagging.
-
Controlled Breathing: Breathe steadily as you alternate legs. Exhale as you drive each knee forward, and inhale as you extend each leg back.
-
Keep the Hips Level: Avoid letting your hips move up or down too much; maintain a level position to keep the focus on your core.
-
Controlled Speed: Start with a slow, controlled pace to ensure proper form, then gradually increase your speed as you feel more stable.
-
Hand and Shoulder Alignment: Keep your hands directly under your shoulders to ensure proper alignment and avoid putting excess strain on your wrists.
Muscle group:
Tips
-
Keep Arms Straight but Not Locked: Maintain a slight bend in the elbows to reduce unnecessary joint strain.
-
Move in a Smooth, Controlled Manner: Avoid jerky or fast motions—slow, controlled reps activate muscles more effectively.
-
Focus on Squeezing the Shoulder Blades: Imagine pinching a pencil between your scapulae at the bottom of the movement.
-
Engage Your Core Throughout: Prevent excessive lumbar arching by keeping abs and glutes activated.
-
Keep a Steady Breathing Pattern: Inhale as you extend the arms forward, and exhale as you sweep them back.
-
Try Adding Light Weights for Progression: Holding small plates or wrist weights can increase resistance for added challenge.
Week 5
- Workout #9
- Workout #10
Warm-Up7 min
-
1 round: Joint warm-up routine
-
2 rounds (no rest):
-
20 sec Jumping Jacks
-
12 Plank Shoulder Taps (or Kneeling Shoulder Taps)
-
No muscle groups found for this post.
Tips
-
Move slowly and deliberately to avoid sudden movements.
-
Keep circles smooth and controlled—avoid jerky motions.
-
Breathe steadily and deeply to maximize relaxation and blood flow.
-
Gradually increase the range of motion as your joints warm up.
-
Perform each movement for 15-20 seconds, or until joints feel loosened.
-
Customize your routine slightly based on the specific demands of your workout.
Muscle groups:
Tips
-
Keep your movements light and bouncy, not stiff or stompy.
-
Maintain a steady breathing rhythm, especially in longer sets.
-
Engage your core to support posture and absorb shock.
-
Land on the balls of your feet and roll through the foot gently to protect your knees.
-
Scale the speed based on your fitness goal—slower for warm-up, faster for conditioning.
-
Stay relaxed in the shoulders and arms, avoiding unnecessary tension.
Tips
-
Core Engagement: Keep your core tight throughout the entire movement. This is key to minimizing any rotation or movement in your hips and torso as you lift each hand.
-
Hip Stability: Focus on keeping your hips level and preventing them from swaying side to side. A wider stance with your feet can provide better stability as you progress.
-
Slow and Controlled: Perform the shoulder taps slowly and with control to maximize core engagement and prevent losing form.
-
Breathing: Breathe steadily throughout the exercise. Inhale as you prepare to lift your hand, and exhale as you tap your shoulder. Controlled breathing will help stabilize your core and prevent fatigue.
Strength: Slow it Down15 min
Structure: Superset format — A1 → 30s rest → A2 → 30s rest → A3 → 60s rest between rounds
3 total rounds
-
A1: Slow Motion Push-Ups (5–6 sec lower) – 4–5 reps
-
A2: Triceps Extensions on Parallettes – 10 reps
-
A3: Incline Push-Ups (low incline) – 8–10 reps
Keep tension throughout. Don’t relax at the bottom—control the entire range.
Tips
-
Body Alignment: Keep your body in a straight line from head to heels. Engage your core and glutes to prevent your hips from dropping or rising.
-
Hand Placement: Your hands should be positioned just outside of shoulder-width for optimal stability. Moving them closer or wider will target different muscles.
-
Elbow Positioning: Keep your elbows at about a 45-degree angle from your body, not flaring out too far to avoid shoulder strain.
-
Breathing: Inhale as you lower yourself, and exhale as you push back up. Controlled breathing improves strength and endurance.
-
Controlled Movements: Lower yourself slowly to build strength, then push back up with a smooth, steady motion.
Muscle group:
Tips
-
Keep elbows in a fixed position—only the forearms should move.
-
Start with partial range of motion if full reps feel too difficult.
-
Engage your abs and glutes like a moving plank to maintain body tension.
-
Slow the eccentric (lowering) phase to increase triceps activation.
-
Use a wall, towel, or mat to stabilize the parallette if needed.
-
Perform after push-ups or dips to isolate and burn out the triceps.
Muscle groups:
Tips
-
Core Engagement: Keep your core tight to prevent your hips from sagging or rising too high. This ensures proper body alignment and protects your lower back.
-
Hand Placement: Your hands should be placed directly under your shoulders. Adjust the width based on comfort, but ensure that your elbows don’t flare out too much.
-
Body Positioning: Ensure that your body forms a straight line from your head to your heels throughout the exercise. Engage your glutes and quads to maintain this alignment.
-
Controlled Movement: Lower yourself slowly to engage your muscles fully and avoid rushing through the reps.
-
Breathing: Inhale as you lower yourself and exhale as you push back up. Proper breathing helps maintain strength and stability.
Finisher: Static & Stretch5 min
Format: 30s on / 15s off alternating, for 3 rounds
-
Elbow Plank (or Knee Plank)
-
Tabletop Hold (or Reverse Plank)
Tips
-
Straight Body Line: Ensure your body forms a straight line from your head to your heels. Avoid raising or lowering your hips too much, as this can compromise form.
-
Core Engagement: Keep your core muscles tight throughout the entire exercise. This helps stabilize your spine and prevents your hips from sagging or arching.
-
Elbow Positioning: Your elbows should be directly under your shoulders, creating a strong base of support. This will also help engage your shoulders and reduce strain.
-
Steady Breathing: Focus on controlled, deep breaths. Inhale through your nose and exhale through your mouth, which helps stabilize your core and manage endurance.
-
Avoid Tension in the Neck: Keep your neck neutral by looking down at the floor to prevent any tension or strain in the neck.
Muscle group:
Tips
-
Squeeze your glutes at the top to fully activate your posterior chain.
-
Look slightly upward to maintain neck alignment but avoid excessive tilting.
-
Engage your core to prevent lower back sagging.
-
If your wrists feel strained, try placing hands on yoga blocks or using fists instead of flat palms.
-
Perform dynamic reps by lowering and lifting the hips for added activation before holding the position statically.
Warm-Up7 min
-
1 round: Joint warm-up routine
-
2 rounds (no rest):
-
20 sec Jumping Jacks
-
12 Plank Shoulder Taps (or Kneeling Shoulder Taps)
-
No muscle groups found for this post.
Tips
-
Move slowly and deliberately to avoid sudden movements.
-
Keep circles smooth and controlled—avoid jerky motions.
-
Breathe steadily and deeply to maximize relaxation and blood flow.
-
Gradually increase the range of motion as your joints warm up.
-
Perform each movement for 15-20 seconds, or until joints feel loosened.
-
Customize your routine slightly based on the specific demands of your workout.
Muscle groups:
Tips
-
Keep your movements light and bouncy, not stiff or stompy.
-
Maintain a steady breathing rhythm, especially in longer sets.
-
Engage your core to support posture and absorb shock.
-
Land on the balls of your feet and roll through the foot gently to protect your knees.
-
Scale the speed based on your fitness goal—slower for warm-up, faster for conditioning.
-
Stay relaxed in the shoulders and arms, avoiding unnecessary tension.
Tips
-
Core Engagement: Keep your core tight throughout the entire movement. This is key to minimizing any rotation or movement in your hips and torso as you lift each hand.
-
Hip Stability: Focus on keeping your hips level and preventing them from swaying side to side. A wider stance with your feet can provide better stability as you progress.
-
Slow and Controlled: Perform the shoulder taps slowly and with control to maximize core engagement and prevent losing form.
-
Breathing: Breathe steadily throughout the exercise. Inhale as you prepare to lift your hand, and exhale as you tap your shoulder. Controlled breathing will help stabilize your core and prevent fatigue.
Strength15 min
Structure: Superset format — A1 → 30s rest → A2 → 30s rest → A3 → 60s rest between rounds
3 total rounds
-
A1: Resistance Band Push-Ups – 6–8 reps
-
A2: Bench Dips – 12–15 reps
-
A3: Cobra Push-Ups – 6–8 reps
Banded push-ups build power from mid to top. Push with intent—you’re training for unassisted reps now.
Muscle group:
Tips
-
Position the Band Securely: Make sure the band is positioned across your upper back, so it won’t slip or move during the exercise.
-
Engage the Core: Keep your core tight to prevent your hips from sagging, which maintains a straight body line.
-
Controlled Movements: Perform the exercise slowly and with control, especially when lowering your body to the ground.
-
Avoid Flaring Elbows: Keep your elbows at a 45-degree angle to your body to protect your shoulders and engage the chest effectively.
-
Breathing: Inhale as you lower down, and exhale as you press back up, maintaining a steady rhythm and focus.
Tips
-
Keep your chest lifted and shoulder blades squeezed back.
-
Move slowly and with control, especially during the lowering phase.
-
Stop when your upper arms are parallel to the ground—deeper is not better.
-
Try squeezing your triceps at the top of each rep for a stronger contraction.
-
Warm up the shoulders and triceps before performing high-rep or weighted variations.
-
Place a weight plate or dumbbell on your lap for added challenge (advanced).
Muscle groups:
Tips
-
Maintain smooth, steady breathing, inhaling as you lower and exhaling as you press upward.
-
Gradually increase your range of motion over time as spinal flexibility improves.
-
Keep your palms evenly pressed into the floor to avoid uneven shoulder activation.
-
Engage your core and lightly activate your glutes to prevent excessive lower-back arching.
-
Start slowly, emphasizing quality over quantity or speed.
Finisher: Core Rocker5 min
Format: 30s work / 15s rest alternating, 3 rounds
-
Hollow Body Rocks (or Tuck Rocks)
-
Superman Rocks (or Pulses)
Muscle group:
Tips
-
Engage Your Core Fully: Ensure your abs remain tight to maintain proper form and control throughout the movement.
-
Avoid Using Momentum: The rocking motion should come from controlled engagement of your core, not from swinging your arms or legs.
-
Press Your Lower Back Into the Floor: Keep your lower back in contact with the ground to prevent strain and maximize core engagement.
-
Start Slow: If you’re new to the exercise, perform small, controlled rocks and gradually increase the range of motion.
-
Breathe Steadily: Don’t hold your breath; steady breathing helps maintain tension and focus.
Muscle group:
Tips
-
Maintain a Strong Arch: Focus on keeping your chest and legs lifted off the ground throughout the movement. Your body should remain in a solid arch shape, with tension in your back, glutes, and shoulders.
-
Engage Your Core: Although this exercise primarily targets the posterior chain, keeping your core engaged will help stabilize your body and maintain balance during the rocking motion.
-
Controlled Movement: Avoid jerking or using momentum. The rocking should be slow and controlled, driven by muscle engagement rather than swinging
-
Breathing: Breathe steadily throughout the movement. Exhale as you rock forward and inhale as you rock backward. This will help you maintain control and endurance.
Week 6
- Workout #11
- Workout #12
Warm-Up: Form Sharpener7 min
-
1 round: Joint warm-up routine
-
2 rounds (no rest):
-
20 sec Jumping Jacks
-
12 Plank Shoulder Taps (or Kneeling Shoulder Taps)
-
No muscle groups found for this post.
Tips
-
Move slowly and deliberately to avoid sudden movements.
-
Keep circles smooth and controlled—avoid jerky motions.
-
Breathe steadily and deeply to maximize relaxation and blood flow.
-
Gradually increase the range of motion as your joints warm up.
-
Perform each movement for 15-20 seconds, or until joints feel loosened.
-
Customize your routine slightly based on the specific demands of your workout.
Muscle groups:
Tips
-
Keep your movements light and bouncy, not stiff or stompy.
-
Maintain a steady breathing rhythm, especially in longer sets.
-
Engage your core to support posture and absorb shock.
-
Land on the balls of your feet and roll through the foot gently to protect your knees.
-
Scale the speed based on your fitness goal—slower for warm-up, faster for conditioning.
-
Stay relaxed in the shoulders and arms, avoiding unnecessary tension.
Tips
-
Core Engagement: Keep your core tight throughout the entire movement. This is key to minimizing any rotation or movement in your hips and torso as you lift each hand.
-
Hip Stability: Focus on keeping your hips level and preventing them from swaying side to side. A wider stance with your feet can provide better stability as you progress.
-
Slow and Controlled: Perform the shoulder taps slowly and with control to maximize core engagement and prevent losing form.
-
Breathing: Breathe steadily throughout the exercise. Inhale as you prepare to lift your hand, and exhale as you tap your shoulder. Controlled breathing will help stabilize your core and prevent fatigue.
Strength: Max Test + Reinforce17 min
Structure:
-
Max Rep Test: Choose your highest progression (regular push-up, incline push-up, etc.)
→ Perform one max rep set with perfect form
→ Rest 2–3 minutes
Then proceed to the 3-round superset:
-
A1: Slow Motion Push-Ups (5-sec lowering, 5-sec pushing phase) – 5 reps
-
A2: Triceps Extensions on Parallettes – 8–10 reps
-
A3: Incline Push-Ups (low incline) – 8–10 reps
→ 30 sec rest between exercises, 60 sec rest between rounds
Muscle groups:
Slow motion version: 5-sec lowering, 5-sec pushing phase
Tips
-
Body Alignment: Keep your body in a straight line from head to heels. Engage your core and glutes to prevent your hips from dropping or rising.
-
Hand Placement: Your hands should be positioned just outside of shoulder-width for optimal stability. Moving them closer or wider will target different muscles.
-
Elbow Positioning: Keep your elbows at about a 45-degree angle from your body, not flaring out too far to avoid shoulder strain.
-
Breathing: Inhale as you lower yourself, and exhale as you push back up. Controlled breathing improves strength and endurance.
-
Controlled Movements: Lower yourself slowly to build strength, then push back up with a smooth, steady motion.
Muscle group:
Tips
-
Keep elbows in a fixed position—only the forearms should move.
-
Start with partial range of motion if full reps feel too difficult.
-
Engage your abs and glutes like a moving plank to maintain body tension.
-
Slow the eccentric (lowering) phase to increase triceps activation.
-
Use a wall, towel, or mat to stabilize the parallette if needed.
-
Perform after push-ups or dips to isolate and burn out the triceps.
Tips
-
Core Engagement: Keep your core tight to prevent your hips from sagging or rising too high. This ensures proper body alignment and protects your lower back.
-
Hand Placement: Your hands should be placed directly under your shoulders. Adjust the width based on comfort, but ensure that your elbows don’t flare out too much.
-
Body Positioning: Ensure that your body forms a straight line from your head to your heels throughout the exercise. Engage your glutes and quads to maintain this alignment.
-
Controlled Movement: Lower yourself slowly to engage your muscles fully and avoid rushing through the reps.
-
Breathing: Inhale as you lower yourself and exhale as you push back up. Proper breathing helps maintain strength and stability.
Finisher: Lockdown Core5 min
Format: Alternate 30s on / 15s off, 3 rounds
-
Elbow Plank (or Knee Plank)
-
Tabletop Hold (or Reverse Plank)
Tips
-
Straight Body Line: Ensure your body forms a straight line from your head to your heels. Avoid raising or lowering your hips too much, as this can compromise form.
-
Core Engagement: Keep your core muscles tight throughout the entire exercise. This helps stabilize your spine and prevents your hips from sagging or arching.
-
Elbow Positioning: Your elbows should be directly under your shoulders, creating a strong base of support. This will also help engage your shoulders and reduce strain.
-
Steady Breathing: Focus on controlled, deep breaths. Inhale through your nose and exhale through your mouth, which helps stabilize your core and manage endurance.
-
Avoid Tension in the Neck: Keep your neck neutral by looking down at the floor to prevent any tension or strain in the neck.
Muscle group:
Tips
-
Squeeze your glutes at the top to fully activate your posterior chain.
-
Look slightly upward to maintain neck alignment but avoid excessive tilting.
-
Engage your core to prevent lower back sagging.
-
If your wrists feel strained, try placing hands on yoga blocks or using fists instead of flat palms.
-
Perform dynamic reps by lowering and lifting the hips for added activation before holding the position statically.
Warm-Up: Final Activation7 min
-
1 round: Joint warm-up routine
-
2 rounds (no rest):
-
20 sec Jumping Jacks
-
12 Plank Shoulder Taps (or Kneeling Shoulder Taps)
-
No muscle groups found for this post.
Tips
-
Move slowly and deliberately to avoid sudden movements.
-
Keep circles smooth and controlled—avoid jerky motions.
-
Breathe steadily and deeply to maximize relaxation and blood flow.
-
Gradually increase the range of motion as your joints warm up.
-
Perform each movement for 15-20 seconds, or until joints feel loosened.
-
Customize your routine slightly based on the specific demands of your workout.
Muscle groups:
Tips
-
Keep your movements light and bouncy, not stiff or stompy.
-
Maintain a steady breathing rhythm, especially in longer sets.
-
Engage your core to support posture and absorb shock.
-
Land on the balls of your feet and roll through the foot gently to protect your knees.
-
Scale the speed based on your fitness goal—slower for warm-up, faster for conditioning.
-
Stay relaxed in the shoulders and arms, avoiding unnecessary tension.
Tips
-
Core Engagement: Keep your core tight throughout the entire movement. This is key to minimizing any rotation or movement in your hips and torso as you lift each hand.
-
Hip Stability: Focus on keeping your hips level and preventing them from swaying side to side. A wider stance with your feet can provide better stability as you progress.
-
Slow and Controlled: Perform the shoulder taps slowly and with control to maximize core engagement and prevent losing form.
-
Breathing: Breathe steadily throughout the exercise. Inhale as you prepare to lift your hand, and exhale as you tap your shoulder. Controlled breathing will help stabilize your core and prevent fatigue.
Strength: Controlled Volume15 min
Structure: Superset format — A1 → 30s rest → A2 → 30s rest → A3 → 60s rest between rounds
3 total rounds
-
A1: Regular Push-Ups (or Incline Push-Ups) – 5–8 reps
-
A2: Diamond Face Push-Ups – 6–8 reps
-
A3: Cobra Push-Ups – 8–10 reps
Use the hardest version of push-ups you can do with perfect form. If that’s still incline or negative, that’s totally fine—form is everything!
Muscle groups:
Tips
-
Body Alignment: Keep your body in a straight line from head to heels. Engage your core and glutes to prevent your hips from dropping or rising.
-
Hand Placement: Your hands should be positioned just outside of shoulder-width for optimal stability. Moving them closer or wider will target different muscles.
-
Elbow Positioning: Keep your elbows at about a 45-degree angle from your body, not flaring out too far to avoid shoulder strain.
-
Breathing: Inhale as you lower yourself, and exhale as you push back up. Controlled breathing improves strength and endurance.
-
Controlled Movements: Lower yourself slowly to build strength, then push back up with a smooth, steady motion.

Muscle groups:
Tips
-
Focus on Elbow Positioning: Keep your elbows close to your body during the movement to target the triceps more effectively and reduce strain on the shoulders.
-
Start with a Slight Angle: If you’re new to diamond face push-ups, start with a slight forward angle, gradually increasing the difficulty as you build strength.
-
Control the Descent: Perform the lowering phase slowly and with control to maximize muscle engagement in the triceps and shoulders.
-
Breathing: Inhale as you lower your face toward your hands, and exhale as you push back up. Proper breathing will help you maintain stability and power.
Muscle groups:
Tips
-
Maintain smooth, steady breathing, inhaling as you lower and exhaling as you press upward.
-
Gradually increase your range of motion over time as spinal flexibility improves.
-
Keep your palms evenly pressed into the floor to avoid uneven shoulder activation.
-
Engage your core and lightly activate your glutes to prevent excessive lower-back arching.
-
Start slowly, emphasizing quality over quantity or speed.
Finisher: Push Core Closer5 min
Format: 30s on / 15s rest alternating for 3 rounds
-
Mountain Climbers
-
Reverse Snow Angels
Tips
-
Core Engagement: Focus on keeping your core engaged throughout the exercise to prevent your hips from rising or sagging.
-
Controlled Breathing: Breathe steadily as you alternate legs. Exhale as you drive each knee forward, and inhale as you extend each leg back.
-
Keep the Hips Level: Avoid letting your hips move up or down too much; maintain a level position to keep the focus on your core.
-
Controlled Speed: Start with a slow, controlled pace to ensure proper form, then gradually increase your speed as you feel more stable.
-
Hand and Shoulder Alignment: Keep your hands directly under your shoulders to ensure proper alignment and avoid putting excess strain on your wrists.
Muscle group:
Tips
-
Keep Arms Straight but Not Locked: Maintain a slight bend in the elbows to reduce unnecessary joint strain.
-
Move in a Smooth, Controlled Manner: Avoid jerky or fast motions—slow, controlled reps activate muscles more effectively.
-
Focus on Squeezing the Shoulder Blades: Imagine pinching a pencil between your scapulae at the bottom of the movement.
-
Engage Your Core Throughout: Prevent excessive lumbar arching by keeping abs and glutes activated.
-
Keep a Steady Breathing Pattern: Inhale as you extend the arms forward, and exhale as you sweep them back.
-
Try Adding Light Weights for Progression: Holding small plates or wrist weights can increase resistance for added challenge.