
Horizontal Parallel Bar Push-Up
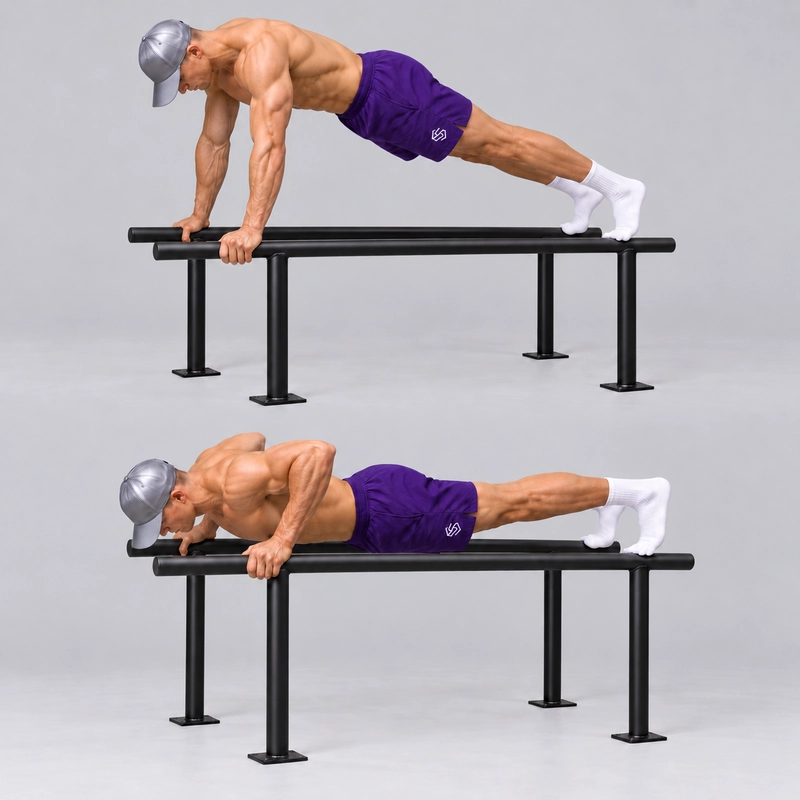
How to do Horizontal Parallel Bar Push-Up?
The horizontal parallel bar push-up is a bodyweight pressing exercise performed with the hands and feet supported at approximately the same height. On long parallel bars, grip one rail with each hand and place one foot on each rail behind you. Keep the legs straight, lower the chest between the bars, then press back to straight arms.
The open space between the rails allows the chest to descend below hand level, providing more available range of motion than a regular floor push-up. The chest, triceps and front shoulders produce the press, while the trunk and legs maintain the body line. Begin with a depth you can control and increase it gradually.
This is an equal-height version of the deficit pressing pattern. The standard deficit push-up on parallettes keeps the feet on the floor; here the feet are raised to rail height. You can reproduce the equal-height setup with stable dip bars and a separate foot platform at the same height.
A systematic review of resistance-training range of motion found small average differences generally favoring full or longer ranges, alongside effects specific to the range trained and tested. It did not establish an ideal depth for this exercise. Use the extra clearance to develop controlled movement rather than treating the deepest possible position as a requirement.
Equipment and Setup
Option 1: Long Parallel Bars
Use two fixed, level rails long enough to accommodate the distance from your hands to your feet. You need room for the chest to move between them without meeting a cross-brace, post or other obstruction.
- Hands: one on each rail, with the palms facing inward and thumbs wrapped around the bars.
- Feet: one on each rail behind the hands, using secure toe/forefoot contact. The rails support the front of the feet; this is not a heel-supported row position.
- Height: hand and foot contact points at approximately the same level.
- Spacing: rails approximately shoulder-width apart, or a little wider if needed for a comfortable pressing path. Fixed bars that are too widely spaced may be unsuitable.
- Surface: dry, grippy rails and secure footwear. Do not train on wet or slippery bars.
Check the structure and plan how you will get on and off before beginning. Use a stable access step where needed. Establish the grip and bring the feet onto the rails one at a time while remaining supported. Avoid jumping into position or continuing a set when the feet begin to slip.
Option 2: Dip Bars With an Equal-Height Foot Platform
Grip a pair of stable dip bars and place both feet on a rigid platform behind them. Match the foot-contact height to the hand-contact height. For rails around 90 cm (35.4 in) high, use a foot surface around 90 cm (35.4 in) high as well.
A fixed platform or suitable exercise box can work if it is stable under the direction of force and has a secure access route. A typical knee-height bench is too low to reproduce this setup on 90 cm bars. Use a purpose-built support of the required height rather than stacking loose furniture or weights.
Test the dip bars and platform for sliding, rocking and tipping before loading them. Position the feet so you can extend the legs without stretching for the edge, and leave a clear space for the chest between the handles. If the bars move under pressure or the foot support shifts, stop and change the equipment.
The platform version uses the same equal-height pressing pattern, but its broader foot support changes the balance task. Record it separately from feet-on-rails training when comparing results.
Readiness and Warm-Up
Build consistent floor push-ups first. Before attempting a deep repetition here, check that you can hold the straight-arm position with secure contact, steady hips and comfortable shoulders. Start with a shallow practice descent to learn the rail setup.
Use the joint warm-up routine, then perform easy push-ups and a few controlled repetitions with less depth. The warm-up should prepare you for pressing without tiring the arms.
How to Do a Horizontal Parallel Bar Push-Up
- Secure the supports. Confirm that both rails and the foot contact points remain stable. On dip bars, check that the foot platform matches the rail height.
- Take the grip. Hold one rail in each hand with the palms facing inward and the thumbs wrapped. Start with the handles beneath or slightly outside the shoulders.
- Establish the feet. Place one foot on each long rail, or both feet securely on the equal-height platform. Keep the legs straight and the contact points fixed.
- Form the top position. Extend the elbows and align the shoulders, hips and ankles. Brace the abdomen and glutes so the pelvis stays connected to the torso.
- Lower between the rails. Bend both elbows while moving the chest and hips down together. Let the elbows travel diagonally backward along a comfortable path; roughly 30–45 degrees from the torso can be a starting cue.
- Enter the additional range gradually. For the extended-range version, let the chest move below the top of the rails. Stop at the chosen depth while the shoulders remain controlled and the body line stays intact.
- Press back through the same path. Push through both hands and raise the shoulders and hips together. Keep the feet supported and avoid bouncing out of the bottom.
- Finish with straight arms. Return to controlled elbow extension without forcing hyperextension. Allow the shoulder blades to move naturally with the press.
- End and dismount deliberately. Stop before grip, foot contact or body control deteriorates. Return to the planned access point with support rather than dropping from the rails when fatigued.
Inhale as you lower and exhale as you press if that rhythm suits you. A descent of about two seconds helps you judge control. Keep breathing while maintaining enough trunk tension to prevent sagging.
How Deep Should You Go?
Begin with a small, repeatable descent below hand level. Add depth only when you can reverse the movement without a bounce, shoulder collapse or a change in body shape. The free space beneath the bars is available clearance, not a target to fill.
There is no universal number of centimeters or inches for the bottom position. Your range depends on your shoulder control, proportions, grip spacing and current training. Reduce the depth if you feel pinching or lose the ability to press out smoothly.
For consistent practice, choose a chest-depth target and check it from the side. Use the same target throughout the set. A shallower version can be useful training, but keep it separate in your log from repetitions performed through a deeper range.
What Counts as a Complete Repetition?
For the extended-range version described here, start with straight elbows, lower the chest visibly below the rail tops to your chosen depth, then press back to straight elbows.
- Both hands keep the same wrapped grip and position on the rails.
- Both feet remain securely supported at approximately hand height.
- The knees stay straight and the shoulders, hips and ankles retain a continuous body line.
- The chest and hips descend and rise together without twisting, sagging or folding at the waist.
- The bottom position is controlled and uses the same depth on each repetition.
- The bars and any separate foot platform remain stationary.
A set that stops above rail height still trains the equal-height push-up, but it does not demonstrate the below-rail range used in this page's extended-range standard. Do not count extra depth achieved by reaching with the head or dropping the shoulders while the hips remain high.
Benefits and Training Purpose
- Practice a deeper press: the chest can pass between the rails, allowing you to train a bottom position unavailable on a flat floor.
- Use a wrapped neutral grip: the handles allow the wrists to stay closer to straight than a palm-flat floor setup.
- Develop whole-body control: the trunk and legs must maintain their shape while the arms move.
- Progress a stable pressing pattern: depth, pauses, repetitions and resistance can be adjusted while keeping the same apparatus.
The grip and extra clearance offer training options; they do not guarantee pain relief or greater muscle growth than every other push-up. The useful version is one you can set up securely, perform consistently and progress.
Common Mistakes and Corrections
Placing the Feet Too Low
Measure the support heights. Feet on the floor or a low bench beneath tall dip bars create an incline setup. To practise this variation, bring the foot-contact surface approximately level with the rails.
Letting the Feet Slip or Moving Them Mid-Set
Use dry surfaces and secure contact. End the set if a foot shifts. Reset the setup before another attempt rather than trying to recover a slipping foot while pressing.
Dropping Into the Deepest Available Position
Choose less depth and control the descent. Increase range in small steps after you can press from the bottom with the same body shape.
Letting the Hips Sag or Rise First
Reset the abdomen and glutes, then lower and raise the shoulders and pelvis together. Use fewer repetitions or an easier exercise if that coordination fails.
Using the Head to Show Extra Depth
Keep the neck aligned with the torso. Judge the chest relative to the rails rather than how far the face drops between them.
Forcing an Uncomfortable Elbow Path
Guide the elbows diagonally backward and use suitable rail spacing. If fixed bars force an uncomfortable position, choose another apparatus.
Holding the Shoulder Blades Rigidly Together
Let the shoulder blades move with the descent and press. Keep the movement controlled without pinning them in one position throughout.
Finishing With Bent Elbows
Return to the same straight-arm top on each repetition. End the set when you cannot complete the press without changing depth or body alignment.
How to Make It Easier
Reduce the below-rail depth while learning the setup, and label that shallower range in your training log. For a simpler support task, use regular floor push-ups or low parallettes with the feet on the floor.
If the pressing load is too demanding, use a knee-height incline push-up or another stable hands-higher-than-feet setup. A force-platform study of push-up variations measured lower peak hand-supported forces in its hands-elevated conditions than in regular push-ups. It did not test this equal-height rail configuration, so it provides context for the incline regression rather than an exact load estimate for this exercise.
Lowering both hand and foot supports together can make access easier while retaining equal contact heights. That change alone does not reliably reduce the pressing demand; use range or a clear incline regression when you need to scale the exercise.
How to Make It Harder
First build repeatable repetitions at the same depth. Then change one variable: add a brief bottom pause, slow the descent, or increase the deficit slightly if the shoulders can control it. Keep the support heights and contact positions unchanged while judging the effect.
After mastering the unweighted version, the weighted push-up provides guidance on adding resistance. A securely fitted vest is one option if you can mount and dismount safely and the equipment is suitable for the combined load. Learn the loading method in a lower, easier-access setup first.
A ring push-up is a related alternative with independently moving hand supports. Treat it as a separate stabilization challenge rather than assuming that its repetitions are directly equivalent to fixed-bar repetitions.
Sets, Reps and Frequency
As a coaching starting point, use 2–4 sets of 5–10 controlled repetitions, resting 90 seconds to three minutes between demanding sets. Choose a depth that leaves roughly one or two clean repetitions in reserve.
Practise two or three times per week, fitting the exercise around your other demanding chest, shoulder and triceps work. If recovery or shoulder control declines, reduce the volume or use an easier variation.
When your chosen sets are repeatable over more than one session, adjust a single training variable. These are practical coaching suggestions, not validated readiness cutoffs. If you are still building basic push-up strength, follow the push-up progression guide before adding an elevated deep-range setup.
Track the Setup When Retesting
Record the hand and foot support heights, rail spacing, hand-to-foot distance, footwear, foot support type, bottom depth, tempo and any added load. A side-view recording helps verify the chest depth and whether the torso and hips move together.
Keep feet-on-rails and feet-on-platform results identifiable. Do not treat different depths, support heights or grip widths as the same test, and do not assign a fixed bodyweight percentage from the bar height alone.
Comfort and When to Stop
End the set for sharp pain, pinching, numbness, a feeling of shoulder instability, slipping contact or moving equipment. Use less depth or an easier variation for training that remains comfortable. Persistent or recurring symptoms warrant advice from a qualified healthcare professional.
Horizontal Parallel Bar Push-Up FAQ
Do both the hands and feet go on the rails?
Yes in the long-bar version: one hand and one foot on each rail, with the feet behind the hands. The alternative uses dip bars for the hands and a separate equal-height platform for the feet.
Can I use dip bars around 90 cm high?
Yes, if they are stable and suitable for the force applied. Match them with a secure foot-contact surface around 90 cm (35.4 in) high, and plan a supported way to mount and dismount.
Can I put my feet on a normal workout bench?
Only if its foot-contact surface approximately matches the hand-contact height. A typical knee-height bench beneath 90 cm dip bars places the feet lower than the hands and creates a different incline setup.
Is this a decline push-up because the feet are raised?
The feet are raised relative to the floor, but they match the hand height in this version. A decline setup places the feet higher than the hands.
Is it the same as a parallel bar dip?
No. Here the feet remain supported behind you and the body stays in a push-up position. A dip uses an upright suspended support position with the feet off the support.
How far below the bars should the chest go?
Use a modest depth that you can repeat and reverse under control. Increase it gradually; there is no universal maximum-depth target.
Is it harder than a floor push-up?
Adding below-hand depth can make the bottom portion more demanding, and rail-supported feet add a different contact task. Difficulty still depends on the depth, spacing and body control used; the height above the floor alone does not establish it.
Tips for the proper execution of Horizontal Parallel Bar Push-Up
Use stable parallel rails long enough to support your hands and feet, with clear space for the chest between them.
Place one hand and one foot on each long rail, keeping secure toe/forefoot contact behind the hands.
On dip bars, match the foot-platform height to the rail height: approximately 90 cm (35.4 in) for 90 cm bars.
Use a wrapped neutral grip with the palms facing inward and choose rail spacing that allows a comfortable elbow path.
Keep the legs straight and maintain a continuous shoulder-to-ankle line while the shoulders and hips move together.
Lower the chest between the rails while guiding the elbows diagonally backward, keeping the neck aligned with the torso.
Introduce the below-rail range gradually and use the same controlled bottom depth on every repetition.
Press back to straight elbows without bouncing, twisting or raising the hips ahead of the chest.
Allow the shoulder blades to move naturally rather than holding them rigidly squeezed together.
Plan a supported mounting and dismounting route, and stop before slipping contact, moving equipment or fatigue compromises control.
Muscles worked when doing Horizontal Parallel Bar Push-Up
The horizontal parallel bar push-up combines an upper-body press with a straight-body hold. The extra clearance allows a deeper bottom position, while the feet remain supported at approximately hand height.
Primary Pressing Muscles
- Pectoralis major: Produces much of the pressing force through movement of the upper arms.
- Triceps brachii: Extends the elbows as the body rises.
Supporting Muscles
- Anterior deltoids: Assist the press and control the upper arms through the descent.
- Serratus anterior and other shoulder-blade stabilizers: Coordinate the shoulder blades with the moving arms.
- Abdominals, obliques and spinal stabilizers: Help maintain the relationship between the ribs and pelvis.
- Glutes and quadriceps: Help keep the hips steady and the knees straight.
- Forearm and hand muscles: Maintain the wrapped grip and pressure on the rails.
- Lower-leg and foot muscles: Help maintain secure foot contact, particularly on narrow rails.
Depth changes the movement task, but this setup does not establish a precise muscle-activation advantage or isolate one section of the chest. Increase the range according to control and training goals.
Primary Muscle(s):

Middle chest

Triceps
Secondary Muscle(s):

Anterior delt

Abdominal
Equipment needed for Horizontal Parallel Bar Push-Up
No equipment found.
Adjust the difficulty of Horizontal Parallel Bar Push-Up
Reduce the below-rail depth to learn the setup, or use regular floor push-ups and incline push-ups as easier alternatives. To progress, build consistent repetitions before adding a bottom pause, slower descent, modest additional depth or securely fitted resistance. Maintain approximately equal hand and foot heights for this version. Record feet-on-rails and feet-on-platform setups separately.
How to make Horizontal Parallel Bar Push-Up harder?
How to make Horizontal Parallel Bar Push-Up easier?
How to make Horizontal Parallel Bar Push-Up harder?
To make Horizontal Parallel Bar Push-Up harder:
-
Increase the chest depth below the rails in small steps while retaining the same shoulder control, support heights and body line.
-
Pause for one to two seconds at the chosen bottom position without relaxing, bouncing or losing foot contact.
-
Take approximately three seconds to lower, then press smoothly to straight arms without changing the range or support positions.
-
Add a securely fitted weighted vest after mastering the unweighted setup and confirming that safe access and suitable equipment are available.
How to make Horizontal Parallel Bar Push-Up easier?
To make Horizontal Parallel Bar Push-Up easier:
-
Use a shallower controlled descent on the same apparatus while learning secure contact and body alignment. Record the reduced range separately.
-
Return to regular floor push-ups or low parallettes with the feet on the floor for a simpler support setup and less available deficit.
-
Perform incline push-ups with the hands higher than the feet when you need to reduce the pressing load. Treat this as a separate variation.
