
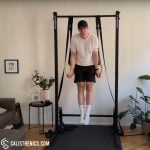
How to Dip: 6-Week Workout Plan to Get From 0 To 5 Dips
When I first started training for bodyweight dips, I quickly realized it wasn’t just about brute strength. You need control, technique, and shoulder stability, especially in the bottom position, not to mention wrist strength on rings in the top position.
That’s exactly why I built the Zero to 5 Dips plan—to guide beginners through every step of learning and earning their first 5 clean, full-range dips, whether on parallel bars or rings.
IMPORTANT‼️ Make sure you ▶️ choose the right dip bars for your workout.
How the Program is Structured
This plan is a progressive 6-week program with 2 workouts per week—each session lasting about 45–50 minutes. Every workout follows the same structure:
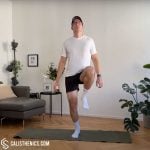
- Warm-Up (10 min): Each warm-up includes a wrist prep routine (to reduce strain and build resilience), scapula push-ups, and a rotating dynamic movement like jumping jacks, inchworms, or high knees. This activates your shoulders, warms up your joints, and sets your posture for clean pushing.
- Strength Section (25 min): Every session includes:
- A superset of one horizontal push (like push-ups) and one vertical push (like pike or decline push-ups)
- A dedicated dip progression (starting with support holds, working up to assisted dips and eventually full reps)
- Every third workout includes a bonus triceps exercise to build lockout strength
- Core Finisher (10 min): You’ll finish every session with a focused HIIT-style core workout using Tabata, EMOM, or AMRAP formats. This is where we reinforce body alignment and build the stability needed to hold a tight, controlled dip position—especially on rings.
What You Can Expect
- Build pressing strength and control across the chest, shoulders, and triceps
- Master dip mechanics step by step—from holds, shrugs, negatives, assisted, and finally full reps
- Improve wrist and shoulder health with safe, structured mobility work
- Strengthen your core to stabilize your body through every rep
By the end of 6 weeks, most people who can do 3 regular push-ups and stick to the plan can hit their first 5 strict bodyweight dips—or come very close.
Prerequisites
This plan is beginner-friendly, but not for absolute beginners. You should already be able to:
- Perform at least 3-5 clean push-ups with good form
- Have no current shoulder, elbow, or wrist injuries
- Train consistently twice per week for 6 weeks
If you’re completely new to pushing movements, I’d recommend starting with a basic push-up progression plan first.
Equipment Needed
Here’s what you need to get the most out of this program:
Required Equipment:
- Dip bars or gymnastic rings (mounted at dip height)
- A resistance band (light to medium)
- A box, bench, or parallettes
Equipment I Recommend:
- A yoga mat or padded surface for floor exercises
- A wall or doorframe for band anchoring
- Access to both rings and parallel bars (to mix stability and control)
This program is based on how I learned dips myself—through patience, consistency, and breaking the skill down into smaller wins. I’ve helped others follow this same framework, and now it’s your turn.
See you at the bottom of the dip—and back up stronger!
Week 1
- Workout #1
- Workout #2
Warm-Up10 min
Goal: Activate shoulders, warm up wrists, and mobilize the pushing chain.
Format:
-
Wrist warm-up routine – 1 round
-
2 rounds (superset format, no rest between exercises):
-
10 Scapula Push-Ups
-
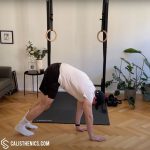
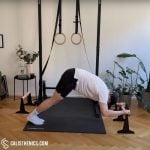
6 Inchworms with Push-Up
-


Muscle group:

Tips
-
Perform this routine before every handstand or push workout.
-
Use a soft mat or towel if your wrists are sensitive to hard surfaces.
-
Pair with scapular and shoulder prep for a complete upper-body warm-up.
-
Spread your fingers during each drill to distribute load.
-
Gradually increase range and pressure over weeks, not in one session.


Tips
-
Focus on Shoulder Blade Movement: The goal of this exercise is to isolate the movement of the scapula. Ensure your elbows remain locked and focus on squeezing and spreading your shoulder blades.
-
Core Engagement: Keep your core and glutes engaged to maintain proper body alignment and avoid unwanted movement in the hips or lower back.
-
Controlled Movements: Perform the exercise slowly and with control to fully engage the muscles of the shoulder girdle and prevent injury.
-
Breathing: Inhale as you retract your scapula (lowering your chest) and exhale as you protract your scapula (pushing through your hands and rounding your back).

Muscle group:

Tips
-
Keep your core actively engaged throughout to maintain stability and prevent excessive lower-back stress.
-
Walk your hands out progressively further as your strength and flexibility improve.
-
Focus on smooth transitions between each phase of the exercise to improve coordination and body control.
-
Use controlled breathing, matching each movement phase to inhalation and exhalation cycles.
-
Perform regularly as part of your warm-up routine to optimize flexibility, mobility, and upper-body strength.
Strength25 min
Goal: Develop basic horizontal and vertical pushing mechanics and dip position stability.
Structure:
-
Superset A (3 rounds): A1 + A2, rest 60–90 sec
-
Set B (2 rounds): Dip progression
→ Rest 60 sec between all rounds
🟦 Superset A:
-
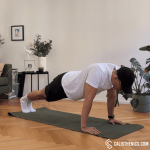
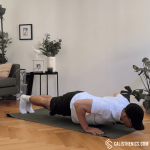
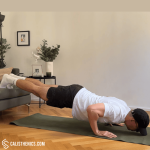
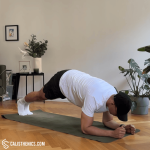
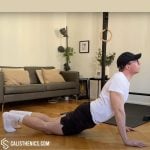
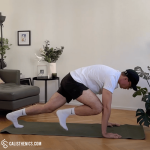
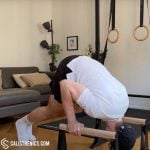
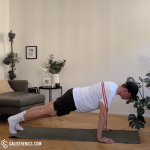
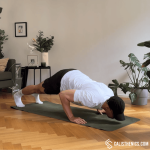
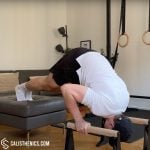
A1: Negative Push-Ups – 8–10 reps
-
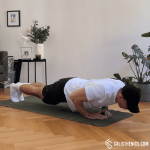
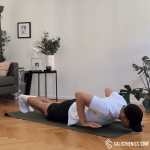
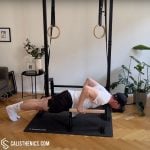
A2: Decline Push-Ups – 3–5 reps
🟩 Set B:
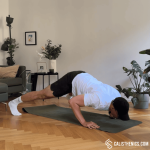
-
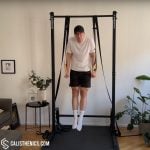
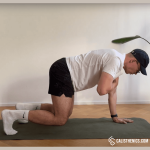
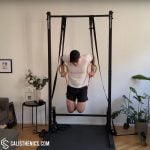
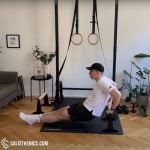
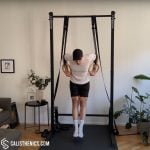
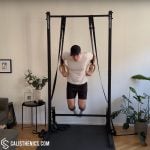
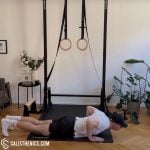
Dip Support Hold (Rings or Dip Bars) – 2 sets of 15–20 sec hold
Focus on squeezing your glutes and core during support holds—no shoulder shrugging!

Muscle group:
Tips
-
Focus on Eccentric Movement: The primary focus is on the slow lowering (eccentric) phase. Aim for 3-5 seconds of controlled lowering to maximize muscle engagement.
-
Core Engagement: Keep your core tight throughout the movement to maintain proper body alignment and prevent sagging hips.
-
Elbow Positioning: Keep your elbows close to your body or at a slight 45-degree angle. This will reduce strain on the shoulders and engage the triceps more effectively.
-
Controlled Movements: Don’t rush the descent. The slower the movement, the greater the benefit for building muscle strength.
-
Breathing: Inhale as you lower your body slowly, and exhale as you reset to the starting position.

Muscle groups:

If too difficult, do only negatives. The goal is to target the upper chest and anterior deltoids.
Tips
-
Core Engagement: Keep your core tight throughout the movement to avoid letting your lower back sag or your hips rise too high. This ensures proper body alignment.
-
Elbow Positioning: Keep your elbows close to your body (around 45 degrees) to reduce shoulder strain and engage the triceps more effectively.
-
Controlled Descent: Lower yourself slowly to maximize muscle engagement and avoid rushing through the reps.
-
Body Alignment: Ensure that your body stays in a straight line from head to heels, maintaining tension in your core and glutes to prevent sagging.
-
Breathing: Inhale as you lower your body, and exhale as you push back up. Controlled breathing helps stabilize your core and improve endurance.

Muscle group:
If you have no gymnastics rings, you can perform them on dip bars too.
Tips
-
Maintain external rotation of the rings (turn them slightly outward) to engage the shoulders properly.
-
Keep a tight core to prevent unnecessary movement.
-
Start with short holds (5-10 seconds) and progressively increase your time.
-
Use a controlled entry and exit to prevent unnecessary strain.
-
Keep the rings close to your body for better control.
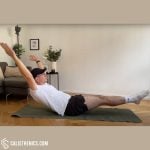
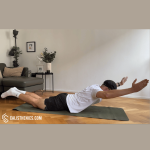
Core Burner10 min
Format: 10-minute EMOM (Every Minute on the Minute)
-
Odd Minutes: 30 sec Hollow Body Rocks
-
Even Minutes: 30 sec Arch Body Rocks
→ Rest for the remainder of each minute
Goal: Strengthen your core for better dip control and body alignment.

Muscle group:

Tips
-
Engage Your Core Fully: Ensure your abs remain tight to maintain proper form and control throughout the movement.
-
Avoid Using Momentum: The rocking motion should come from controlled engagement of your core, not from swinging your arms or legs.
-
Press Your Lower Back Into the Floor: Keep your lower back in contact with the ground to prevent strain and maximize core engagement.
-
Start Slow: If you’re new to the exercise, perform small, controlled rocks and gradually increase the range of motion.
-
Breathe Steadily: Don’t hold your breath; steady breathing helps maintain tension and focus.

Muscle group:

Tips
-
Maintain a Strong Arch: Focus on keeping your chest and legs lifted off the ground throughout the movement. Your body should remain in a solid arch shape, with tension in your back, glutes, and shoulders.
-
Engage Your Core: Although this exercise primarily targets the posterior chain, keeping your core engaged will help stabilize your body and maintain balance during the rocking motion.
-
Controlled Movement: Avoid jerking or using momentum. The rocking should be slow and controlled, driven by muscle engagement rather than swinging
-
Breathing: Breathe steadily throughout the movement. Exhale as you rock forward and inhale as you rock backward. This will help you maintain control and endurance.
Warm-Up10 min
Goal: Activate scapulae and prep shoulders/wrists for pressing.
Format:
-
Wrist warm-up routine – 1 round
-
2 rounds (superset format):
-
10 Scapula Push-Ups
-
20 sec High Knees
-
Muscle group:
Tips
-
Perform this routine before every handstand or push workout.
-
Use a soft mat or towel if your wrists are sensitive to hard surfaces.
-
Pair with scapular and shoulder prep for a complete upper-body warm-up.
-
Spread your fingers during each drill to distribute load.
-
Gradually increase range and pressure over weeks, not in one session.
Tips
-
Focus on Shoulder Blade Movement: The goal of this exercise is to isolate the movement of the scapula. Ensure your elbows remain locked and focus on squeezing and spreading your shoulder blades.
-
Core Engagement: Keep your core and glutes engaged to maintain proper body alignment and avoid unwanted movement in the hips or lower back.
-
Controlled Movements: Perform the exercise slowly and with control to fully engage the muscles of the shoulder girdle and prevent injury.
-
Breathing: Inhale as you retract your scapula (lowering your chest) and exhale as you protract your scapula (pushing through your hands and rounding your back).


Tips
-
Keep your core tight to stabilize your spine and prevent over-rotation.
-
Pump your arms naturally—elbows bent and driving in sync with your legs.
-
Look straight ahead rather than down to keep posture aligned.
-
Use a metronome or playlist with a steady beat to maintain tempo.
-
Start slow to warm up and ramp up intensity gradually.
-
Train barefoot or in minimalist shoes (on soft flooring) to improve foot strength and awareness.
Strength25 min
Goal: Build endurance and joint awareness through controlled motion and targeted isolation.
Structure:
-
Superset A (3 rounds): A1 + A2, rest 60–90 sec
-
Set B (2 rounds): Dip progression
-
Set C (2 round): Triceps finisher
→ Rest 60 sec between all rounds
🟦 Superset A:
-
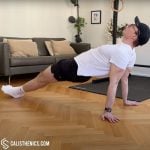
A1: Incline Push-Ups – 10–12 reps
-
A2: Hindu Push-Ups – 4 reps
🟩 Set B:
-
Dip Shrugs (Rings or Dip Bars) – 2 sets of 10 reps
🟨 Set C (Bonus):
-
Resistance Band Triceps Extensions – 15–20 reps
Shrugs may feel strange at first—focus on depressing and retracting your shoulder blades.


Muscle groups:
Tips
-
Core Engagement: Keep your core tight to prevent your hips from sagging or rising too high. This ensures proper body alignment and protects your lower back.
-
Hand Placement: Your hands should be placed directly under your shoulders. Adjust the width based on comfort, but ensure that your elbows don’t flare out too much.
-
Body Positioning: Ensure that your body forms a straight line from your head to your heels throughout the exercise. Engage your glutes and quads to maintain this alignment.
-
Controlled Movement: Lower yourself slowly to engage your muscles fully and avoid rushing through the reps.
-
Breathing: Inhale as you lower yourself and exhale as you push back up. Proper breathing helps maintain strength and stability.

Muscle groups:

Tips
-
Fluid Movements: Focus on making the movement smooth and continuous, transitioning seamlessly from the downward dog to upward dog and back.
-
Hand and Elbow Positioning: Keep your hands firmly planted and your elbows close to your body during the dive to engage your triceps and reduce strain on your shoulders.
-
Core Engagement: Keep your core tight throughout the movement to protect your lower back and maintain control.
-
Controlled Breathing: Inhale as you dive forward and exhale as you push your chest up and return to the downward dog position.
-
Flexibility: If you find it difficult to move smoothly through the range of motion, work on improving your shoulder and hip flexibility over time.

Muscle group:
Tips
-
Keep your arms completely straight throughout the movement.
-
Focus on slow, controlled repetitions rather than fast, uncontrolled movements.
-
Actively think about pressing the shoulders down as far as possible in each rep.
-
Brace your core to minimize excessive movement.
-
Gradually increase reps and sets as your strength improves.

Muscle group:
Tips
-
Secure Band Position: Ensure the band is securely anchored under your feet and doesn’t slip during the exercise.
-
Keep Elbows Pointed Up: Avoid letting your elbows drift outward; keep them close to your head to target the triceps effectively.
-
Engage the Core: Maintain core engagement to prevent arching your back as you press the band overhead.
-
Controlled Movement: Focus on a slow, controlled motion, especially when lowering the band, to keep the triceps under tension.
-
Breathe Steadily: Exhale as you extend your arms up, and inhale as you lower them back down, maintaining a steady rhythm and control.
HIIT Core Finisher10 min
Format: 10-minute TABATA (20 sec on, 10 sec off – 8 rounds alternating)
-
Hollow Body Rocks
-
Elbow Plank
Goal: Strengthen your midline for better dip alignment and stability during pushing.
Muscle group:
Tips
-
Engage Your Core Fully: Ensure your abs remain tight to maintain proper form and control throughout the movement.
-
Avoid Using Momentum: The rocking motion should come from controlled engagement of your core, not from swinging your arms or legs.
-
Press Your Lower Back Into the Floor: Keep your lower back in contact with the ground to prevent strain and maximize core engagement.
-
Start Slow: If you’re new to the exercise, perform small, controlled rocks and gradually increase the range of motion.
-
Breathe Steadily: Don’t hold your breath; steady breathing helps maintain tension and focus.


Tips
-
Straight Body Line: Ensure your body forms a straight line from your head to your heels. Avoid raising or lowering your hips too much, as this can compromise form.
-
Core Engagement: Keep your core muscles tight throughout the entire exercise. This helps stabilize your spine and prevents your hips from sagging or arching.
-
Elbow Positioning: Your elbows should be directly under your shoulders, creating a strong base of support. This will also help engage your shoulders and reduce strain.
-
Steady Breathing: Focus on controlled, deep breaths. Inhale through your nose and exhale through your mouth, which helps stabilize your core and manage endurance.
-
Avoid Tension in the Neck: Keep your neck neutral by looking down at the floor to prevent any tension or strain in the neck.
Week 2
- Workout #3
- Workout #4
Warm-Up10 min
Goal: Mobilize shoulders and activate scapulae with dynamic control.
Format:
-
Wrist warm-up routine – 1 round
-
2 rounds (superset format):
-
10 Scapula Push-Ups
-
10 Off-Knees Quadruped Shoulder Taps
-
Muscle group:
Tips
-
Perform this routine before every handstand or push workout.
-
Use a soft mat or towel if your wrists are sensitive to hard surfaces.
-
Pair with scapular and shoulder prep for a complete upper-body warm-up.
-
Spread your fingers during each drill to distribute load.
-
Gradually increase range and pressure over weeks, not in one session.
Tips
-
Focus on Shoulder Blade Movement: The goal of this exercise is to isolate the movement of the scapula. Ensure your elbows remain locked and focus on squeezing and spreading your shoulder blades.
-
Core Engagement: Keep your core and glutes engaged to maintain proper body alignment and avoid unwanted movement in the hips or lower back.
-
Controlled Movements: Perform the exercise slowly and with control to fully engage the muscles of the shoulder girdle and prevent injury.
-
Breathing: Inhale as you retract your scapula (lowering your chest) and exhale as you protract your scapula (pushing through your hands and rounding your back).

Tips
-
Core Engagement: Keep your core engaged throughout the movement to stabilize your torso and prevent your hips from swaying.
-
Minimize Hip Movement: The primary focus of this exercise is to keep your hips and torso as stable as possible. The shoulder tap should be the only movement.
-
Controlled Movement: Perform each tap slowly and with control. Avoid rushing through the exercise, as this can lead to instability and reduce its effectiveness.
-
Breathing: Exhale as you lift your hand to tap your shoulder and inhale as you return to the quadruped position. Steady breathing helps maintain focus and stability.
-
Hand and Knee Alignment: Ensure your hands are directly under your shoulders and your knees remain close to the floor throughout the exercise to maintain proper form.
Strength25 min
Goal: Build strength through volume and controlled dip patterning.
Structure:
-
Superset A (3 rounds): A1 + A2, rest 90 sec
-
Set B (2 rounds): Dip progression
-
Set C (2 round): Bonus triceps finisher
→ Rest 60–90 sec between all rounds
🟦 Superset A:
-
A1: Cobra Push-Ups – 8–10 reps
-
A2: Diamond Push-Ups – 6–8 reps
🟩 Set B:
-
Resistance Band Dips (Rings or Dip Bars) – 2 sets of 5–6 reps
🟨 Set C (Bonus):
-
Bench Dips – 15–20 reps
In the band dips, focus on a smooth descent and a powerful press-up. No bouncing at the bottom!

Muscle groups:
Tips
-
Maintain smooth, steady breathing, inhaling as you lower and exhaling as you press upward.
-
Gradually increase your range of motion over time as spinal flexibility improves.
-
Keep your palms evenly pressed into the floor to avoid uneven shoulder activation.
-
Engage your core and lightly activate your glutes to prevent excessive lower-back arching.
-
Start slowly, emphasizing quality over quantity or speed.

Muscle groups:
Tips
-
Elbow Positioning: Keep your elbows close to your body throughout the movement to emphasize the triceps. Flaring the elbows out will reduce the focus on the triceps and increase shoulder strain.
-
Hand Placement: Make sure your hands form a firm diamond shape, but adjust them slightly outward if you experience wrist discomfort.
-
Core Engagement: Maintain a tight core and straight body line to prevent sagging hips or arched lower back.
-
Controlled Movements: Perform the exercise slowly and with control, especially during the lowering phase, to maximize muscle engagement.
-
Breathing: Inhale as you lower your body, and exhale as you push back up.

Tips
-
Choose a band with just enough assistance—not too strong, not too weak.
-
Control your descent for at least 3-5 seconds to build eccentric strength.
-
Keep your body tight and avoid excessive movement to maintain stability.
-
Keep the rings close to your torso throughout the movement.
-
Gradually decrease band assistance as you gain strength.
-
Focus on a full range of motion—avoid stopping too high in the dip.
-
Engage your core to prevent swinging or loss of balance.

Tips
-
Keep your chest lifted and shoulder blades squeezed back.
-
Move slowly and with control, especially during the lowering phase.
-
Stop when your upper arms are parallel to the ground—deeper is not better.
-
Try squeezing your triceps at the top of each rep for a stronger contraction.
-
Warm up the shoulders and triceps before performing high-rep or weighted variations.
-
Place a weight plate or dumbbell on your lap for added challenge (advanced).
HIIT Core Finisher – “Plank & Burn”10 min
Format: 10-minute EMOM
-
Odd Minutes: 30 sec Mountain Climbers
-
Even Minutes: 30 sec Elbow Plank Hold
→ Use the remaining seconds each minute to rest. Maintain perfect posture.

Tips
-
Core Engagement: Focus on keeping your core engaged throughout the exercise to prevent your hips from rising or sagging.
-
Controlled Breathing: Breathe steadily as you alternate legs. Exhale as you drive each knee forward, and inhale as you extend each leg back.
-
Keep the Hips Level: Avoid letting your hips move up or down too much; maintain a level position to keep the focus on your core.
-
Controlled Speed: Start with a slow, controlled pace to ensure proper form, then gradually increase your speed as you feel more stable.
-
Hand and Shoulder Alignment: Keep your hands directly under your shoulders to ensure proper alignment and avoid putting excess strain on your wrists.
Tips
-
Straight Body Line: Ensure your body forms a straight line from your head to your heels. Avoid raising or lowering your hips too much, as this can compromise form.
-
Core Engagement: Keep your core muscles tight throughout the entire exercise. This helps stabilize your spine and prevents your hips from sagging or arching.
-
Elbow Positioning: Your elbows should be directly under your shoulders, creating a strong base of support. This will also help engage your shoulders and reduce strain.
-
Steady Breathing: Focus on controlled, deep breaths. Inhale through your nose and exhale through your mouth, which helps stabilize your core and manage endurance.
-
Avoid Tension in the Neck: Keep your neck neutral by looking down at the floor to prevent any tension or strain in the neck.
Warm-Up10 min
Goal: Prep wrists and activate deep core/shoulder stabilizers.
Format:
-
Wrist warm-up routine – 1 round
-
2 rounds (superset format):
-
10 Scapula Push-Ups
-
20 sec Jumping Jacks
-
Muscle group:
Tips
-
Perform this routine before every handstand or push workout.
-
Use a soft mat or towel if your wrists are sensitive to hard surfaces.
-
Pair with scapular and shoulder prep for a complete upper-body warm-up.
-
Spread your fingers during each drill to distribute load.
-
Gradually increase range and pressure over weeks, not in one session.
Tips
-
Focus on Shoulder Blade Movement: The goal of this exercise is to isolate the movement of the scapula. Ensure your elbows remain locked and focus on squeezing and spreading your shoulder blades.
-
Core Engagement: Keep your core and glutes engaged to maintain proper body alignment and avoid unwanted movement in the hips or lower back.
-
Controlled Movements: Perform the exercise slowly and with control to fully engage the muscles of the shoulder girdle and prevent injury.
-
Breathing: Inhale as you retract your scapula (lowering your chest) and exhale as you protract your scapula (pushing through your hands and rounding your back).

Muscle groups:


Tips
-
Keep your movements light and bouncy, not stiff or stompy.
-
Maintain a steady breathing rhythm, especially in longer sets.
-
Engage your core to support posture and absorb shock.
-
Land on the balls of your feet and roll through the foot gently to protect your knees.
-
Scale the speed based on your fitness goal—slower for warm-up, faster for conditioning.
-
Stay relaxed in the shoulders and arms, avoiding unnecessary tension.
Strength25 min
Goal: Strengthen full-body pushing and dip control with stronger lockouts.
Structure:
-
Superset A (3 rounds): A1 + A2, rest 90 sec
-
Set B (2 rounds): Dip progression
→ Rest 60–90 sec between all rounds
🟦 Superset A:
-
A1: Hand Release Push-Ups – 8 reps
-
A2: Pike Push-Ups – 6 reps
🟩 Set B:
-
Resistance Band Dips (Rings or Dip Bars) – 2 sets of 6–7 reps
Add a 1–2 second pause at the bottom of the dip to improve strength and control.

Muscle groups:
Tips
-
Full Body Control: Engage your core and glutes to maintain a straight line from your head to your heels during both the lowering and lifting phases.
-
Elbow Positioning: Keep your elbows close to your body to reduce shoulder strain and to focus on the triceps and chest.
-
Hand Release Focus: Ensure you fully lift your hands off the ground at the bottom of each rep to reset and engage the muscles from the start of each push-up.
-
Breathing: Inhale as you lower yourself, and exhale as you push back up. Controlled breathing helps maintain stability and power throughout the movement.
-
Consistent Tempo: Perform the movement slowly and with control, focusing on the full range of motion rather than rushing through the reps.

Muscle groups:
Tips
-
Focus on the Tripod Position: Always ensure the head lowers between the hands to form the correct triangle shape.
-
Keep Hips High: The higher the hips, the more vertical the pressing angle, making the exercise more effective.
-
Press the Head Through at the Top: This ensures full range of motion and activates the shoulders completely.
-
Engage Your Core: Keep the abs tight to prevent an excessive arch in the lower back.
-
Use a Slow, Controlled Tempo: Aim for a 3-4 second descent and a strong, controlled press back up.
-
Gradually Increase Range of Motion: Start with shallow reps if necessary and work towards a full deep push-up.
Muscle group:
Tips
-
Choose a band with just enough assistance—not too strong, not too weak.
-
Control your descent for at least 3-5 seconds to build eccentric strength.
-
Keep your body tight and avoid excessive movement to maintain stability.
-
Keep the rings close to your torso throughout the movement.
-
Gradually decrease band assistance as you gain strength.
-
Focus on a full range of motion—avoid stopping too high in the dip.
-
Engage your core to prevent swinging or loss of balance.
HIIT Core Finisher10 min
Format: 10-minute TABATA (20s on, 10s off x 8 rounds alternating)
-
Arch Body Rocks
-
Reverse Plank Hold
→ Fight for clean form, especially on the reverse plank—lift your chest and squeeze your glutes!
Muscle group:
Tips
-
Maintain a Strong Arch: Focus on keeping your chest and legs lifted off the ground throughout the movement. Your body should remain in a solid arch shape, with tension in your back, glutes, and shoulders.
-
Engage Your Core: Although this exercise primarily targets the posterior chain, keeping your core engaged will help stabilize your body and maintain balance during the rocking motion.
-
Controlled Movement: Avoid jerking or using momentum. The rocking should be slow and controlled, driven by muscle engagement rather than swinging
-
Breathing: Breathe steadily throughout the movement. Exhale as you rock forward and inhale as you rock backward. This will help you maintain control and endurance.


Tips
-
Engage your core and glutes strongly to stabilize the body and maintain straight alignment.
-
Practice pointing toes and flexing quads to enhance full-body tension.
-
Keep your gaze upward or forward rather than downward to maintain better alignment.
-
Use parallettes if experiencing wrist discomfort, allowing for neutral wrist positioning.
-
Gradually increase hold duration to improve strength, endurance, and mobility safely.
Week 3
- Workout #5
- Workout #6
Warm-Up10 min
Goal: Prep the shoulders, wrists, and scapulae for eccentric control.
Format:
-
Wrist warm-up routine – 1 round
-
2 rounds (superset format):
-
10 Scapula Push-Ups
-
6 High Knees (each leg)
-
Muscle group:
Tips
-
Perform this routine before every handstand or push workout.
-
Use a soft mat or towel if your wrists are sensitive to hard surfaces.
-
Pair with scapular and shoulder prep for a complete upper-body warm-up.
-
Spread your fingers during each drill to distribute load.
-
Gradually increase range and pressure over weeks, not in one session.
Tips
-
Focus on Shoulder Blade Movement: The goal of this exercise is to isolate the movement of the scapula. Ensure your elbows remain locked and focus on squeezing and spreading your shoulder blades.
-
Core Engagement: Keep your core and glutes engaged to maintain proper body alignment and avoid unwanted movement in the hips or lower back.
-
Controlled Movements: Perform the exercise slowly and with control to fully engage the muscles of the shoulder girdle and prevent injury.
-
Breathing: Inhale as you retract your scapula (lowering your chest) and exhale as you protract your scapula (pushing through your hands and rounding your back).
Tips
-
Keep your core tight to stabilize your spine and prevent over-rotation.
-
Pump your arms naturally—elbows bent and driving in sync with your legs.
-
Look straight ahead rather than down to keep posture aligned.
-
Use a metronome or playlist with a steady beat to maintain tempo.
-
Start slow to warm up and ramp up intensity gradually.
-
Train barefoot or in minimalist shoes (on soft flooring) to improve foot strength and awareness.
Strength25 minutes
Goal: Build vertical pushing strength by controlling the descent of the dip and reinforcing full pushing capacity.
Structure:
-
Superset A (3 rounds): A1 + A2, rest 90 sec
-
Set B (2 rounds): Dip progression
-
Set C (1 round): Triceps finisher
→ Rest 60–90 sec between all rounds
🟦 Superset A:
-
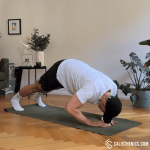
A1: Slow Motion Push-Ups (5 sec down, 1 sec hold, fast up) – 6–8 reps
-
A2: Pike Push-Ups – 6 reps
🟩 Set B:
-
Negative Dips (Rings or Dip Bars) – 2 sets of 3–5 reps (3–5 sec lower)
🟨 Set C:
-
Diamond Face Push-Ups – 8–10 reps
Focus on technique in every rep. In negative dips, control the entire descent—don’t drop fast at the bottom.
Tips
-
Body Alignment: Keep your body in a straight line from head to heels. Engage your core and glutes to prevent your hips from dropping or rising.
-
Hand Placement: Your hands should be positioned just outside of shoulder-width for optimal stability. Moving them closer or wider will target different muscles.
-
Elbow Positioning: Keep your elbows at about a 45-degree angle from your body, not flaring out too far to avoid shoulder strain.
-
Breathing: Inhale as you lower yourself, and exhale as you push back up. Controlled breathing improves strength and endurance.
-
Controlled Movements: Lower yourself slowly to build strength, then push back up with a smooth, steady motion.
Muscle groups:
Tips
-
Focus on the Tripod Position: Always ensure the head lowers between the hands to form the correct triangle shape.
-
Keep Hips High: The higher the hips, the more vertical the pressing angle, making the exercise more effective.
-
Press the Head Through at the Top: This ensures full range of motion and activates the shoulders completely.
-
Engage Your Core: Keep the abs tight to prevent an excessive arch in the lower back.
-
Use a Slow, Controlled Tempo: Aim for a 3-4 second descent and a strong, controlled press back up.
-
Gradually Increase Range of Motion: Start with shallow reps if necessary and work towards a full deep push-up.

Muscle group:
Tips
-
Aim for a 3-5 second descent per repetition for maximum strength gains.
-
Maintain external rotation of the rings (slight outward turn) to protect the shoulders.
-
Focus on quality over quantity—4-6 well-controlled reps are better than 10 rushed ones.
-
Keep the core tight and legs slightly in front to prevent excessive swinging.
-
If full range of motion is difficult, use foot assistance or perform partial negatives before progressing.
-
Gradually work toward slower descents as you gain strength.

Muscle groups:
Tips
-
Focus on Elbow Positioning: Keep your elbows close to your body during the movement to target the triceps more effectively and reduce strain on the shoulders.
-
Start with a Slight Angle: If you’re new to diamond face push-ups, start with a slight forward angle, gradually increasing the difficulty as you build strength.
-
Control the Descent: Perform the lowering phase slowly and with control to maximize muscle engagement in the triceps and shoulders.
-
Breathing: Inhale as you lower your face toward your hands, and exhale as you push back up. Proper breathing will help you maintain stability and power.
HIIT Core Finisher10 min
Format: 10-minute AMRAP (As Many Rounds As Possible)
-
10 Mountain Climbers
-
30 sec Elbow Plank Hold
→ Aim for 5–6 controlled rounds with perfect core bracing.
Tips
-
Core Engagement: Focus on keeping your core engaged throughout the exercise to prevent your hips from rising or sagging.
-
Controlled Breathing: Breathe steadily as you alternate legs. Exhale as you drive each knee forward, and inhale as you extend each leg back.
-
Keep the Hips Level: Avoid letting your hips move up or down too much; maintain a level position to keep the focus on your core.
-
Controlled Speed: Start with a slow, controlled pace to ensure proper form, then gradually increase your speed as you feel more stable.
-
Hand and Shoulder Alignment: Keep your hands directly under your shoulders to ensure proper alignment and avoid putting excess strain on your wrists.
Tips
-
Straight Body Line: Ensure your body forms a straight line from your head to your heels. Avoid raising or lowering your hips too much, as this can compromise form.
-
Core Engagement: Keep your core muscles tight throughout the entire exercise. This helps stabilize your spine and prevents your hips from sagging or arching.
-
Elbow Positioning: Your elbows should be directly under your shoulders, creating a strong base of support. This will also help engage your shoulders and reduce strain.
-
Steady Breathing: Focus on controlled, deep breaths. Inhale through your nose and exhale through your mouth, which helps stabilize your core and manage endurance.
-
Avoid Tension in the Neck: Keep your neck neutral by looking down at the floor to prevent any tension or strain in the neck.
Warm-Up10 min
Goal: Fire up the core and pressing muscles dynamically.
Format:
-
Wrist warm-up routine – 1 round
-
2 rounds (superset format):
-
10 Scapula Push-Ups
-
10 Off-Knees Quadruped Shoulder Taps
-
Muscle group:
Tips
-
Perform this routine before every handstand or push workout.
-
Use a soft mat or towel if your wrists are sensitive to hard surfaces.
-
Pair with scapular and shoulder prep for a complete upper-body warm-up.
-
Spread your fingers during each drill to distribute load.
-
Gradually increase range and pressure over weeks, not in one session.
Tips
-
Focus on Shoulder Blade Movement: The goal of this exercise is to isolate the movement of the scapula. Ensure your elbows remain locked and focus on squeezing and spreading your shoulder blades.
-
Core Engagement: Keep your core and glutes engaged to maintain proper body alignment and avoid unwanted movement in the hips or lower back.
-
Controlled Movements: Perform the exercise slowly and with control to fully engage the muscles of the shoulder girdle and prevent injury.
-
Breathing: Inhale as you retract your scapula (lowering your chest) and exhale as you protract your scapula (pushing through your hands and rounding your back).
Tips
-
Core Engagement: Keep your core engaged throughout the movement to stabilize your torso and prevent your hips from swaying.
-
Minimize Hip Movement: The primary focus of this exercise is to keep your hips and torso as stable as possible. The shoulder tap should be the only movement.
-
Controlled Movement: Perform each tap slowly and with control. Avoid rushing through the exercise, as this can lead to instability and reduce its effectiveness.
-
Breathing: Exhale as you lift your hand to tap your shoulder and inhale as you return to the quadruped position. Steady breathing helps maintain focus and stability.
-
Hand and Knee Alignment: Ensure your hands are directly under your shoulders and your knees remain close to the floor throughout the exercise to maintain proper form.
Strength25 min
Goal: Practice dip mechanics with feet assistance, while increasing pushing and triceps volume.
Structure:
-
Superset A (3 rounds): A1 + A2, rest 90 sec
-
Set B (2 rounds): Dip progression
-
Set C (2 rounds): Bonus triceps finisher
→ Rest 60–90 sec between all rounds
🟦 Superset A:
-
A1: Resistance Band Push-Ups – 6–8 reps
-
A2: Dive Bomber Push-Ups – 3-5 reps
🟩 Set B:
-
Feet-Assisted Dips (Rings or Dip Bars) – 2 sets of 6–8 reps
🟨 Set C:
-
Triceps Extensions on Parallettes or Bench – 8-10 reps
Focus on controlled full ROM in the dips. Keep shoulders packed, elbows tracking behind you.

Muscle group:
Tips
-
Position the Band Securely: Make sure the band is positioned across your upper back, so it won’t slip or move during the exercise.
-
Engage the Core: Keep your core tight to prevent your hips from sagging, which maintains a straight body line.
-
Controlled Movements: Perform the exercise slowly and with control, especially when lowering your body to the ground.
-
Avoid Flaring Elbows: Keep your elbows at a 45-degree angle to your body to protect your shoulders and engage the chest effectively.
-
Breathing: Inhale as you lower down, and exhale as you press back up, maintaining a steady rhythm and focus.

Muscle groups:
Tips
-
Smooth Transitions: Focus on making the transition from the downward dog to upward dog and back as smooth as possible. Avoid jerky movements.
-
Elbow Positioning: Keep your elbows close to your body during the descent to engage the triceps and protect the shoulders from strain.
-
Core Engagement: Keep your core tight throughout the movement to protect your lower back and maintain proper form.
-
Breathing Control: Inhale as you sweep your body down and forward, and exhale as you push back into the downward dog position.
-
Flexibility: Work on flexibility, especially in the shoulders, chest, and hips, as the movement requires a good range of motion in these areas.

Muscle group:
Tips
-
Use Minimal Leg Assistance: The goal is to train your upper body, not rely too much on your legs.
-
Maintain a Hollow Body Position: Keep your core engaged and legs slightly in front of you for better control.
-
Move Slowly and Deliberately: 3-4 second descents and 1-2 second pauses at the bottom increase strength gains.
-
Keep the Rings Close to Your Body: This helps with stability and prevents excessive shoulder strain.
-
Practice Static Holds: Holding at the bottom or top position improves control and endurance.
-
Gradually Reduce Assistance: Over time, decrease the weight you place on your feet to transition toward strict dips.

Muscle group:
Tips
-
Keep elbows in a fixed position—only the forearms should move.
-
Start with partial range of motion if full reps feel too difficult.
-
Engage your abs and glutes like a moving plank to maintain body tension.
-
Slow the eccentric (lowering) phase to increase triceps activation.
-
Use a wall, towel, or mat to stabilize the parallette if needed.
-
Perform after push-ups or dips to isolate and burn out the triceps.
HIIT Core Finisher 10 min
Format: 10-minute TABATA (20s on, 10s off x 8 rounds alternating)
-
Hollow Body Rocks
-
Burpees
→ Push the burpees hard; keep the rocks tight and controlled.
Muscle group:
Tips
-
Engage Your Core Fully: Ensure your abs remain tight to maintain proper form and control throughout the movement.
-
Avoid Using Momentum: The rocking motion should come from controlled engagement of your core, not from swinging your arms or legs.
-
Press Your Lower Back Into the Floor: Keep your lower back in contact with the ground to prevent strain and maximize core engagement.
-
Start Slow: If you’re new to the exercise, perform small, controlled rocks and gradually increase the range of motion.
-
Breathe Steadily: Don’t hold your breath; steady breathing helps maintain tension and focus.

Muscle groups:
Tips
-
Keep your core tight during the plank and push-up to protect your back.
-
Land softly with bent knees to absorb shock during the jump.
-
Exhale during the jump to maintain rhythm and breathing control.
-
Warm up your wrists and shoulders—burpees place repeated impact on them.
-
Set a tempo or use a timer to pace your reps and avoid burnout too early.
-
Scale volume appropriately—burpees are deceptively demanding and fatigue builds fast.
Week 4
- Workout #7
- Workout #8
Warm-Up10 min
Goal: Open up the chest and shoulders, activate wrist and scapular stabilizers.
Format:
-
Wrist warm-up routine – 1 round
-
2 rounds (superset format):
-
10 Scapula Push-Ups
-
20 sec Jumping Jacks
-
Muscle group:
Tips
-
Perform this routine before every handstand or push workout.
-
Use a soft mat or towel if your wrists are sensitive to hard surfaces.
-
Pair with scapular and shoulder prep for a complete upper-body warm-up.
-
Spread your fingers during each drill to distribute load.
-
Gradually increase range and pressure over weeks, not in one session.
Tips
-
Focus on Shoulder Blade Movement: The goal of this exercise is to isolate the movement of the scapula. Ensure your elbows remain locked and focus on squeezing and spreading your shoulder blades.
-
Core Engagement: Keep your core and glutes engaged to maintain proper body alignment and avoid unwanted movement in the hips or lower back.
-
Controlled Movements: Perform the exercise slowly and with control to fully engage the muscles of the shoulder girdle and prevent injury.
-
Breathing: Inhale as you retract your scapula (lowering your chest) and exhale as you protract your scapula (pushing through your hands and rounding your back).
Muscle groups:
Tips
-
Keep your movements light and bouncy, not stiff or stompy.
-
Maintain a steady breathing rhythm, especially in longer sets.
-
Engage your core to support posture and absorb shock.
-
Land on the balls of your feet and roll through the foot gently to protect your knees.
-
Scale the speed based on your fitness goal—slower for warm-up, faster for conditioning.
-
Stay relaxed in the shoulders and arms, avoiding unnecessary tension.
Strength25 min
Goal: Build stability at the weakest point of the dip: the bottom position.
Structure:
-
Superset A (3 rounds): A1 + A2, rest 90 sec
-
Set B (2 rounds): Dip progression
→ Rest 60–90 sec between all rounds
🟦 Superset A:
-
A1: Slow Motion Push-Ups – 6–8 reps (7 sec down, 1 sec pause, fast up)
-
A2: Pike Push-Ups – 7 reps
🟩 Set B:
-
Feet-Assisted Dips with 2-sec pause at bottom – 2 sets of 5–6 reps
The pause adds intensity—don’t rush out of the hole. Stay tight through your whole body.
Tips
-
Body Alignment: Keep your body in a straight line from head to heels. Engage your core and glutes to prevent your hips from dropping or rising.
-
Hand Placement: Your hands should be positioned just outside of shoulder-width for optimal stability. Moving them closer or wider will target different muscles.
-
Elbow Positioning: Keep your elbows at about a 45-degree angle from your body, not flaring out too far to avoid shoulder strain.
-
Breathing: Inhale as you lower yourself, and exhale as you push back up. Controlled breathing improves strength and endurance.
-
Controlled Movements: Lower yourself slowly to build strength, then push back up with a smooth, steady motion.
Muscle groups:
Tips
-
Focus on the Tripod Position: Always ensure the head lowers between the hands to form the correct triangle shape.
-
Keep Hips High: The higher the hips, the more vertical the pressing angle, making the exercise more effective.
-
Press the Head Through at the Top: This ensures full range of motion and activates the shoulders completely.
-
Engage Your Core: Keep the abs tight to prevent an excessive arch in the lower back.
-
Use a Slow, Controlled Tempo: Aim for a 3-4 second descent and a strong, controlled press back up.
-
Gradually Increase Range of Motion: Start with shallow reps if necessary and work towards a full deep push-up.
Muscle group:
Tips
-
Use Minimal Leg Assistance: The goal is to train your upper body, not rely too much on your legs.
-
Maintain a Hollow Body Position: Keep your core engaged and legs slightly in front of you for better control.
-
Move Slowly and Deliberately: 3-4 second descents and 1-2 second pauses at the bottom increase strength gains.
-
Keep the Rings Close to Your Body: This helps with stability and prevents excessive shoulder strain.
-
Practice Static Holds: Holding at the bottom or top position improves control and endurance.
-
Gradually Reduce Assistance: Over time, decrease the weight you place on your feet to transition toward strict dips.
HIIT Core Finisher – “Climb & Hold”10 min
Format: 10-minute EMOM
-
Odd Minutes: 20 Mountain Climbers + 10 Hollow Body Rocks
-
Even Minutes: 30 sec Reverse Plank Hold
→ Focus on posture and breathing. This is a full-body burn.
Tips
-
Core Engagement: Focus on keeping your core engaged throughout the exercise to prevent your hips from rising or sagging.
-
Controlled Breathing: Breathe steadily as you alternate legs. Exhale as you drive each knee forward, and inhale as you extend each leg back.
-
Keep the Hips Level: Avoid letting your hips move up or down too much; maintain a level position to keep the focus on your core.
-
Controlled Speed: Start with a slow, controlled pace to ensure proper form, then gradually increase your speed as you feel more stable.
-
Hand and Shoulder Alignment: Keep your hands directly under your shoulders to ensure proper alignment and avoid putting excess strain on your wrists.
Muscle group:
Tips
-
Engage Your Core Fully: Ensure your abs remain tight to maintain proper form and control throughout the movement.
-
Avoid Using Momentum: The rocking motion should come from controlled engagement of your core, not from swinging your arms or legs.
-
Press Your Lower Back Into the Floor: Keep your lower back in contact with the ground to prevent strain and maximize core engagement.
-
Start Slow: If you’re new to the exercise, perform small, controlled rocks and gradually increase the range of motion.
-
Breathe Steadily: Don’t hold your breath; steady breathing helps maintain tension and focus.
Tips
-
Engage your core and glutes strongly to stabilize the body and maintain straight alignment.
-
Practice pointing toes and flexing quads to enhance full-body tension.
-
Keep your gaze upward or forward rather than downward to maintain better alignment.
-
Use parallettes if experiencing wrist discomfort, allowing for neutral wrist positioning.
-
Gradually increase hold duration to improve strength, endurance, and mobility safely.
Warm-Up10 min
Goal: Activate chest, triceps, and posterior shoulders.
Format:
-
Wrist warm-up routine – 1 round
-
2 rounds (superset format):
-
10 Scapula Push-Ups
-
20 sec High Knees
-
Muscle group:
Tips
-
Perform this routine before every handstand or push workout.
-
Use a soft mat or towel if your wrists are sensitive to hard surfaces.
-
Pair with scapular and shoulder prep for a complete upper-body warm-up.
-
Spread your fingers during each drill to distribute load.
-
Gradually increase range and pressure over weeks, not in one session.
Tips
-
Focus on Shoulder Blade Movement: The goal of this exercise is to isolate the movement of the scapula. Ensure your elbows remain locked and focus on squeezing and spreading your shoulder blades.
-
Core Engagement: Keep your core and glutes engaged to maintain proper body alignment and avoid unwanted movement in the hips or lower back.
-
Controlled Movements: Perform the exercise slowly and with control to fully engage the muscles of the shoulder girdle and prevent injury.
-
Breathing: Inhale as you retract your scapula (lowering your chest) and exhale as you protract your scapula (pushing through your hands and rounding your back).
Tips
-
Keep your core tight to stabilize your spine and prevent over-rotation.
-
Pump your arms naturally—elbows bent and driving in sync with your legs.
-
Look straight ahead rather than down to keep posture aligned.
-
Use a metronome or playlist with a steady beat to maintain tempo.
-
Start slow to warm up and ramp up intensity gradually.
-
Train barefoot or in minimalist shoes (on soft flooring) to improve foot strength and awareness.
Strength25 min
Goal: Build pushing strength across horizontal and vertical planes, then isolate the triceps to improve lockout power.
Structure:
-
Superset A (3 rounds): A1 + A2, rest 90 sec
-
Set B (2 rounds): Dip progression
-
Set C (1 round): Bonus triceps set
→ Rest 60–90 sec between all rounds
🟦 Superset A:
-
A1: Resistance Band Push-Ups – 6–8 reps
-
A2: Dive Bomber Push-Ups – 5 reps
🟩 Set B:
-
Feet-Assisted Dips (Rings or Dip Bars) – 2 sets of 7–8 reps
🟨 Set C (Bonus – Triceps Combo):
-
Triceps Extensions on Parallettes – 8–10 reps
-
Bench Dips – Max reps (aim for 12–15)
Push hard here—your triceps are what finishes each dip rep. Lock out cleanly, no flaring elbows.
Muscle group:
Tips
-
Position the Band Securely: Make sure the band is positioned across your upper back, so it won’t slip or move during the exercise.
-
Engage the Core: Keep your core tight to prevent your hips from sagging, which maintains a straight body line.
-
Controlled Movements: Perform the exercise slowly and with control, especially when lowering your body to the ground.
-
Avoid Flaring Elbows: Keep your elbows at a 45-degree angle to your body to protect your shoulders and engage the chest effectively.
-
Breathing: Inhale as you lower down, and exhale as you press back up, maintaining a steady rhythm and focus.
Muscle groups:
Tips
-
Smooth Transitions: Focus on making the transition from the downward dog to upward dog and back as smooth as possible. Avoid jerky movements.
-
Elbow Positioning: Keep your elbows close to your body during the descent to engage the triceps and protect the shoulders from strain.
-
Core Engagement: Keep your core tight throughout the movement to protect your lower back and maintain proper form.
-
Breathing Control: Inhale as you sweep your body down and forward, and exhale as you push back into the downward dog position.
-
Flexibility: Work on flexibility, especially in the shoulders, chest, and hips, as the movement requires a good range of motion in these areas.
Muscle group:
Tips
-
Use Minimal Leg Assistance: The goal is to train your upper body, not rely too much on your legs.
-
Maintain a Hollow Body Position: Keep your core engaged and legs slightly in front of you for better control.
-
Move Slowly and Deliberately: 3-4 second descents and 1-2 second pauses at the bottom increase strength gains.
-
Keep the Rings Close to Your Body: This helps with stability and prevents excessive shoulder strain.
-
Practice Static Holds: Holding at the bottom or top position improves control and endurance.
-
Gradually Reduce Assistance: Over time, decrease the weight you place on your feet to transition toward strict dips.
Muscle group:
Tips
-
Keep elbows in a fixed position—only the forearms should move.
-
Start with partial range of motion if full reps feel too difficult.
-
Engage your abs and glutes like a moving plank to maintain body tension.
-
Slow the eccentric (lowering) phase to increase triceps activation.
-
Use a wall, towel, or mat to stabilize the parallette if needed.
-
Perform after push-ups or dips to isolate and burn out the triceps.
Tips
-
Keep your chest lifted and shoulder blades squeezed back.
-
Move slowly and with control, especially during the lowering phase.
-
Stop when your upper arms are parallel to the ground—deeper is not better.
-
Try squeezing your triceps at the top of each rep for a stronger contraction.
-
Warm up the shoulders and triceps before performing high-rep or weighted variations.
-
Place a weight plate or dumbbell on your lap for added challenge (advanced).
HIIT Core Finisher AMRAP10 min
Format: 10-minute AMRAP
-
5 Burpees
-
30 sec Elbow Plank
→ Max quality rounds in 10 minutes
Muscle groups:
Tips
-
Keep your core tight during the plank and push-up to protect your back.
-
Land softly with bent knees to absorb shock during the jump.
-
Exhale during the jump to maintain rhythm and breathing control.
-
Warm up your wrists and shoulders—burpees place repeated impact on them.
-
Set a tempo or use a timer to pace your reps and avoid burnout too early.
-
Scale volume appropriately—burpees are deceptively demanding and fatigue builds fast.
Tips
-
Straight Body Line: Ensure your body forms a straight line from your head to your heels. Avoid raising or lowering your hips too much, as this can compromise form.
-
Core Engagement: Keep your core muscles tight throughout the entire exercise. This helps stabilize your spine and prevents your hips from sagging or arching.
-
Elbow Positioning: Your elbows should be directly under your shoulders, creating a strong base of support. This will also help engage your shoulders and reduce strain.
-
Steady Breathing: Focus on controlled, deep breaths. Inhale through your nose and exhale through your mouth, which helps stabilize your core and manage endurance.
-
Avoid Tension in the Neck: Keep your neck neutral by looking down at the floor to prevent any tension or strain in the neck.
Week 5
- Workout #9
- Workout #10
Warm-Up10 min
Goal: Prime the body for slower pushing tempo and scapular retraction.
Format:
-
Wrist warm-up routine – 1 round
-
2 rounds (superset format):
-
10 Scapula Push-Ups
-
6 Inchworms with Push-Up
-
Muscle group:
Tips
-
Perform this routine before every handstand or push workout.
-
Use a soft mat or towel if your wrists are sensitive to hard surfaces.
-
Pair with scapular and shoulder prep for a complete upper-body warm-up.
-
Spread your fingers during each drill to distribute load.
-
Gradually increase range and pressure over weeks, not in one session.
Tips
-
Focus on Shoulder Blade Movement: The goal of this exercise is to isolate the movement of the scapula. Ensure your elbows remain locked and focus on squeezing and spreading your shoulder blades.
-
Core Engagement: Keep your core and glutes engaged to maintain proper body alignment and avoid unwanted movement in the hips or lower back.
-
Controlled Movements: Perform the exercise slowly and with control to fully engage the muscles of the shoulder girdle and prevent injury.
-
Breathing: Inhale as you retract your scapula (lowering your chest) and exhale as you protract your scapula (pushing through your hands and rounding your back).
Muscle group:
Tips
-
Keep your core actively engaged throughout to maintain stability and prevent excessive lower-back stress.
-
Walk your hands out progressively further as your strength and flexibility improve.
-
Focus on smooth transitions between each phase of the exercise to improve coordination and body control.
-
Use controlled breathing, matching each movement phase to inhalation and exhalation cycles.
-
Perform regularly as part of your warm-up routine to optimize flexibility, mobility, and upper-body strength.
Strength25 min
Goal: Build high-quality pushing strength and refine control in the bottom range of the dip.
Structure:
-
Superset A (3 rounds): A1 + A2, rest 90 sec
-
Set B (2 rounds): Dip progression
→ Rest 60–90 sec between all rounds
🟦 Superset A:
-
A1: Slow Motion Push-Ups – 5–6 reps (5 sec down, 2 sec pause, explode up)
-
A2: Pike Push-Ups with Elevated Feet – 6 reps
🟩 Set B:
-
Negative Dips – 2 sets of 3–4 reps (5–6 sec lower, aim to go deeper)
Control every inch of the descent. Finish every push-up and dip with a full elbow lockout.
Tips
-
Body Alignment: Keep your body in a straight line from head to heels. Engage your core and glutes to prevent your hips from dropping or rising.
-
Hand Placement: Your hands should be positioned just outside of shoulder-width for optimal stability. Moving them closer or wider will target different muscles.
-
Elbow Positioning: Keep your elbows at about a 45-degree angle from your body, not flaring out too far to avoid shoulder strain.
-
Breathing: Inhale as you lower yourself, and exhale as you push back up. Controlled breathing improves strength and endurance.
-
Controlled Movements: Lower yourself slowly to build strength, then push back up with a smooth, steady motion.

Muscle groups:
Tips
-
Keep your hips high and stacked over your shoulders to maximize vertical pressing mechanics.
-
Slow down the eccentric (lowering) phase, aiming for at least 3-5 seconds per repetition.
-
Maintain external rotation at the shoulders, actively pressing into the parallettes for better stability.
-
Engage your core throughout the entire movement to avoid unnecessary swinging or instability.
-
Gradually increase the elevation height of your feet as strength improves.
-
Pause at the bottom for 1-2 seconds to enhance strength development and improve control.
-
Aim to fully press your head through your arms at the top position, achieving proper overhead alignment.
Muscle group:
Tips
-
Aim for a 3-5 second descent per repetition for maximum strength gains.
-
Maintain external rotation of the rings (slight outward turn) to protect the shoulders.
-
Focus on quality over quantity—4-6 well-controlled reps are better than 10 rushed ones.
-
Keep the core tight and legs slightly in front to prevent excessive swinging.
-
If full range of motion is difficult, use foot assistance or perform partial negatives before progressing.
-
Gradually work toward slower descents as you gain strength.
HIIT Core Finisher – TABATA10 min
Format: 10-minute TABATA (20s on / 10s off – 8 rounds alternating)
-
Hollow Body Rocks
-
Mountain Climbers
→ Keep the core tight through the fatigue!
Muscle group:
Tips
-
Engage Your Core Fully: Ensure your abs remain tight to maintain proper form and control throughout the movement.
-
Avoid Using Momentum: The rocking motion should come from controlled engagement of your core, not from swinging your arms or legs.
-
Press Your Lower Back Into the Floor: Keep your lower back in contact with the ground to prevent strain and maximize core engagement.
-
Start Slow: If you’re new to the exercise, perform small, controlled rocks and gradually increase the range of motion.
-
Breathe Steadily: Don’t hold your breath; steady breathing helps maintain tension and focus.
Tips
-
Core Engagement: Focus on keeping your core engaged throughout the exercise to prevent your hips from rising or sagging.
-
Controlled Breathing: Breathe steadily as you alternate legs. Exhale as you drive each knee forward, and inhale as you extend each leg back.
-
Keep the Hips Level: Avoid letting your hips move up or down too much; maintain a level position to keep the focus on your core.
-
Controlled Speed: Start with a slow, controlled pace to ensure proper form, then gradually increase your speed as you feel more stable.
-
Hand and Shoulder Alignment: Keep your hands directly under your shoulders to ensure proper alignment and avoid putting excess strain on your wrists.
Warm-Up10 min
Goal: Wake up triceps and prime vertical pushing mechanics.
Format:
-
Wrist warm-up routine – 1 round
-
2 rounds (superset format):
-
10 Scapula Push-Ups
-
10 Jumping Jacks
-
Muscle group:
Tips
-
Perform this routine before every handstand or push workout.
-
Use a soft mat or towel if your wrists are sensitive to hard surfaces.
-
Pair with scapular and shoulder prep for a complete upper-body warm-up.
-
Spread your fingers during each drill to distribute load.
-
Gradually increase range and pressure over weeks, not in one session.
Tips
-
Focus on Shoulder Blade Movement: The goal of this exercise is to isolate the movement of the scapula. Ensure your elbows remain locked and focus on squeezing and spreading your shoulder blades.
-
Core Engagement: Keep your core and glutes engaged to maintain proper body alignment and avoid unwanted movement in the hips or lower back.
-
Controlled Movements: Perform the exercise slowly and with control to fully engage the muscles of the shoulder girdle and prevent injury.
-
Breathing: Inhale as you retract your scapula (lowering your chest) and exhale as you protract your scapula (pushing through your hands and rounding your back).
Muscle groups:
Tips
-
Keep your movements light and bouncy, not stiff or stompy.
-
Maintain a steady breathing rhythm, especially in longer sets.
-
Engage your core to support posture and absorb shock.
-
Land on the balls of your feet and roll through the foot gently to protect your knees.
-
Scale the speed based on your fitness goal—slower for warm-up, faster for conditioning.
-
Stay relaxed in the shoulders and arms, avoiding unnecessary tension.
Strength25 min
Goal: Build strength with minimal assistance and reinforce full elbow extension.
Structure:
-
Superset A (3 rounds): A1 + A2, rest 90 sec
-
Set B (2 rounds): Dip progression
-
Set C (1 round): Triceps finisher
→ Rest 60–90 sec between all rounds
🟦 Superset A:
-
A1: Resistance Band Push-Ups – 6–8 reps
-
A2: Diamond Push-Ups – 8–10 reps
🟩 Set B:
-
Feet-Assisted Dips – 2 sets of 6–8 reps (reduce leg assistance as much as possible on the way up and try to lower yourself without assistance)
🟨 Set C (Bonus – Triceps Overload):
-
Triceps Extensions on Parallettes – 8–10 reps
-
Diamond Face Push-Ups – Max reps (aim for 10–12)
Elbow lockout is the focus here—don’t stop short at the top of any dip or push-up.
Muscle group:
Tips
-
Position the Band Securely: Make sure the band is positioned across your upper back, so it won’t slip or move during the exercise.
-
Engage the Core: Keep your core tight to prevent your hips from sagging, which maintains a straight body line.
-
Controlled Movements: Perform the exercise slowly and with control, especially when lowering your body to the ground.
-
Avoid Flaring Elbows: Keep your elbows at a 45-degree angle to your body to protect your shoulders and engage the chest effectively.
-
Breathing: Inhale as you lower down, and exhale as you press back up, maintaining a steady rhythm and focus.
Muscle groups:
Tips
-
Elbow Positioning: Keep your elbows close to your body throughout the movement to emphasize the triceps. Flaring the elbows out will reduce the focus on the triceps and increase shoulder strain.
-
Hand Placement: Make sure your hands form a firm diamond shape, but adjust them slightly outward if you experience wrist discomfort.
-
Core Engagement: Maintain a tight core and straight body line to prevent sagging hips or arched lower back.
-
Controlled Movements: Perform the exercise slowly and with control, especially during the lowering phase, to maximize muscle engagement.
-
Breathing: Inhale as you lower your body, and exhale as you push back up.
Muscle group:
Reduce leg assistance as much as possible on the way up and try to lower yourself without assistance.
Tips
-
Use Minimal Leg Assistance: The goal is to train your upper body, not rely too much on your legs.
-
Maintain a Hollow Body Position: Keep your core engaged and legs slightly in front of you for better control.
-
Move Slowly and Deliberately: 3-4 second descents and 1-2 second pauses at the bottom increase strength gains.
-
Keep the Rings Close to Your Body: This helps with stability and prevents excessive shoulder strain.
-
Practice Static Holds: Holding at the bottom or top position improves control and endurance.
-
Gradually Reduce Assistance: Over time, decrease the weight you place on your feet to transition toward strict dips.
Muscle group:
Tips
-
Keep elbows in a fixed position—only the forearms should move.
-
Start with partial range of motion if full reps feel too difficult.
-
Engage your abs and glutes like a moving plank to maintain body tension.
-
Slow the eccentric (lowering) phase to increase triceps activation.
-
Use a wall, towel, or mat to stabilize the parallette if needed.
-
Perform after push-ups or dips to isolate and burn out the triceps.
Muscle groups:
Tips
-
Focus on Elbow Positioning: Keep your elbows close to your body during the movement to target the triceps more effectively and reduce strain on the shoulders.
-
Start with a Slight Angle: If you’re new to diamond face push-ups, start with a slight forward angle, gradually increasing the difficulty as you build strength.
-
Control the Descent: Perform the lowering phase slowly and with control to maximize muscle engagement in the triceps and shoulders.
-
Breathing: Inhale as you lower your face toward your hands, and exhale as you push back up. Proper breathing will help you maintain stability and power.
HIIT Core Finisher – “Posterior Chain Punisher”10 min
Format: 10-minute EMOM
-
Minute 1: 30 sec Arch Body Rocks
-
Minute 2: 30 sec Reverse Plank Hold
→ Focus on full-body tension, from glutes to shoulders.
Muscle group:
Tips
-
Maintain a Strong Arch: Focus on keeping your chest and legs lifted off the ground throughout the movement. Your body should remain in a solid arch shape, with tension in your back, glutes, and shoulders.
-
Engage Your Core: Although this exercise primarily targets the posterior chain, keeping your core engaged will help stabilize your body and maintain balance during the rocking motion.
-
Controlled Movement: Avoid jerking or using momentum. The rocking should be slow and controlled, driven by muscle engagement rather than swinging
-
Breathing: Breathe steadily throughout the movement. Exhale as you rock forward and inhale as you rock backward. This will help you maintain control and endurance.
Tips
-
Engage your core and glutes strongly to stabilize the body and maintain straight alignment.
-
Practice pointing toes and flexing quads to enhance full-body tension.
-
Keep your gaze upward or forward rather than downward to maintain better alignment.
-
Use parallettes if experiencing wrist discomfort, allowing for neutral wrist positioning.
-
Gradually increase hold duration to improve strength, endurance, and mobility safely.
Week 6
- Workout #11
- Workout #12
Warm-Up – “Test Prep Circuit”10 min
Goal: Wake up shoulders, activate the pushing chain, and mentally prep for peak effort.
Format:
-
Wrist warm-up routine – 1 round
-
2 rounds (superset format):
-
10 Scapula Push-Ups
-
12 High Knees
-
Muscle group:
Tips
-
Perform this routine before every handstand or push workout.
-
Use a soft mat or towel if your wrists are sensitive to hard surfaces.
-
Pair with scapular and shoulder prep for a complete upper-body warm-up.
-
Spread your fingers during each drill to distribute load.
-
Gradually increase range and pressure over weeks, not in one session.
Tips
-
Focus on Shoulder Blade Movement: The goal of this exercise is to isolate the movement of the scapula. Ensure your elbows remain locked and focus on squeezing and spreading your shoulder blades.
-
Core Engagement: Keep your core and glutes engaged to maintain proper body alignment and avoid unwanted movement in the hips or lower back.
-
Controlled Movements: Perform the exercise slowly and with control to fully engage the muscles of the shoulder girdle and prevent injury.
-
Breathing: Inhale as you retract your scapula (lowering your chest) and exhale as you protract your scapula (pushing through your hands and rounding your back).
Tips
-
Keep your core tight to stabilize your spine and prevent over-rotation.
-
Pump your arms naturally—elbows bent and driving in sync with your legs.
-
Look straight ahead rather than down to keep posture aligned.
-
Use a metronome or playlist with a steady beat to maintain tempo.
-
Start slow to warm up and ramp up intensity gradually.
-
Train barefoot or in minimalist shoes (on soft flooring) to improve foot strength and awareness.
Strength – “Measure & Build”25 min
Goal: Test your dip level, then reinforce the mechanics with strength-focused progressions.
Structure:
-
Dip Strength Test
-
Superset A (3 rounds): A1 + A2, rest 90 sec
-
Set B (2 rounds): Control-focused dips
→ Rest 60–90 sec between all rounds
✅ Dip Strength Test:
→ Max reps at your current level:
-
Unassisted dips
-
Band-assisted dips
-
Feet-assisted dips
Record your result. This is your new benchmark.
🟦 Superset A:
-
A1: Pseudo Planche Push-Ups – 6–8 reps
-
A2: Dive Bomber Push-Ups – 6 reps
🟩 Set B:
-
Negative Dips (very slow: 5–6 sec) – 2 sets of 3–4 reps
Keep form strict: chest upright, core tight, elbows close.

Muscle groups:
Tips
-
Lean forward more to increase difficulty and better mimic planche mechanics.
-
Keep toes pointed and legs together to improve body alignment.
-
Use a slow eccentric phase (3-5 seconds down) to build more time under tension.
-
Experiment with wider and narrower parallettes placement to target different muscle engagement.
-
If feeling wrist discomfort, adjust grip angle slightly on the parallettes for better comfort.
Muscle groups:
Tips
-
Smooth Transitions: Focus on making the transition from the downward dog to upward dog and back as smooth as possible. Avoid jerky movements.
-
Elbow Positioning: Keep your elbows close to your body during the descent to engage the triceps and protect the shoulders from strain.
-
Core Engagement: Keep your core tight throughout the movement to protect your lower back and maintain proper form.
-
Breathing Control: Inhale as you sweep your body down and forward, and exhale as you push back into the downward dog position.
-
Flexibility: Work on flexibility, especially in the shoulders, chest, and hips, as the movement requires a good range of motion in these areas.
Tips
-
Maintain external rotation of the rings (turn them slightly outward) at the top for better shoulder engagement.
-
Keep your core braced and legs slightly forward to minimize unnecessary movement.
-
Lower yourself slowly to increase control and muscle activation.
-
Avoid locking your elbows harshly at the top; fully extend but maintain slight tension.
-
Start with fewer reps and prioritize form over quantity.
-
If new to ring dips, master the ring support hold and ring shrugs before progressing.
Muscle group:
Tips
-
Aim for a 3-5 second descent per repetition for maximum strength gains.
-
Maintain external rotation of the rings (slight outward turn) to protect the shoulders.
-
Focus on quality over quantity—4-6 well-controlled reps are better than 10 rushed ones.
-
Keep the core tight and legs slightly in front to prevent excessive swinging.
-
If full range of motion is difficult, use foot assistance or perform partial negatives before progressing.
-
Gradually work toward slower descents as you gain strength.
HIIT Core Finisher – “Push & Plank Burnout”10 min
Format: 10-minute TABATA (20s on, 10s off x 8 rounds alternating)
-
Burpees
-
Elbow Plank
This one’s about stamina and stability—go hard on the burpees, stay calm in the plank.
Muscle groups:
Tips
-
Keep your core tight during the plank and push-up to protect your back.
-
Land softly with bent knees to absorb shock during the jump.
-
Exhale during the jump to maintain rhythm and breathing control.
-
Warm up your wrists and shoulders—burpees place repeated impact on them.
-
Set a tempo or use a timer to pace your reps and avoid burnout too early.
-
Scale volume appropriately—burpees are deceptively demanding and fatigue builds fast.
Tips
-
Straight Body Line: Ensure your body forms a straight line from your head to your heels. Avoid raising or lowering your hips too much, as this can compromise form.
-
Core Engagement: Keep your core muscles tight throughout the entire exercise. This helps stabilize your spine and prevents your hips from sagging or arching.
-
Elbow Positioning: Your elbows should be directly under your shoulders, creating a strong base of support. This will also help engage your shoulders and reduce strain.
-
Steady Breathing: Focus on controlled, deep breaths. Inhale through your nose and exhale through your mouth, which helps stabilize your core and manage endurance.
-
Avoid Tension in the Neck: Keep your neck neutral by looking down at the floor to prevent any tension or strain in the neck.
Warm-Up 10 min
Goal: Mobilize joints and activate the entire pushing chain for max effort.
Format:
-
Wrist warm-up routine – 1 round
-
2 rounds (superset format):
-
10 Scapula Push-Ups
-
20 sec Jumping Jacks
-
Muscle group:
Tips
-
Perform this routine before every handstand or push workout.
-
Use a soft mat or towel if your wrists are sensitive to hard surfaces.
-
Pair with scapular and shoulder prep for a complete upper-body warm-up.
-
Spread your fingers during each drill to distribute load.
-
Gradually increase range and pressure over weeks, not in one session.
Tips
-
Focus on Shoulder Blade Movement: The goal of this exercise is to isolate the movement of the scapula. Ensure your elbows remain locked and focus on squeezing and spreading your shoulder blades.
-
Core Engagement: Keep your core and glutes engaged to maintain proper body alignment and avoid unwanted movement in the hips or lower back.
-
Controlled Movements: Perform the exercise slowly and with control to fully engage the muscles of the shoulder girdle and prevent injury.
-
Breathing: Inhale as you retract your scapula (lowering your chest) and exhale as you protract your scapula (pushing through your hands and rounding your back).
Muscle groups:
Tips
-
Keep your movements light and bouncy, not stiff or stompy.
-
Maintain a steady breathing rhythm, especially in longer sets.
-
Engage your core to support posture and absorb shock.
-
Land on the balls of your feet and roll through the foot gently to protect your knees.
-
Scale the speed based on your fitness goal—slower for warm-up, faster for conditioning.
-
Stay relaxed in the shoulders and arms, avoiding unnecessary tension.
Strength – “Final Flight”25 min
Goal: Perform your most advanced dip progression, lock in technique, and push endurance.
Structure:
-
Superset A (3 rounds): A1 + A2, rest 90 sec
-
Set B (2 rounds): Dip progression
-
Set C (1 round): Final triceps burnout
→ Rest 60–90 sec between all rounds
🟦 Superset A:
-
A1: Resistance Band Push-Ups – 6–8 reps
-
A2: Pike Push-Ups with Elevated Feet – 6 reps
🟩 Set B:
-
Choose your highest level dip variation:
→ Regular Dips – 2 sets of 3–5 reps
→ Feet-Assisted Dips – 2 sets of 6–8 reps
→ Band-Assisted Dips – 2 sets of 5–7 reps
🟨 Set C – Final Triceps Burnout:
-
Triceps Extensions on Parallettes – Max reps
-
Bench Dips – Max reps
You’ve got nothing to lose here—go hard, go clean.
Muscle group:
Tips
-
Position the Band Securely: Make sure the band is positioned across your upper back, so it won’t slip or move during the exercise.
-
Engage the Core: Keep your core tight to prevent your hips from sagging, which maintains a straight body line.
-
Controlled Movements: Perform the exercise slowly and with control, especially when lowering your body to the ground.
-
Avoid Flaring Elbows: Keep your elbows at a 45-degree angle to your body to protect your shoulders and engage the chest effectively.
-
Breathing: Inhale as you lower down, and exhale as you press back up, maintaining a steady rhythm and focus.
Muscle groups:
Tips
-
Keep your hips high and stacked over your shoulders to maximize vertical pressing mechanics.
-
Slow down the eccentric (lowering) phase, aiming for at least 3-5 seconds per repetition.
-
Maintain external rotation at the shoulders, actively pressing into the parallettes for better stability.
-
Engage your core throughout the entire movement to avoid unnecessary swinging or instability.
-
Gradually increase the elevation height of your feet as strength improves.
-
Pause at the bottom for 1-2 seconds to enhance strength development and improve control.
-
Aim to fully press your head through your arms at the top position, achieving proper overhead alignment.
Muscle group:
Choose your highest level dip variation:
→ Regular Dips – 2 sets of 3–5 reps
→ Feet-Assisted Dips – 2 sets of 6–8 reps
→ Band-Assisted Dips – 2 sets of 5–7 reps
Tips
-
Maintain external rotation of the rings (turn them slightly outward) at the top for better shoulder engagement.
-
Keep your core braced and legs slightly forward to minimize unnecessary movement.
-
Lower yourself slowly to increase control and muscle activation.
-
Avoid locking your elbows harshly at the top; fully extend but maintain slight tension.
-
Start with fewer reps and prioritize form over quantity.
-
If new to ring dips, master the ring support hold and ring shrugs before progressing.
Muscle group:
Tips
-
Keep elbows in a fixed position—only the forearms should move.
-
Start with partial range of motion if full reps feel too difficult.
-
Engage your abs and glutes like a moving plank to maintain body tension.
-
Slow the eccentric (lowering) phase to increase triceps activation.
-
Use a wall, towel, or mat to stabilize the parallette if needed.
-
Perform after push-ups or dips to isolate and burn out the triceps.
Tips
-
Keep your chest lifted and shoulder blades squeezed back.
-
Move slowly and with control, especially during the lowering phase.
-
Stop when your upper arms are parallel to the ground—deeper is not better.
-
Try squeezing your triceps at the top of each rep for a stronger contraction.
-
Warm up the shoulders and triceps before performing high-rep or weighted variations.
-
Place a weight plate or dumbbell on your lap for added challenge (advanced).
HIIT Core Finisher – “Hollow Drive Finale”10 min
Format: 10-minute AMRAP
-
10 Hollow Body Rocks
-
30 sec Reverse Plank Hold
→ Max rounds with perfect form
Muscle group:
Tips
-
Engage Your Core Fully: Ensure your abs remain tight to maintain proper form and control throughout the movement.
-
Avoid Using Momentum: The rocking motion should come from controlled engagement of your core, not from swinging your arms or legs.
-
Press Your Lower Back Into the Floor: Keep your lower back in contact with the ground to prevent strain and maximize core engagement.
-
Start Slow: If you’re new to the exercise, perform small, controlled rocks and gradually increase the range of motion.
-
Breathe Steadily: Don’t hold your breath; steady breathing helps maintain tension and focus.
Tips
-
Engage your core and glutes strongly to stabilize the body and maintain straight alignment.
-
Practice pointing toes and flexing quads to enhance full-body tension.
-
Keep your gaze upward or forward rather than downward to maintain better alignment.
-
Use parallettes if experiencing wrist discomfort, allowing for neutral wrist positioning.
-
Gradually increase hold duration to improve strength, endurance, and mobility safely.