
How to Pull-Up: 6-Week Workout Plan to Achieve Your First 5 Strict Pull-Ups
When I first started calisthenics, pull-ups felt impossible to do. It's the signature exercise of bodyweight training, and I felt so bad for not being able to do a single one. I remember hanging from the bar, swinging helplessly, wondering how anyone could lift themselves so effortlessly.
But with the right structure, a bit of patience, and consistent effort, I went from zero to five strict pull-ups—and I’ve since helped many beginners do the same.
If you’re just starting out and want to build the strength and technique to conquer your first five pull-ups, here’s the complete guide I wish I had when I began.
Foundational Strength Building
Before you try to muscle your way through a pull-up, it’s crucial to develop the muscles that support the movement—especially your back, biceps, shoulders, and grip.
Start with these foundational exercises:
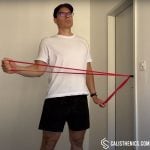
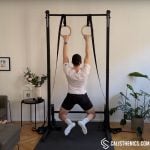
• 👉 Active to Passive Hangs
Hang from a pull-up bar and alternate between an active hang (shoulders pulled down, lats engaged) and a passive hang (shoulders relaxed). This teaches shoulder stability and grip endurance.
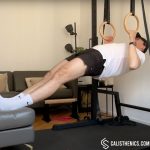
• 👉 Body Rows (Inverted Rows)
Use a low bar or rings. Keep your body straight like a plank and pull your chest toward the bar. Adjust your body angle to control difficulty—more horizontal means harder.
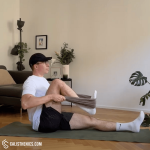
• 👉 Seated Pull-Ups
Sit under a low bar, use your legs for assistance, and pull yourself up. Focus on using your upper body while keeping your motion smooth and controlled.
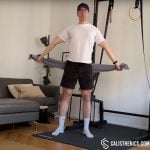
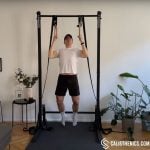
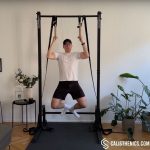
• 👉 Assisted Pull-Ups
Use resistance bands or a pull-up machine to offload some of your bodyweight. The goal is to mimic the full range of motion with proper technique.
Technique and Consistency
Getting stronger is one thing—but mastering the technique of the pull-up is what will make your reps smooth, efficient, and injury-free.
• ✅ Hollow Body Form:
Engage your core, glutes, and quads. Keep your ribs tucked and avoid swinging—this creates a stable foundation.
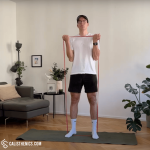
• ✅ Grip Training:
Don’t neglect your grip. Dead hangs, towel hangs, or farmer’s carries can massively boost your hold strength.
• ✅ Be Consistent:
Whether you’re progressing fast or slow, the key is to keep showing up. Sprinkle in technique work even outside your main workouts—hangs, rows, or negatives every couple of days can go a long way.
• ✅ Progressive Overload:
Slowly increase difficulty. Reduce assistance, add reps, or eventually add weight with a vest or backpack when ready.
Equipment I Recommend
Here’s what helped me (and many of my clients) train effectively at home or in the park:
• Pull-Up Bar: Wall-mounted, doorway, or outdoor—just make sure it’s sturdy.
• Resistance Bands: Essential for scaling difficulty and making progress.
• Gymnastic Rings: Great for rows, dips, and even pull-up variations that challenge stabilizers.
• Weighted Vest or Backpack: For when you’re repping out 5+ pull-ups and want to keep progressing.
Workout Plan Structure
Each workout includes:
- Warm-Up (~8–10 min)
- Strength Training (~20–25 min)
- Cash Out / HIIT Finisher (~10 min)
Each workout features 3 strength exercises:
- 1 Horizontal Pull
- 1 Vertical Pull
- 1 Accessory Exercise
Week 1 – Foundation Begins
- Workout #1
- Workout #2
Warm-Up10 min
“Towel Wake-Up Call”
Goal: Activate the muscles involved in pulling and shoulder stabilization.
Format: Circuit – 2 rounds, no rest between exercises or rounds
•30 sec Mountain Climbers
•15x Towel Bent Over Rows
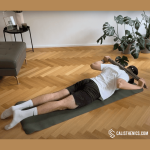
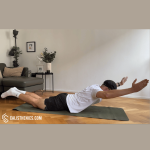
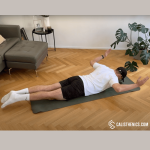
•12x Superman Towel Rows
These exercises will get your heart rate up while waking up your lats, scapula, and posterior chain. Focus on smooth, controlled movements—especially during the towel rows.


No muscle groups found for this post.
Tips
-
Move slowly and deliberately to avoid sudden movements.
-
Keep circles smooth and controlled—avoid jerky motions.
-
Breathe steadily and deeply to maximize relaxation and blood flow.
-
Gradually increase the range of motion as your joints warm up.
-
Perform each movement for 15-20 seconds, or until joints feel loosened.
-
Customize your routine slightly based on the specific demands of your workout.


Tips
-
Core Engagement: Focus on keeping your core engaged throughout the exercise to prevent your hips from rising or sagging.
-
Controlled Breathing: Breathe steadily as you alternate legs. Exhale as you drive each knee forward, and inhale as you extend each leg back.
-
Keep the Hips Level: Avoid letting your hips move up or down too much; maintain a level position to keep the focus on your core.
-
Controlled Speed: Start with a slow, controlled pace to ensure proper form, then gradually increase your speed as you feel more stable.
-
Hand and Shoulder Alignment: Keep your hands directly under your shoulders to ensure proper alignment and avoid putting excess strain on your wrists.


Tips
-
Keep Your Back Flat – Avoid rounding your spine by keeping your chest up and core engaged.
-
Control the Resistance – In self-resisted rows, make sure your non-working arm provides enough tension.
-
Squeeze the Shoulder Blades – This maximizes back muscle activation.
-
Use a Sturdy Anchor – If using an anchored towel, ensure it won’t slip or loosen.
-
Focus on squeezing your shoulder blades: This will help activate the target muscles and ensure proper form.
-
Maintain a Slight Knee Bend – This helps stabilize your position and prevent lower back strain.

Muscle groups:

Tips
-
Keep Constant Tension on the Towel: Actively pull outward to engage shoulders and upper back more effectively.
-
Lift Your Chest Slightly for Full Activation: Avoid lying completely flat—slight elevation increases muscle engagement.
-
Slow Down the Movement: Take 3-4 seconds to extend the arms back out, increasing time under tension.
-
Breathe Properly: Inhale when extending the arms, exhale when pulling the towel toward the chest.
-
Engage the Glutes & Core: Maintain a tight posterior chain to stabilize the movement.
-
Use a Thicker Towel or Band for Added Resistance: This helps increase muscle engagement and pulling endurance.
Strength25 min
Goal: Develop initial strength and coordination in horizontal and vertical pulling patterns, using full support from the ground.
Structure:
•Superset A (3 rounds): Perform A1 + A2 back-to-back, rest 60 sec
•Set B (2 sets): Perform on its own, rest 45 sec
🟦 Superset A:
•A1: Towel Seated Rows – 15 reps
•A2: Lying Towel Pulldown – 12 reps
→ Rest 60 sec after each superset
🟩 Set B:
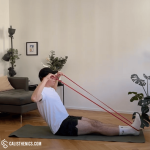
•Resistance Band Face Pulls (or towel scap pulls if no band) – 15 reps
→ Rest 45 sec between sets


Tips
-
Core Engagement: Keep your core tight throughout the exercise to support your lower back and maintain good posture.
-
Squeeze Your Shoulder Blades: Focus on squeezing your shoulder blades together as you pull the towel toward your body. This helps engage the upper back muscles more effectively.
-
Controlled Movement: Perform the exercise slowly and with control, avoiding jerky movements. Both the pulling and the resistance from the leg should be steady.
-
Leg Resistance: Your leg should push forward gently but with enough force to create resistance. The goal is to mimic the effect of pulling against a resistance band or weight.
-
Breathing: Exhale as you pull the towel toward you, and inhale as you extend your arms back to the starting position. Proper breathing helps maintain focus and control.

Tips
-
Squeeze the Shoulder Blades: Focus on squeezing your shoulder blades together as you pull the towel down. This ensures you engage the upper back and lat muscles effectively.
-
Keep Core Tight: Maintain core engagement throughout the exercise to prevent your lower back from arching excessively. This helps protect your spine and stabilize your body.
-
Controlled Movement: Perform the exercise slowly and with control, especially when returning to the starting position. Avoid rushing through the movement.
-
Elbow Position: As you pull the towel down, make sure your elbows stay wide and level with your shoulders, simulating the proper mechanics of a pull-up or lat pull-down.
-
Breathing: Exhale as you pull the towel down, and inhale as you return to the starting position. Proper breathing helps maintain focus and control.


Tips
-
Keep the Elbows High: Lead with your elbows, keeping them in line with your shoulders as you pull to maximize engagement of the rear deltoids.
-
Engage the Core: Keep your core tight to stabilize your torso and maintain an upright posture, avoiding any rocking or leaning.
-
Focus on Shoulder Rotation: Rotate your shoulders externally as you pull, ensuring your hands are level with your ears at the peak of the movement.
-
Avoid Shrugging the Shoulders: Keep your shoulders down and away from your ears to avoid upper trap overactivation.
-
Controlled Movement: Perform the exercise slowly and with control to fully activate the target muscles and avoid using momentum.
HIIT 10 min
Goal: Boost endurance and shoulder/posterior chain stability with minimal joint impact.
Format: EMOM – 5 Rounds (10 minutes total)
•Minute 1: 40 sec Mountain Climbers + 20 sec Tabletop Hold
•Minute 2: Repeat
→ Alternate for 5 rounds
This combo hits your shoulders, core, and glutes—key stabilizers that support your progress toward pull-ups.
Tips
-
Core Engagement: Focus on keeping your core engaged throughout the exercise to prevent your hips from rising or sagging.
-
Controlled Breathing: Breathe steadily as you alternate legs. Exhale as you drive each knee forward, and inhale as you extend each leg back.
-
Keep the Hips Level: Avoid letting your hips move up or down too much; maintain a level position to keep the focus on your core.
-
Controlled Speed: Start with a slow, controlled pace to ensure proper form, then gradually increase your speed as you feel more stable.
-
Hand and Shoulder Alignment: Keep your hands directly under your shoulders to ensure proper alignment and avoid putting excess strain on your wrists.

Muscle group:
Tips
-
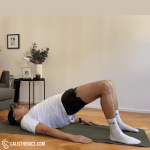
Squeeze your glutes at the top to fully activate your posterior chain.
-
Look slightly upward to maintain neck alignment but avoid excessive tilting.
-
Engage your core to prevent lower back sagging.
-
If your wrists feel strained, try placing hands on yoga blocks or using fists instead of flat palms.
-
Perform dynamic reps by lowering and lifting the hips for added activation before holding the position statically.
Warm-Up10 min
Goal: Warm up the posterior shoulder, upper back, and get blood flowing.
Format: Circuit – 2 rounds, no rest between exercises or rounds
•30 sec Jumping Jacks
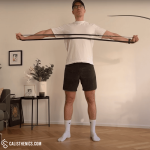
•15x Resistance Band Pull-Aparts
•12x Seated Resistance Band Face Pulls
These movements target posture, scapular engagement, and rotator cuff activation—all key areas for safe and effective pull-up training.
No muscle groups found for this post.
Tips
-
Move slowly and deliberately to avoid sudden movements.
-
Keep circles smooth and controlled—avoid jerky motions.
-
Breathe steadily and deeply to maximize relaxation and blood flow.
-
Gradually increase the range of motion as your joints warm up.
-
Perform each movement for 15-20 seconds, or until joints feel loosened.
-
Customize your routine slightly based on the specific demands of your workout.

Muscle groups:


Tips
-
Keep your movements light and bouncy, not stiff or stompy.
-
Maintain a steady breathing rhythm, especially in longer sets.
-
Engage your core to support posture and absorb shock.
-
Land on the balls of your feet and roll through the foot gently to protect your knees.
-
Scale the speed based on your fitness goal—slower for warm-up, faster for conditioning.
-
Stay relaxed in the shoulders and arms, avoiding unnecessary tension.

Tips
-
Squeeze Your Shoulder Blades: Focus on squeezing your shoulder blades together as you pull the band apart. This ensures that you engage the muscles of your upper back effectively.
-
Keep Arms Straight but Not Locked: Maintain straight arms during the movement, but avoid locking your elbows to protect your joints and maximize muscle engagement.
-
Core Engagement: Keep your core tight to prevent arching your back as you pull the band apart. A stable core helps maintain proper posture and prevents compensations.
-
Controlled Movement: Perform the movement slowly and with control, both when pulling the band apart and when returning to the starting position. Avoid jerking or using momentum.
-
Breathing: Exhale as you pull the band apart and inhale as you return to the starting position. Proper breathing helps maintain focus and control.
Tips
-
Keep the Elbows High: Lead with your elbows, keeping them in line with your shoulders as you pull to maximize engagement of the rear deltoids.
-
Engage the Core: Keep your core tight to stabilize your torso and maintain an upright posture, avoiding any rocking or leaning.
-
Focus on Shoulder Rotation: Rotate your shoulders externally as you pull, ensuring your hands are level with your ears at the peak of the movement.
-
Avoid Shrugging the Shoulders: Keep your shoulders down and away from your ears to avoid upper trap overactivation.
-
Controlled Movement: Perform the exercise slowly and with control to fully activate the target muscles and avoid using momentum.
Strength25 min
Goal: Continue building strength with light resistance pulling exercises that simulate pull-up motions.
Structure:
•Superset A (3 rounds): Perform A1 + A2, rest 60–90 sec
•Set B (2 sets): Perform alone, rest 45 sec
🟦 Superset A:
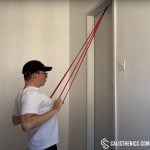
•A1: Resistance Band Pull-Downs – 12 reps
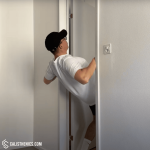
•A2: Doorway Rows (or Seated Band Rows if no doorframe) – 12 reps
→ Rest 60–90 sec after each superset
🟩 Set B:
•Resistance Band Rotator Cuff External Rotations – 10 reps each arm
→ Rest 45 sec between sets
Pull-downs mimic the vertical pulling pattern of a pull-up, while rows reinforce horizontal pulling strength. Finish with external rotations to keep the shoulder joint healthy and strong.

Muscle group:
Tips
-
Keep your core tight to prevent excessive body movement.
-
Focus on driving the elbows down and back, not just pulling with your hands.
-
Try different grip variations (neutral, supinated, pronated) for varied muscle activation.
-
Use a thicker band for more resistance or double up bands for progressive overload.
-
Maintain slow eccentric control to build strength effectively.

Tips
-
Core Engagement: Keep your core tight to support your spine and prevent any sagging or arching during the movement.
-
Squeeze Your Shoulder Blades: Focus on squeezing your shoulder blades together as you pull yourself toward the door frame. This helps target the upper back muscles more effectively.
-
Elbow Positioning: Keep your elbows close to your body during the rowing movement to avoid placing unnecessary strain on your shoulders.
-
Grip Strength: Ensure you have a firm grip on the door frame for stability. Use both hands evenly to maintain balance throughout the movement.
-
Breathing: Inhale as you extend your arms and lean back, and exhale as you pull your body toward the door frame. Proper breathing helps maintain control and power during the exercise.

Muscle group:
Tips
-
Keep your wrist neutral throughout the movement to prevent strain.
-
Use a light resistance band to prioritize control and full range of motion.
-
Place a rolled-up towel under your elbow to improve muscle activation and prevent compensation.
-
Focus on high reps (12-20) with slow, controlled movement rather than heavy resistance.
-
Maintain even tension in the band throughout the motion to avoid jerky movements.
HIIT Finisher10 min
Goal: Improve trunk stability and muscular endurance under light cardio fatigue.
Format: 4 rounds – 45 sec work / 15 sec rest
→ Alternate between:
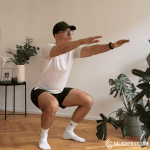
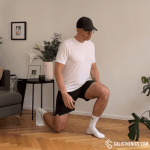
•Bodyweight Squats (45 sec)
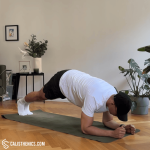
•Elbow Plank Hold (45 sec)
→ Repeat 4x = 10 minutes total
Stay tight in the plank and go for continuous squats at a moderate tempo. You should be breathing hard but able to maintain good form.

Tips
-
Keep Arms Extended: Maintain straight, extended arms throughout the entire movement. This helps to stabilize your upper body and keep your torso upright.
-
Chest Up, Back Straight: Focus on keeping your chest lifted and your back flat as you squat. Avoid rounding your lower back, which can put strain on your spine.
-
Knee Alignment: Ensure that your knees track over your toes and do not collapse inward. Proper knee alignment protects your joints and promotes better muscle engagement.
-
Weight on Heels: Keep your weight on your midfoot and heels, not your toes. You should be able to wiggle your toes slightly as you lower into the squat.
-
Breathe Correctly: Inhale as you lower into the squat and exhale as you push back up. Proper breathing will help you maintain core stability and rhythm.

Tips
-
Straight Body Line: Ensure your body forms a straight line from your head to your heels. Avoid raising or lowering your hips too much, as this can compromise form.
-
Core Engagement: Keep your core muscles tight throughout the entire exercise. This helps stabilize your spine and prevents your hips from sagging or arching.
-
Elbow Positioning: Your elbows should be directly under your shoulders, creating a strong base of support. This will also help engage your shoulders and reduce strain.
-
Steady Breathing: Focus on controlled, deep breaths. Inhale through your nose and exhale through your mouth, which helps stabilize your core and manage endurance.
-
Avoid Tension in the Neck: Keep your neck neutral by looking down at the floor to prevent any tension or strain in the neck.
Week 2 – Building Pulling Power
- Workout #3
- Workout #4
Warm-Up10 min
Goal: Prepare the shoulders and core for overhead pulling and scapula activation.
Format: Circuit – 2 rounds, no rest between exercises or rounds
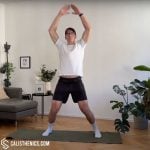
•5x Inchworms with Push-Up
•10x Towel Pass-Throughs
•12x Towel Bent Over Rows
Expect a gentle shoulder opening and core switch-on that preps you for hanging work.
No muscle groups found for this post.
Tips
-
Move slowly and deliberately to avoid sudden movements.
-
Keep circles smooth and controlled—avoid jerky motions.
-
Breathe steadily and deeply to maximize relaxation and blood flow.
-
Gradually increase the range of motion as your joints warm up.
-
Perform each movement for 15-20 seconds, or until joints feel loosened.
-
Customize your routine slightly based on the specific demands of your workout.

Muscle group:

Tips
-
Keep your core actively engaged throughout to maintain stability and prevent excessive lower-back stress.
-
Walk your hands out progressively further as your strength and flexibility improve.
-
Focus on smooth transitions between each phase of the exercise to improve coordination and body control.
-
Use controlled breathing, matching each movement phase to inhalation and exhalation cycles.
-
Perform regularly as part of your warm-up routine to optimize flexibility, mobility, and upper-body strength.

Tips
-
Start with a wider grip if you feel tightness in your shoulders.
-
If the movement feels too challenging, switch to a resistance band, which allows more flexibility.
-
Perform in front of a mirror to check for excessive arching or compensations.
-
Include it in your warm-up routine before upper body workouts, especially if working on overhead movements.
-
If you experience pain, stop and reassess your grip width and movement control.
You can also use a resistance band instead of a towel.
Tips
-
Keep Your Back Flat – Avoid rounding your spine by keeping your chest up and core engaged.
-
Control the Resistance – In self-resisted rows, make sure your non-working arm provides enough tension.
-
Squeeze the Shoulder Blades – This maximizes back muscle activation.
-
Use a Sturdy Anchor – If using an anchored towel, ensure it won’t slip or loosen.
-
Focus on squeezing your shoulder blades: This will help activate the target muscles and ensure proper form.
-
Maintain a Slight Knee Bend – This helps stabilize your position and prevent lower back strain.
Strength25 min
Goal: Improve vertical pulling mechanics and scapular control using assistance from bands or feet.
Structure:
•Superset A (3 rounds): Perform A1 + A2 back-to-back, rest 90 sec
•Set B (2 sets): Performed on its own, rest 45 sec
🟦 Superset A:
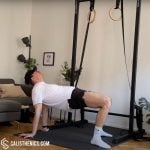
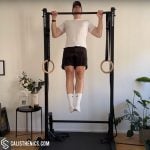
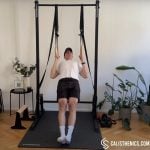
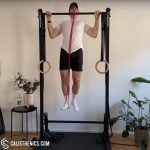
•A1: Scapula Pull-Ups (or Dead Hangs if not yet ready) – 5 reps or 20 sec hang
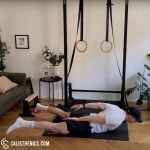
•A2: Feet-Assisted Pull-Ups (use chair or floor support) – 6–8 reps
→ Rest 90 sec between rounds
🟩 Set B:
•Resistance Band Shrugs – 15 reps
→ Rest 45 sec between sets
Keep control during scapula pull-ups—don’t rush. For assisted pull-ups, aim to use your upper body as much as possible and just lightly assist with your feet.

Tips
-
Keep Arms Straight – Do not bend your elbows; the movement should come only from the scapula.
-
Engage Your Core – Helps prevent excessive body movement or swinging.
-
Control the Descent – Avoid dropping too fast; lower with control.
-
Breathe Properly – Inhale while lowering, exhale while pulling your scapula together.
-
Use a Full Range of Motion – Ensure you fully depress and retract your scapula.

Muscle group:
Do it on gymnastics rings or a pull-up bar.
For feet support, you can use a chair, plyo box or a stack of weight plates etc.
Tips
-
Use the Least Assistance Necessary – Rely on your upper body first, using your legs only as needed.
-
Keep Rings Close to Your Body – Prevent the rings from drifting outward for better control.
-
Engage Your Core to Avoid Swinging – Keep your torso tight and stable.
-
Control the Lowering Phase – Avoid dropping quickly, focus on a slow eccentric movement.
-
Breathe Properly – Inhale before pulling, and exhale at the top.

Muscle group:
Tips
-
Keep the Core Tight: Engaging your core helps stabilize your torso, ensuring the movement focuses on the traps.
-
Focus on Shoulder Elevation: Avoid pulling with your arms; instead, focus on lifting your shoulders directly upward toward your ears.
-
Avoid Rolling the Shoulders: Lift your shoulders straight up and down; rolling the shoulders can lead to improper form and shoulder strain.
-
Controlled Movement: Perform the exercise slowly, focusing on squeezing the traps at the top and controlling the descent.
-
Breathe Steadily: Exhale as you lift into the shrug and inhale as you lower back down, maintaining a consistent rhythm.
HIIT Finisher10 min
Goal: Build push-pull balance, core endurance, and total-body fatigue resistance.
Format: 4 rounds – 45 sec work / 15 sec rest
→ Alternate between:
•Push-Ups (from knees or full)
•Walking Lunges
→ 4 rounds = 10 minutes
You’ll be tired, but that’s part of the point—learning to keep tension under fatigue builds control and strength for future pull-up work.


Tips
-
Body Alignment: Keep your body in a straight line from head to heels. Engage your core and glutes to prevent your hips from dropping or rising.
-
Hand Placement: Your hands should be positioned just outside of shoulder-width for optimal stability. Moving them closer or wider will target different muscles.
-
Elbow Positioning: Keep your elbows at about a 45-degree angle from your body, not flaring out too far to avoid shoulder strain.
-
Breathing: Inhale as you lower yourself, and exhale as you push back up. Controlled breathing improves strength and endurance.
-
Controlled Movements: Lower yourself slowly to build strength, then push back up with a smooth, steady motion.

If you don't have a large enough space for walking lunges do Reverse Lunges instead.
Tips
-
Maintain Upright Posture: Keep your torso upright and chest lifted throughout the movement. Avoid leaning forward or arching your back.
-
Step with Control: Focus on controlled, deliberate steps. Rushing the movement can lead to poor form and injury.
-
Knee Alignment: Ensure that your front knee stays aligned with your toes and doesn’t go past your toes as you lunge.
-
Push Through the Heel: When you push off to bring your back leg forward, drive through the heel of your front foot to engage your glutes and hamstrings effectively.
-
Engage Your Core: Keep your core engaged to help with balance and stability as you move forward.
-
Avoid Overstriding: Taking too large a step can cause your back leg to overstretch and may place unnecessary stress on your joints.
Warm-Up10 min
Goal: Prepare the shoulders and core for overhead pulling and scapula activation.
Format: Circuit – 2 rounds, no rest between exercises or rounds
•5x Inchworms with Push-Up
•10x Towel Pass-Throughs
•12x Towel Bent Over Rows
Expect a gentle shoulder opening and core switch-on that preps you for hanging work.
No muscle groups found for this post.
Tips
-
Move slowly and deliberately to avoid sudden movements.
-
Keep circles smooth and controlled—avoid jerky motions.
-
Breathe steadily and deeply to maximize relaxation and blood flow.
-
Gradually increase the range of motion as your joints warm up.
-
Perform each movement for 15-20 seconds, or until joints feel loosened.
-
Customize your routine slightly based on the specific demands of your workout.
Muscle group:
Tips
-
Keep your core actively engaged throughout to maintain stability and prevent excessive lower-back stress.
-
Walk your hands out progressively further as your strength and flexibility improve.
-
Focus on smooth transitions between each phase of the exercise to improve coordination and body control.
-
Use controlled breathing, matching each movement phase to inhalation and exhalation cycles.
-
Perform regularly as part of your warm-up routine to optimize flexibility, mobility, and upper-body strength.
Tips
-
Start with a wider grip if you feel tightness in your shoulders.
-
If the movement feels too challenging, switch to a resistance band, which allows more flexibility.
-
Perform in front of a mirror to check for excessive arching or compensations.
-
Include it in your warm-up routine before upper body workouts, especially if working on overhead movements.
-
If you experience pain, stop and reassess your grip width and movement control.
You can also use a resistance band instead of a towel.
Tips
-
Keep Your Back Flat – Avoid rounding your spine by keeping your chest up and core engaged.
-
Control the Resistance – In self-resisted rows, make sure your non-working arm provides enough tension.
-
Squeeze the Shoulder Blades – This maximizes back muscle activation.
-
Use a Sturdy Anchor – If using an anchored towel, ensure it won’t slip or loosen.
-
Focus on squeezing your shoulder blades: This will help activate the target muscles and ensure proper form.
-
Maintain a Slight Knee Bend – This helps stabilize your position and prevent lower back strain.
Strength25 min
Goal: Improve vertical pulling mechanics and scapular control using assistance from bands or feet.
Structure:
•Superset A (3 rounds): Perform A1 + A2 back-to-back, rest 90 sec
•Set B (2 sets): Performed on its own, rest 45 sec
🟦 Superset A:
•A1: Scapula Pull-Ups (or Dead Hangs if not yet ready) – 5 reps or 20 sec hang
•A2: Feet-Assisted Pull-Ups (use chair or floor support) – 6–8 reps
→ Rest 90 sec between rounds
🟩 Set B:
•Resistance Band Shrugs – 15 reps
→ Rest 45 sec between sets
Keep control during scapula pull-ups—don’t rush. For assisted pull-ups, aim to use your upper body as much as possible and just lightly assist with your feet.
Tips
-
Keep Arms Straight – Do not bend your elbows; the movement should come only from the scapula.
-
Engage Your Core – Helps prevent excessive body movement or swinging.
-
Control the Descent – Avoid dropping too fast; lower with control.
-
Breathe Properly – Inhale while lowering, exhale while pulling your scapula together.
-
Use a Full Range of Motion – Ensure you fully depress and retract your scapula.
Muscle group:
Do it on gymnastics rings or a pull-up bar.
For feet support, you can use a chair, plyo box or a stack of weight plates etc.
Tips
-
Use the Least Assistance Necessary – Rely on your upper body first, using your legs only as needed.
-
Keep Rings Close to Your Body – Prevent the rings from drifting outward for better control.
-
Engage Your Core to Avoid Swinging – Keep your torso tight and stable.
-
Control the Lowering Phase – Avoid dropping quickly, focus on a slow eccentric movement.
-
Breathe Properly – Inhale before pulling, and exhale at the top.
Muscle group:
Tips
-
Keep the Core Tight: Engaging your core helps stabilize your torso, ensuring the movement focuses on the traps.
-
Focus on Shoulder Elevation: Avoid pulling with your arms; instead, focus on lifting your shoulders directly upward toward your ears.
-
Avoid Rolling the Shoulders: Lift your shoulders straight up and down; rolling the shoulders can lead to improper form and shoulder strain.
-
Controlled Movement: Perform the exercise slowly, focusing on squeezing the traps at the top and controlling the descent.
-
Breathe Steadily: Exhale as you lift into the shrug and inhale as you lower back down, maintaining a consistent rhythm.
HIIT Finisher10 min
Goal: Build push-pull balance, core endurance, and total-body fatigue resistance.
Format: 4 rounds – 45 sec work / 15 sec rest
→ Alternate between:
•Push-Ups (from knees or full)
•Walking Lunges
→ 4 rounds = 10 minutes
You’ll be tired, but that’s part of the point—learning to keep tension under fatigue builds control and strength for future pull-up work.
Tips
-
Body Alignment: Keep your body in a straight line from head to heels. Engage your core and glutes to prevent your hips from dropping or rising.
-
Hand Placement: Your hands should be positioned just outside of shoulder-width for optimal stability. Moving them closer or wider will target different muscles.
-
Elbow Positioning: Keep your elbows at about a 45-degree angle from your body, not flaring out too far to avoid shoulder strain.
-
Breathing: Inhale as you lower yourself, and exhale as you push back up. Controlled breathing improves strength and endurance.
-
Controlled Movements: Lower yourself slowly to build strength, then push back up with a smooth, steady motion.
If you don't have a large enough space for walking lunges do Reverse Lunges instead.
Tips
-
Maintain Upright Posture: Keep your torso upright and chest lifted throughout the movement. Avoid leaning forward or arching your back.
-
Step with Control: Focus on controlled, deliberate steps. Rushing the movement can lead to poor form and injury.
-
Knee Alignment: Ensure that your front knee stays aligned with your toes and doesn’t go past your toes as you lunge.
-
Push Through the Heel: When you push off to bring your back leg forward, drive through the heel of your front foot to engage your glutes and hamstrings effectively.
-
Engage Your Core: Keep your core engaged to help with balance and stability as you move forward.
-
Avoid Overstriding: Taking too large a step can cause your back leg to overstretch and may place unnecessary stress on your joints.
Week 3 – Strength Under Control
- Workout #5
- Workout #6
Warm-Up10 min
Goal: Prepare your shoulders and scapulae for eccentric loading and grip demand.
Format: Circuit – 2 rounds, no rest between exercises or rounds
-
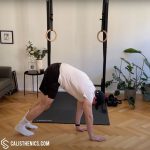
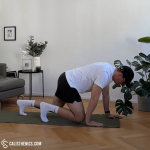
30 sec Bear Crawl
-
10x Scapula Rows (use gymnastics rings, low bar or resistance band)
-
10x Doorway or Pole Rows
This warm-up fires up your back and core while getting your body used to pulling from different angles.
No muscle groups found for this post.
Tips
-
Move slowly and deliberately to avoid sudden movements.
-
Keep circles smooth and controlled—avoid jerky motions.
-
Breathe steadily and deeply to maximize relaxation and blood flow.
-
Gradually increase the range of motion as your joints warm up.
-
Perform each movement for 15-20 seconds, or until joints feel loosened.
-
Customize your routine slightly based on the specific demands of your workout.

Muscle group:
Tips
-
Keep the Core Tight: Engage your core throughout the movement to prevent your hips from lifting or sagging.
-
Minimize Hip Movement: The goal is to keep your hips stable, avoiding excessive side-to-side motion. This helps maximize core engagement and balance.
-
Small Steps: Take smaller, controlled steps to improve balance and coordination while keeping the movement fluid.
-
Controlled Breathing: Breathe steadily as you crawl, exhaling as you move each hand and foot forward, and inhaling as you stabilize. Proper breathing helps maintain core stability.
-
Hand and Shoulder Alignment: Keep your hands under your shoulders and ensure each step forward is controlled to reduce strain on your wrists and shoulders.

Muscle group:
Tips
-
Keep your body in a rigid plank position to maximize stability.
-
Engage your lats throughout the movement to maintain control.
-
Perform the exercise slowly, focusing on mind-muscle connection.
-
If you’re new to scapular control, practice hanging scapular retractions first.
-
Use controlled breathing to maintain core engagement and stability.
-
Keep your neck neutral—avoid tucking or craning it forward.
Tips
-
Core Engagement: Keep your core tight to support your spine and prevent any sagging or arching during the movement.
-
Squeeze Your Shoulder Blades: Focus on squeezing your shoulder blades together as you pull yourself toward the door frame. This helps target the upper back muscles more effectively.
-
Elbow Positioning: Keep your elbows close to your body during the rowing movement to avoid placing unnecessary strain on your shoulders.
-
Grip Strength: Ensure you have a firm grip on the door frame for stability. Use both hands evenly to maintain balance throughout the movement.
-
Breathing: Inhale as you extend your arms and lean back, and exhale as you pull your body toward the door frame. Proper breathing helps maintain control and power during the exercise.
Strength25 min
Goal: Build strength through negatives, reinforce pulling pattern with rows, and protect shoulders with accessory work.
Structure:
-
Superset A (3 rounds): Perform A1 + A2, rest 90 sec
-
Set B (2 sets): Performed alone, rest 45 sec
🟦 Superset A:
-
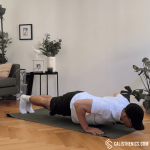
A1: Negative Pull-Ups – 3–5 reps (3–5 sec lower)
-
A2: Bodyweight Rows with Bent Knees – 8–10 reps
→ Rest 90 sec after each round
🟩 Set B:
-
Resistance Band Pull-Aparts – 20 reps
→ Rest 45 sec between sets
Focus on control during the negatives. Step or jump to the top, then lower slowly. No fast drops—this is where the strength happens!

Tips
-
Start with a descent of 3-5 seconds, gradually increasing to 6-8 seconds as you gain strength.
-
Engage your core and glutes throughout the movement to stabilize your body.
-
Breathe steadily—inhale at the top and exhale slowly during the descent.
-
Use a slight pause at the bottom before stepping back up to reinforce control.
-
Experiment with grip variations (neutral grip may feel more comfortable for some athletes).
-
Train consistently—negative pull-ups should be performed 2-3 times per week for optimal progress.

Tips
-
Brace your core throughout the movement to avoid unwanted torso movement.
-
Adjust the rings’ height to modify difficulty—lowering the rings increases challenge.
-
Use a slight pause at the top for better mind-muscle connection.
-
Focus on scapular movement by initiating the pull with your shoulder blades.
-
Keep your wrists in line with your forearms to avoid unnecessary strain.
-
Experiment with grip variations (neutral, overhand, underhand) to target different muscles.
Tips
-
Squeeze Your Shoulder Blades: Focus on squeezing your shoulder blades together as you pull the band apart. This ensures that you engage the muscles of your upper back effectively.
-
Keep Arms Straight but Not Locked: Maintain straight arms during the movement, but avoid locking your elbows to protect your joints and maximize muscle engagement.
-
Core Engagement: Keep your core tight to prevent arching your back as you pull the band apart. A stable core helps maintain proper posture and prevents compensations.
-
Controlled Movement: Perform the movement slowly and with control, both when pulling the band apart and when returning to the starting position. Avoid jerking or using momentum.
-
Breathing: Exhale as you pull the band apart and inhale as you return to the starting position. Proper breathing helps maintain focus and control.
HIIT Finisher10 min
Goal: Reinforce upright posture and core strength while building aerobic endurance.
Format: 5 rounds – EMOM (Every Minute on the Minute, for 10 minutes total)
-
Minute 1: 40 sec Push-Ups + 20 sec Squat Hold
-
Minute 2: Repeat
Keep your form tight. The squat hold forces you to brace and stay tall—mirroring the posture needed for clean pull-ups.
Muscle groups:
Tips
-
Body Alignment: Keep your body in a straight line from head to heels. Engage your core and glutes to prevent your hips from dropping or rising.
-
Hand Placement: Your hands should be positioned just outside of shoulder-width for optimal stability. Moving them closer or wider will target different muscles.
-
Elbow Positioning: Keep your elbows at about a 45-degree angle from your body, not flaring out too far to avoid shoulder strain.
-
Breathing: Inhale as you lower yourself, and exhale as you push back up. Controlled breathing improves strength and endurance.
-
Controlled Movements: Lower yourself slowly to build strength, then push back up with a smooth, steady motion.
Tips
-
Maintain an Upright Posture: Keep your chest up and back straight during the entire hold. Avoid letting your lower back round, which can put strain on the spine.
-
Knee and Toe Alignment: Ensure that your knees track over your toes and do not collapse inward. Your knees should be at a 90-degree angle or slightly less.
-
Keep Your Heels Down: Ensure that your weight is distributed evenly across your feet, with your heels pressed firmly into the ground. You should be able to wiggle your toes slightly.
-
Engage Your Core: Tighten your abdominal muscles to help stabilize your lower back and maintain proper form throughout the hold.
-
Breathe Consistently: Don’t hold your breath! Breathe deeply and consistently to stay relaxed and focused.
Warm-Up10 min
Goal: Fire up scapular control and dynamic mobility.
Format: Circuit – 2 rounds, no rest between exercises or rounds
-
30 sec Jumping Jacks
-
15x Resistance Band Pull-Aparts
-
12x Seated Resistance Band Face Pulls
Expect shoulder engagement and light burn—this primes you for quality pulling.
No muscle groups found for this post.
Tips
-
Move slowly and deliberately to avoid sudden movements.
-
Keep circles smooth and controlled—avoid jerky motions.
-
Breathe steadily and deeply to maximize relaxation and blood flow.
-
Gradually increase the range of motion as your joints warm up.
-
Perform each movement for 15-20 seconds, or until joints feel loosened.
-
Customize your routine slightly based on the specific demands of your workout.
Muscle groups:
Tips
-
Keep your movements light and bouncy, not stiff or stompy.
-
Maintain a steady breathing rhythm, especially in longer sets.
-
Engage your core to support posture and absorb shock.
-
Land on the balls of your feet and roll through the foot gently to protect your knees.
-
Scale the speed based on your fitness goal—slower for warm-up, faster for conditioning.
-
Stay relaxed in the shoulders and arms, avoiding unnecessary tension.
Tips
-
Squeeze Your Shoulder Blades: Focus on squeezing your shoulder blades together as you pull the band apart. This ensures that you engage the muscles of your upper back effectively.
-
Keep Arms Straight but Not Locked: Maintain straight arms during the movement, but avoid locking your elbows to protect your joints and maximize muscle engagement.
-
Core Engagement: Keep your core tight to prevent arching your back as you pull the band apart. A stable core helps maintain proper posture and prevents compensations.
-
Controlled Movement: Perform the movement slowly and with control, both when pulling the band apart and when returning to the starting position. Avoid jerking or using momentum.
-
Breathing: Exhale as you pull the band apart and inhale as you return to the starting position. Proper breathing helps maintain focus and control.
Tips
-
Keep the Elbows High: Lead with your elbows, keeping them in line with your shoulders as you pull to maximize engagement of the rear deltoids.
-
Engage the Core: Keep your core tight to stabilize your torso and maintain an upright posture, avoiding any rocking or leaning.
-
Focus on Shoulder Rotation: Rotate your shoulders externally as you pull, ensuring your hands are level with your ears at the peak of the movement.
-
Avoid Shrugging the Shoulders: Keep your shoulders down and away from your ears to avoid upper trap overactivation.
-
Controlled Movement: Perform the exercise slowly and with control to fully activate the target muscles and avoid using momentum.
Strength25 min
Goal: Increase pulling strength and static control using horizontal and vertical tension.
Structure:
-
Superset A (3 rounds): Perform A1 + A2, rest 90 sec
-
Set B (2 sets): Performed alone, rest 45 sec
🟦 Superset A:
-
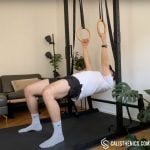
A1: Bodyweight Rows with Straight Legs (aka Australian Pull-Ups) – 8–10 reps
-
A2: Scapula Pull-Ups (alternate between Dead Hang and Active Hang) – 20–30 sec
→ Rest 90 sec after each round
🟩 Set B:
-
Resistance Band Shrugs – 15 reps
→ Rest 45 sec between sets
The rows are harder now—straighten your legs, keep your core tight, and pull your chest to the bar. The hang builds grip and shoulder endurance.

Tips
-
Maintain a neutral neck position to avoid strain.
-
Keep your wrists straight and aligned with your forearms.
-
Adjust grip width to target different areas of the back (wider for lats, narrower for biceps).
-
If using rings, rotate your grip naturally during the movement for better joint alignment.
-
Pause at the top for a brief second to maximize muscle engagement.
-
Gradually increase the difficulty by changing body position or adding weight.
It can be performed on gymnastics rings and a pull-up bar. If scapula pull-ups are too hard, do a Dead Hang instead.
Tips
-
Keep Arms Straight – Do not bend your elbows; the movement should come only from the scapula.
-
Engage Your Core – Helps prevent excessive body movement or swinging.
-
Control the Descent – Avoid dropping too fast; lower with control.
-
Breathe Properly – Inhale while lowering, exhale while pulling your scapula together.
-
Use a Full Range of Motion – Ensure you fully depress and retract your scapula.
Muscle group:
Tips
-
Keep the Core Tight: Engaging your core helps stabilize your torso, ensuring the movement focuses on the traps.
-
Focus on Shoulder Elevation: Avoid pulling with your arms; instead, focus on lifting your shoulders directly upward toward your ears.
-
Avoid Rolling the Shoulders: Lift your shoulders straight up and down; rolling the shoulders can lead to improper form and shoulder strain.
-
Controlled Movement: Perform the exercise slowly, focusing on squeezing the traps at the top and controlling the descent.
-
Breathe Steadily: Exhale as you lift into the shrug and inhale as you lower back down, maintaining a consistent rhythm.
HIIT Finisher10 min
Goal: Improve push-pull coordination, leg drive, and total-body stability under fatigue.
Format: 4 rounds – 45 sec work / 15 sec rest
→ Alternate:
-
Resistance Band Thrusters (Squat + Press)
-
Glute Bridges
→ 4 rounds = 10 minutes
This finisher reinforces drive through your posterior chain while keeping your heart rate high.

Muscle groups:

Tips
-
Secure Band Position: Ensure the band is securely anchored under both feet to prevent any slipping, and hold it firmly at shoulder height.
-
Engage the Core: Keep your core tight throughout the entire movement to maintain balance and stability.
-
Drive Through the Heels: Push through your heels as you rise from the squat to fully engage your glutes and quads.
-
Smooth Transition: Move fluidly from the squat into the overhead press, ensuring a controlled, coordinated movement.
-
Avoid Locking Elbows: At the top of the press, avoid fully locking out your elbows to keep constant tension on the shoulders.

Muscle groups:

Tips
-
Core Engagement: Keep your core muscles engaged throughout the movement to prevent your lower back from arching. This helps protect your spine and enhances the effectiveness of the exercise.
-
Push Through Your Heels: Pressing through your heels activates the glutes more effectively. Avoid pushing through the balls of your feet or letting your toes lift off the floor.
-
Squeeze at the Top: At the top of the movement, fully squeeze your glutes to maximize muscle activation. Ensure that your body forms a straight line from your shoulders to your knees.
-
Avoid Overextension: Be mindful not to hyperextend your lower back at the top of the movement. Focus on lifting with your glutes, not your lower back.
-
Breathing: Inhale as you lower your hips and exhale as you lift them. Proper breathing enhances core engagement and control.
Week 4 – Control Meets Endurance
- Workout #7
- Workout #8
Warm-Up10 min
Goal: Prime shoulders and scapulae for static tension and postural control.
Format: Circuit – 2 rounds, no rest between exercises or rounds
-
30 sec Inchworm with Push-Up
-
10x Towel Pass-Throughs
-
12x Towel Bent Over Rows
This warm-up emphasizes shoulder mobility and scapular activation—both key for safe and effective holds.
No muscle groups found for this post.
Tips
-
Move slowly and deliberately to avoid sudden movements.
-
Keep circles smooth and controlled—avoid jerky motions.
-
Breathe steadily and deeply to maximize relaxation and blood flow.
-
Gradually increase the range of motion as your joints warm up.
-
Perform each movement for 15-20 seconds, or until joints feel loosened.
-
Customize your routine slightly based on the specific demands of your workout.
Muscle group:
Tips
-
Keep your core actively engaged throughout to maintain stability and prevent excessive lower-back stress.
-
Walk your hands out progressively further as your strength and flexibility improve.
-
Focus on smooth transitions between each phase of the exercise to improve coordination and body control.
-
Use controlled breathing, matching each movement phase to inhalation and exhalation cycles.
-
Perform regularly as part of your warm-up routine to optimize flexibility, mobility, and upper-body strength.
Tips
-
Start with a wider grip if you feel tightness in your shoulders.
-
If the movement feels too challenging, switch to a resistance band, which allows more flexibility.
-
Perform in front of a mirror to check for excessive arching or compensations.
-
Include it in your warm-up routine before upper body workouts, especially if working on overhead movements.
-
If you experience pain, stop and reassess your grip width and movement control.
If you have no towel, use a resistance band or a stick.
Tips
-
Keep Your Back Flat – Avoid rounding your spine by keeping your chest up and core engaged.
-
Control the Resistance – In self-resisted rows, make sure your non-working arm provides enough tension.
-
Squeeze the Shoulder Blades – This maximizes back muscle activation.
-
Use a Sturdy Anchor – If using an anchored towel, ensure it won’t slip or loosen.
-
Focus on squeezing your shoulder blades: This will help activate the target muscles and ensure proper form.
-
Maintain a Slight Knee Bend – This helps stabilize your position and prevent lower back strain.
Strength25 min
Goal: Build strength in difficult pull-up positions and reinforce horizontal pulling under load.
Structure:
-
Superset A (3 rounds): A1 + A2, rest 90 sec
-
Set B (2 sets): Performed alone, rest 45 sec
🟦 Superset A:
-
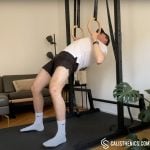
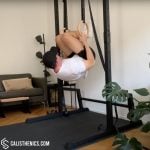
A1: Three-Position Isometric Pull-Up Hold – 3–5 sec each at top, mid, and bottom (use band or box to get into position)
-
A2: Bodyweight Rows with Elevated Feet – 6–8 reps
→ Rest 90 sec between rounds
🟩 Set B:
-
Resistance Band Bicep Curls – 15 reps
→ Rest 45 sec between sets
Keep everything slow and intentional. For the isometric holds, aim to “own” each position—especially the mid-range, which mimics the sticking point of most beginners.

Muscle group:
If too hard use resistance band for assistance.
Tips
-
Use an Elevated Platform for Rings – Stepping into the top position prevents unnecessary swinging.
-
Maintain Full-Body Tension – Engage your core, glutes, and legs to minimize movement.
-
Control the Descent Between Holds – Avoid dropping quickly from one hold to the next.
-
Breathe Properly – Exhale when holding each position, and inhale when transitioning.
-
Increase Hold Time Gradually – Start with 5 seconds per hold, working up to 10-15 seconds.

Use a low bar (e.g. dip bar) or gymnastics rings set up below chest height. Elevate your feet with a chair or plyo box.
Tips
-
Engage the Core Throughout the Movement: Keep a hollow body position to maintain stability.
-
Adjust the Ring Height to Modify Difficulty: Lower rings = harder (more horizontal position), higher rings = easier.
-
Use a Controlled Tempo: 3-4 second eccentric (lowering) phases will increase time under tension for strength gains.
-
Focus on Scapular Retraction: Squeeze your shoulder blades together at the top of each rep.
-
Keep Wrists Neutral: Avoid excessive wrist bending by maintaining a strong, aligned grip.
-
Breathe Properly: Inhale during the eccentric phase (lowering) and exhale as you pull up.

Muscle group:

Tips
-
Keep Elbows Fixed: Keep your elbows close to your body, preventing them from moving forward or backward, which helps isolate the biceps.
-
Avoid Swinging: Perform the movement slowly and with control to avoid using momentum, which reduces effectiveness.
-
Maintain a Neutral Wrist: Keep your wrists straight, aligned with your forearms, to avoid unnecessary strain and maximize bicep activation.
-
Engage the Core: Keep your core tight to stabilize your torso and prevent any rocking motion during the curl.
-
Breathe Steadily: Exhale as you curl up, and inhale as you lower the band down, maintaining rhythm and focus.
HIIT Finisher10 min
Goal: Combine push and core drill to challenge full-body endurance under tension.
Format: 5 Rounds – 1 minute per round
-
40 sec Push-Ups
-
20 sec Superman Pulses
→ 5 rounds = 10 minutes total
This blend pushes muscular endurance and core control—both vital for strong, clean reps.
Muscle groups:
Tips
-
Body Alignment: Keep your body in a straight line from head to heels. Engage your core and glutes to prevent your hips from dropping or rising.
-
Hand Placement: Your hands should be positioned just outside of shoulder-width for optimal stability. Moving them closer or wider will target different muscles.
-
Elbow Positioning: Keep your elbows at about a 45-degree angle from your body, not flaring out too far to avoid shoulder strain.
-
Breathing: Inhale as you lower yourself, and exhale as you push back up. Controlled breathing improves strength and endurance.
-
Controlled Movements: Lower yourself slowly to build strength, then push back up with a smooth, steady motion.

Muscle group:
Tips
-
Core Engagement: Keep your core muscles tight throughout the exercise to protect your lower back and maintain proper form.
-
Small, Controlled Movements: The pulses should be small and controlled. Focus on raising and lowering your limbs just a few inches with each pulse to engage the muscles without losing control.
-
Neck Position: Keep your neck in a neutral position, looking down at the floor. Avoid lifting your head too high, which can strain your neck.
-
Squeeze Your Glutes: Actively engage your glutes during the pulses to maximize the benefits for your lower back and posterior chain.
-
Breathing: Breathe steadily throughout the movement. Exhale as you pulse upwards and inhale as you lower slightly.
Warm-Up10 min
Goal: Activate the posterior chain and prep the body for slow, loaded eccentrics.
Format: Circuit – 2 rounds, no rest between exercises or rounds
-
30 sec Bear Crawl
-
10x Scapula Rows
-
10x Reverse Snow Angels
Expect this warm-up to light up your back and shoulders. Focus on scapular retraction and controlled movement.
No muscle groups found for this post.
Tips
-
Move slowly and deliberately to avoid sudden movements.
-
Keep circles smooth and controlled—avoid jerky motions.
-
Breathe steadily and deeply to maximize relaxation and blood flow.
-
Gradually increase the range of motion as your joints warm up.
-
Perform each movement for 15-20 seconds, or until joints feel loosened.
-
Customize your routine slightly based on the specific demands of your workout.
Muscle group:
Tips
-
Keep the Core Tight: Engage your core throughout the movement to prevent your hips from lifting or sagging.
-
Minimize Hip Movement: The goal is to keep your hips stable, avoiding excessive side-to-side motion. This helps maximize core engagement and balance.
-
Small Steps: Take smaller, controlled steps to improve balance and coordination while keeping the movement fluid.
-
Controlled Breathing: Breathe steadily as you crawl, exhaling as you move each hand and foot forward, and inhaling as you stabilize. Proper breathing helps maintain core stability.
-
Hand and Shoulder Alignment: Keep your hands under your shoulders and ensure each step forward is controlled to reduce strain on your wrists and shoulders.
Tips
-
Keep your body in a rigid plank position to maximize stability.
-
Engage your lats throughout the movement to maintain control.
-
Perform the exercise slowly, focusing on mind-muscle connection.
-
If you’re new to scapular control, practice hanging scapular retractions first.
-
Use controlled breathing to maintain core engagement and stability.
-
Keep your neck neutral—avoid tucking or craning it forward.

Muscle group:
Tips
-
Keep Arms Straight but Not Locked: Maintain a slight bend in the elbows to reduce unnecessary joint strain.
-
Move in a Smooth, Controlled Manner: Avoid jerky or fast motions—slow, controlled reps activate muscles more effectively.
-
Focus on Squeezing the Shoulder Blades: Imagine pinching a pencil between your scapulae at the bottom of the movement.
-
Engage Your Core Throughout: Prevent excessive lumbar arching by keeping abs and glutes activated.
-
Keep a Steady Breathing Pattern: Inhale as you extend the arms forward, and exhale as you sweep them back.
-
Try Adding Light Weights for Progression: Holding small plates or wrist weights can increase resistance for added challenge.
Strength25 min
Goal: Master controlled negatives and combine them with strict horizontal pulling.
Structure:
-
Superset A (3 rounds): A1 + A2, rest 90 sec
-
Set B (2 sets): Performed alone, rest 45 sec
🟦 Superset A:
-
A1: Negative Pull-Ups – 3–4 reps with 5-second lower
-
A2: Australian Pull-Ups (aka. Bodyweight Rows with Straight Legs) – 10 reps
→ Rest 90 sec after each round
🟩 Set B:
-
Resistance Band Rotator Cuff External Rotations – 12 reps per side
→ Rest 45 sec between sets
The slower the better—no fast dropping from the bar. Think: “control all the way down” like you’re moving through water.
Muscle group:
If you need to, then use a resistance band for assistance, but a thinner one than the last time.
Tips
-
Start with a descent of 3-5 seconds, gradually increasing to 6-8 seconds as you gain strength.
-
Engage your core and glutes throughout the movement to stabilize your body.
-
Breathe steadily—inhale at the top and exhale slowly during the descent.
-
Use a slight pause at the bottom before stepping back up to reinforce control.
-
Experiment with grip variations (neutral grip may feel more comfortable for some athletes).
-
Train consistently—negative pull-ups should be performed 2-3 times per week for optimal progress.
Tips
-
Maintain a neutral neck position to avoid strain.
-
Keep your wrists straight and aligned with your forearms.
-
Adjust grip width to target different areas of the back (wider for lats, narrower for biceps).
-
If using rings, rotate your grip naturally during the movement for better joint alignment.
-
Pause at the top for a brief second to maximize muscle engagement.
-
Gradually increase the difficulty by changing body position or adding weight.
Muscle group:
Tips
-
Keep your wrist neutral throughout the movement to prevent strain.
-
Use a light resistance band to prioritize control and full range of motion.
-
Place a rolled-up towel under your elbow to improve muscle activation and prevent compensation.
-
Focus on high reps (12-20) with slow, controlled movement rather than heavy resistance.
-
Maintain even tension in the band throughout the motion to avoid jerky movements.
HIIT Finisher10 min
Goal: Add some dynamic leg work and core engagement under fatigue.
Format: 4 rounds – 45 sec work / 15 sec rest
→ Alternate:
-
Walking Lunges
-
Tabletop Hold
→ 4 rounds = 10 minutes
The tabletop hold reinforces shoulder extension strength while your core fights to keep you stable. Don’t let the simplicity fool you—this will challenge your posture and coordination!
Tips
-
Maintain Upright Posture: Keep your torso upright and chest lifted throughout the movement. Avoid leaning forward or arching your back.
-
Step with Control: Focus on controlled, deliberate steps. Rushing the movement can lead to poor form and injury.
-
Knee Alignment: Ensure that your front knee stays aligned with your toes and doesn’t go past your toes as you lunge.
-
Push Through the Heel: When you push off to bring your back leg forward, drive through the heel of your front foot to engage your glutes and hamstrings effectively.
-
Engage Your Core: Keep your core engaged to help with balance and stability as you move forward.
-
Avoid Overstriding: Taking too large a step can cause your back leg to overstretch and may place unnecessary stress on your joints.
Muscle group:
Tips
-
Squeeze your glutes at the top to fully activate your posterior chain.
-
Look slightly upward to maintain neck alignment but avoid excessive tilting.
-
Engage your core to prevent lower back sagging.
-
If your wrists feel strained, try placing hands on yoga blocks or using fists instead of flat palms.
-
Perform dynamic reps by lowering and lifting the hips for added activation before holding the position statically.
Week 5 – Power & Precision
- Workout #9
- Workout #10
Warm-Up10 min
Goal: Fire up the pulling chain and prep shoulders for vertical tension.
Format: Circuit – 2 rounds, no rest between exercises or rounds
-
30 sec High Knees
-
10x Reverse Snow Angels
-
10x WYT Raises from each letter
This combo opens up your shoulders and activates your scapular muscles for smooth, powerful pulls.
No muscle groups found for this post.
Tips
-
Move slowly and deliberately to avoid sudden movements.
-
Keep circles smooth and controlled—avoid jerky motions.
-
Breathe steadily and deeply to maximize relaxation and blood flow.
-
Gradually increase the range of motion as your joints warm up.
-
Perform each movement for 15-20 seconds, or until joints feel loosened.
-
Customize your routine slightly based on the specific demands of your workout.
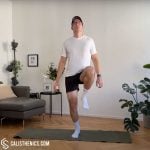


Tips
-
Keep your core tight to stabilize your spine and prevent over-rotation.
-
Pump your arms naturally—elbows bent and driving in sync with your legs.
-
Look straight ahead rather than down to keep posture aligned.
-
Use a metronome or playlist with a steady beat to maintain tempo.
-
Start slow to warm up and ramp up intensity gradually.
-
Train barefoot or in minimalist shoes (on soft flooring) to improve foot strength and awareness.
Muscle group:
Tips
-
Keep Arms Straight but Not Locked: Maintain a slight bend in the elbows to reduce unnecessary joint strain.
-
Move in a Smooth, Controlled Manner: Avoid jerky or fast motions—slow, controlled reps activate muscles more effectively.
-
Focus on Squeezing the Shoulder Blades: Imagine pinching a pencil between your scapulae at the bottom of the movement.
-
Engage Your Core Throughout: Prevent excessive lumbar arching by keeping abs and glutes activated.
-
Keep a Steady Breathing Pattern: Inhale as you extend the arms forward, and exhale as you sweep them back.
-
Try Adding Light Weights for Progression: Holding small plates or wrist weights can increase resistance for added challenge.

Tips
-
Core and Glute Engagement: Keep your core and glutes engaged throughout the exercise to support your lower back and maintain proper body alignment.
-
Focus on Shoulder Blades: The key to WTY raises is squeezing your shoulder blades together during each raise to engage the muscles of the upper back.
-
Control the Movement: Perform each raise slowly and with control, avoiding any jerky movements. Focus on quality over speed.
-
Neck Alignment: Keep your neck in a neutral position by looking down at the floor. Avoid lifting your head too high, which could strain your neck.
-
Breathing: Inhale as you prepare to lift your arms and exhale as you squeeze your shoulder blades together and raise your arms. Steady breathing helps maintain control and focus.
Strength25 min
Goal: Build top-end pulling strength with minimal assistance and strict form.
Structure:
-
Superset A (4 rounds): A1 + A2, rest 2 minutes
-
Set B (2 sets): Performed alone, rest 45 sec
🟦 Superset A:
-
A1: Resistance Band Pull-Ups – 4–5 reps (use a lighter band than before)
-
A2: Bodyweight Rows with Elevated Feet – 6–8 reps
→ Rest 2 minutes between rounds
🟩 Set B:
-
Resistance Band Shrugs – 20 reps
→ Rest 45 sec between sets
These banded pull-ups should feel tough. Focus on explosive pulling and controlled lowering—you’re simulating a real rep now.

Tips
-
Choose the right band tension – A thicker band makes the pull-up easier, while a thinner band provides less assistance.
-
Experiment with different grips – Try neutral grip (palms facing each other) or wide grip for variation.
-
Keep your body tight – Engage your core and glutes to prevent swinging.
-
Control the descent – Lowering slowly builds more strength than letting the band recoil you downward.
-
Breathe properly – Exhale as you pull up, inhale as you lower yourself.
-
Gradually decrease assistance – As you get stronger, transition to thinner bands or fewer loops.
You can do it on Dip Bars or Gymnastics Rings set just below chest height.
Elevate your feet with a chair or plyo box for example.
Tips
-
Engage the Core Throughout the Movement: Keep a hollow body position to maintain stability.
-
Adjust the Ring Height to Modify Difficulty: Lower rings = harder (more horizontal position), higher rings = easier.
-
Use a Controlled Tempo: 3-4 second eccentric (lowering) phases will increase time under tension for strength gains.
-
Focus on Scapular Retraction: Squeeze your shoulder blades together at the top of each rep.
-
Keep Wrists Neutral: Avoid excessive wrist bending by maintaining a strong, aligned grip.
-
Breathe Properly: Inhale during the eccentric phase (lowering) and exhale as you pull up.
Muscle group:
Tips
-
Keep the Core Tight: Engaging your core helps stabilize your torso, ensuring the movement focuses on the traps.
-
Focus on Shoulder Elevation: Avoid pulling with your arms; instead, focus on lifting your shoulders directly upward toward your ears.
-
Avoid Rolling the Shoulders: Lift your shoulders straight up and down; rolling the shoulders can lead to improper form and shoulder strain.
-
Controlled Movement: Perform the exercise slowly, focusing on squeezing the traps at the top and controlling the descent.
-
Breathe Steadily: Exhale as you lift into the shrug and inhale as you lower back down, maintaining a consistent rhythm.
HIIT Finisher10 min
Goal: Drive strength and endurance while maintaining clean movement under fatigue.
Format: 5 rounds – 60 sec per round
-
40 sec Push-Ups
-
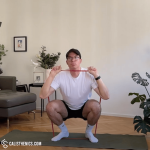
20 sec Squat Hold
→ 5 rounds = 10 minutes
You’ll feel the push-pull balance here. Fight to keep posture tight, even when your arms are smoked from the main set.
Muscle groups:
Tips
-
Body Alignment: Keep your body in a straight line from head to heels. Engage your core and glutes to prevent your hips from dropping or rising.
-
Hand Placement: Your hands should be positioned just outside of shoulder-width for optimal stability. Moving them closer or wider will target different muscles.
-
Elbow Positioning: Keep your elbows at about a 45-degree angle from your body, not flaring out too far to avoid shoulder strain.
-
Breathing: Inhale as you lower yourself, and exhale as you push back up. Controlled breathing improves strength and endurance.
-
Controlled Movements: Lower yourself slowly to build strength, then push back up with a smooth, steady motion.
Tips
-
Maintain an Upright Posture: Keep your chest up and back straight during the entire hold. Avoid letting your lower back round, which can put strain on the spine.
-
Knee and Toe Alignment: Ensure that your knees track over your toes and do not collapse inward. Your knees should be at a 90-degree angle or slightly less.
-
Keep Your Heels Down: Ensure that your weight is distributed evenly across your feet, with your heels pressed firmly into the ground. You should be able to wiggle your toes slightly.
-
Engage Your Core: Tighten your abdominal muscles to help stabilize your lower back and maintain proper form throughout the hold.
-
Breathe Consistently: Don’t hold your breath! Breathe deeply and consistently to stay relaxed and focused.
Warm-Up10 min
Goal: Prime the posterior chain and activate vertical pulling muscles.
Format: Circuit – 2 rounds, no rest between exercises or rounds
-
30 sec Bear Crawl
-
10x Doorframe Rows
-
12x Superman Towel Rows
Don’t rush—control and scapular movement matter more than speed here.
No muscle groups found for this post.
Tips
-
Move slowly and deliberately to avoid sudden movements.
-
Keep circles smooth and controlled—avoid jerky motions.
-
Breathe steadily and deeply to maximize relaxation and blood flow.
-
Gradually increase the range of motion as your joints warm up.
-
Perform each movement for 15-20 seconds, or until joints feel loosened.
-
Customize your routine slightly based on the specific demands of your workout.
Muscle group:
Tips
-
Keep the Core Tight: Engage your core throughout the movement to prevent your hips from lifting or sagging.
-
Minimize Hip Movement: The goal is to keep your hips stable, avoiding excessive side-to-side motion. This helps maximize core engagement and balance.
-
Small Steps: Take smaller, controlled steps to improve balance and coordination while keeping the movement fluid.
-
Controlled Breathing: Breathe steadily as you crawl, exhaling as you move each hand and foot forward, and inhaling as you stabilize. Proper breathing helps maintain core stability.
-
Hand and Shoulder Alignment: Keep your hands under your shoulders and ensure each step forward is controlled to reduce strain on your wrists and shoulders.
Tips
-
Squeeze Your Shoulder Blades: Focus on squeezing your shoulder blades together as you pull the band apart. This ensures that you engage the muscles of your upper back effectively.
-
Keep Arms Straight but Not Locked: Maintain straight arms during the movement, but avoid locking your elbows to protect your joints and maximize muscle engagement.
-
Core Engagement: Keep your core tight to prevent arching your back as you pull the band apart. A stable core helps maintain proper posture and prevents compensations.
-
Controlled Movement: Perform the movement slowly and with control, both when pulling the band apart and when returning to the starting position. Avoid jerking or using momentum.
-
Breathing: Exhale as you pull the band apart and inhale as you return to the starting position. Proper breathing helps maintain focus and control.
Muscle groups:
Tips
-
Keep Constant Tension on the Towel: Actively pull outward to engage shoulders and upper back more effectively.
-
Lift Your Chest Slightly for Full Activation: Avoid lying completely flat—slight elevation increases muscle engagement.
-
Slow Down the Movement: Take 3-4 seconds to extend the arms back out, increasing time under tension.
-
Breathe Properly: Inhale when extending the arms, exhale when pulling the towel toward the chest.
-
Engage the Glutes & Core: Maintain a tight posterior chain to stabilize the movement.
-
Use a Thicker Towel or Band for Added Resistance: This helps increase muscle engagement and pulling endurance.
Strength25 min
Goal: Combine long eccentrics, advanced rows, and grip endurance for full-back strength.
Structure:
-
Superset A (3 rounds): A1 + A2, rest 90–120 sec
-
Set B (2 sets): Performed alone, rest 45 sec
🟦 Superset A:
-
A1: Negative Pull-Ups (5–6 sec lower) – 3–4 reps
-
A2: Tuck Front Lever Rows (or BW Rows w/ Elevated Feet) – 5–6 reps
→ Rest 90–120 sec after each round
🟩 Set B:
-
Scapula Pull-Ups or Hanging Hold – 30 seconds
→ Rest 45 sec between sets
You’re now training like someone who can nearly do full reps. Give each negative full attention—control from the top until your arms are straight.
Muscle group:
Tips
-
Start with a descent of 3-5 seconds, gradually increasing to 6-8 seconds as you gain strength.
-
Engage your core and glutes throughout the movement to stabilize your body.
-
Breathe steadily—inhale at the top and exhale slowly during the descent.
-
Use a slight pause at the bottom before stepping back up to reinforce control.
-
Experiment with grip variations (neutral grip may feel more comfortable for some athletes).
-
Train consistently—negative pull-ups should be performed 2-3 times per week for optimal progress.

Easier alternative: Bodyweight Rows with Elevated Feet
Tips
-
Keep your knees tucked tightly to reduce unnecessary movement.
-
Squeeze your glutes and core to maintain a rigid body line.
-
Use a controlled tempo to maximize strength gains—especially on the eccentric phase.
-
Adjust the angle of your body (pushing your knees further away from your chest into an advanced tuck front lever) to find an appropriate difficulty level.
-
Breathe steadily and avoid holding your breath, as it can cause unnecessary tension.
-
If grip is an issue, try wrapping your thumbs around the bar or rings for extra security.
You can also do it on a pull-up bar.
If scapula pull-ups are too hard: just hang from the bar, either active hang or passive hang.
Tips
-
Keep Arms Straight – Do not bend your elbows; the movement should come only from the scapula.
-
Engage Your Core – Helps prevent excessive body movement or swinging.
-
Control the Descent – Avoid dropping too fast; lower with control.
-
Breathe Properly – Inhale while lowering, exhale while pulling your scapula together.
-
Use a Full Range of Motion – Ensure you fully depress and retract your scapula.
HIIT Finisher10 min
Goal: Fire up your lower body and core without compromising posture.
Format: 4 rounds – 45 sec work / 15 sec rest
→ Alternate:
-
Walking Lunges
-
Reverse Elbow Plank
→ 4 rounds = 10 minutes
Expect wobbly legs by round 3. That’s okay—just stay controlled and tight.
Tips
-
Maintain Upright Posture: Keep your torso upright and chest lifted throughout the movement. Avoid leaning forward or arching your back.
-
Step with Control: Focus on controlled, deliberate steps. Rushing the movement can lead to poor form and injury.
-
Knee Alignment: Ensure that your front knee stays aligned with your toes and doesn’t go past your toes as you lunge.
-
Push Through the Heel: When you push off to bring your back leg forward, drive through the heel of your front foot to engage your glutes and hamstrings effectively.
-
Engage Your Core: Keep your core engaged to help with balance and stability as you move forward.
-
Avoid Overstriding: Taking too large a step can cause your back leg to overstretch and may place unnecessary stress on your joints.
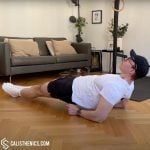

Tips
-
Ensure your elbows are positioned directly beneath your shoulders to maintain optimal stability and prevent shoulder discomfort.
-
Contract your glutes strongly to maintain hip elevation throughout the exercise.
-
Breathe steadily, inhaling deeply through your nose and exhaling slowly through your mouth to enhance endurance and relaxation.
-
Aim to extend hold durations gradually, rather than quickly progressing to avoid compromising form.
-
Use a mat or soft surface beneath your elbows for comfort and stability, reducing unnecessary discomfort.
Week 6 – Test & Transition
- Workout #11
- Workout #12
Warm-Up10 min
Goal: Mobilize, activate, and mentally prepare for your test.
Format: Circuit – 2 rounds, no rest between exercises or rounds
-
5x Inchworms with Push-Up
-
10x Towel Pass-Throughs
-
10x Scapula Rows
Muscle group:
Tips
-
Keep your core actively engaged throughout to maintain stability and prevent excessive lower-back stress.
-
Walk your hands out progressively further as your strength and flexibility improve.
-
Focus on smooth transitions between each phase of the exercise to improve coordination and body control.
-
Use controlled breathing, matching each movement phase to inhalation and exhalation cycles.
-
Perform regularly as part of your warm-up routine to optimize flexibility, mobility, and upper-body strength.
Tips
-
Start with a wider grip if you feel tightness in your shoulders.
-
If the movement feels too challenging, switch to a resistance band, which allows more flexibility.
-
Perform in front of a mirror to check for excessive arching or compensations.
-
Include it in your warm-up routine before upper body workouts, especially if working on overhead movements.
-
If you experience pain, stop and reassess your grip width and movement control.
Tips
-
Keep your body in a rigid plank position to maximize stability.
-
Engage your lats throughout the movement to maintain control.
-
Perform the exercise slowly, focusing on mind-muscle connection.
-
If you’re new to scapular control, practice hanging scapular retractions first.
-
Use controlled breathing to maintain core engagement and stability.
-
Keep your neck neutral—avoid tucking or craning it forward.
Testing + Strength 25 min
Goal: Test your current level, then reinforce your pulling patterns with high-quality reps.
Structure:
-
Test Set: 1 round, then proceed to strength work
-
Superset A (3 rounds): A1 + A2, rest 90–120 sec
-
Set B (2 sets): Performed alone, rest 45 sec
✅ Pull-Up Test Set:
-
Max pull-ups (band-assisted or unassisted)
→ Rest 2–3 min before moving on
🟦 Superset A:
-
A1: Band-Assisted Pull-Ups (or Full Pull-Ups) – 4–6 reps
-
A2: Australian Pull-Ups (aka. Bodyweight Rows with Straight Legs) – 8–10 reps
→ Rest 90–120 sec after each round
🟩 Set B:
-
Resistance Band Face Pulls – 15 reps
→ Rest 45 sec between sets
Write down your test results! Whether it’s one unassisted rep or six clean banded reps, it’s your new starting point.
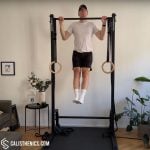

Tips
-
Keep your wrists neutral to avoid unnecessary strain.
-
Squeeze your glutes and engage your core to maintain body control.
-
Try a slight pause at the top to increase time under tension and improve muscle engagement.
-
Start the pulling motion by first engaging your scapulas before bending your arms.
-
Wrap your thumbs around the bar and use chalk or gloves for better hold.
-
If struggling with full reps, focus on negative pull-ups to build strength.
Tips
-
Choose the right band tension – A thicker band makes the pull-up easier, while a thinner band provides less assistance.
-
Experiment with different grips – Try neutral grip (palms facing each other) or wide grip for variation.
-
Keep your body tight – Engage your core and glutes to prevent swinging.
-
Control the descent – Lowering slowly builds more strength than letting the band recoil you downward.
-
Breathe properly – Exhale as you pull up, inhale as you lower yourself.
-
Gradually decrease assistance – As you get stronger, transition to thinner bands or fewer loops.
Tips
-
Maintain a neutral neck position to avoid strain.
-
Keep your wrists straight and aligned with your forearms.
-
Adjust grip width to target different areas of the back (wider for lats, narrower for biceps).
-
If using rings, rotate your grip naturally during the movement for better joint alignment.
-
Pause at the top for a brief second to maximize muscle engagement.
-
Gradually increase the difficulty by changing body position or adding weight.
Tips
-
Keep the Elbows High: Lead with your elbows, keeping them in line with your shoulders as you pull to maximize engagement of the rear deltoids.
-
Engage the Core: Keep your core tight to stabilize your torso and maintain an upright posture, avoiding any rocking or leaning.
-
Focus on Shoulder Rotation: Rotate your shoulders externally as you pull, ensuring your hands are level with your ears at the peak of the movement.
-
Avoid Shrugging the Shoulders: Keep your shoulders down and away from your ears to avoid upper trap overactivation.
-
Controlled Movement: Perform the exercise slowly and with control to fully activate the target muscles and avoid using momentum.
HIIT Finisher10 min
Goal: Push full-body effort and mental resilience post-strength work.
Format: 5 Rounds – EMOM (Every Minute on the Minute)
-
Minute 1: 40 sec Resistance Band Thrusters + 20 sec Glute Bridges
-
Minute 2: Repeat
→ 5 total rounds = 10 minutes
Muscle groups:
Tips
-
Secure Band Position: Ensure the band is securely anchored under both feet to prevent any slipping, and hold it firmly at shoulder height.
-
Engage the Core: Keep your core tight throughout the entire movement to maintain balance and stability.
-
Drive Through the Heels: Push through your heels as you rise from the squat to fully engage your glutes and quads.
-
Smooth Transition: Move fluidly from the squat into the overhead press, ensuring a controlled, coordinated movement.
-
Avoid Locking Elbows: At the top of the press, avoid fully locking out your elbows to keep constant tension on the shoulders.
Muscle groups:
Tips
-
Core Engagement: Keep your core muscles engaged throughout the movement to prevent your lower back from arching. This helps protect your spine and enhances the effectiveness of the exercise.
-
Push Through Your Heels: Pressing through your heels activates the glutes more effectively. Avoid pushing through the balls of your feet or letting your toes lift off the floor.
-
Squeeze at the Top: At the top of the movement, fully squeeze your glutes to maximize muscle activation. Ensure that your body forms a straight line from your shoulders to your knees.
-
Avoid Overextension: Be mindful not to hyperextend your lower back at the top of the movement. Focus on lifting with your glutes, not your lower back.
-
Breathing: Inhale as you lower your hips and exhale as you lift them. Proper breathing enhances core engagement and control.
Warm-Up10 min
Goal: Wake up the full pulling chain with dynamic and static prep.
Format: Circuit – 2 rounds, no rest between exercises or rounds
-
30 sec Jumping Jacks
-
10x Resistance Band Pull-Aparts
-
12x Rotator Cuff External Rotation
No muscle groups found for this post.
Tips
-
Move slowly and deliberately to avoid sudden movements.
-
Keep circles smooth and controlled—avoid jerky motions.
-
Breathe steadily and deeply to maximize relaxation and blood flow.
-
Gradually increase the range of motion as your joints warm up.
-
Perform each movement for 15-20 seconds, or until joints feel loosened.
-
Customize your routine slightly based on the specific demands of your workout.
Muscle groups:
Tips
-
Keep your movements light and bouncy, not stiff or stompy.
-
Maintain a steady breathing rhythm, especially in longer sets.
-
Engage your core to support posture and absorb shock.
-
Land on the balls of your feet and roll through the foot gently to protect your knees.
-
Scale the speed based on your fitness goal—slower for warm-up, faster for conditioning.
-
Stay relaxed in the shoulders and arms, avoiding unnecessary tension.
Tips
-
Squeeze Your Shoulder Blades: Focus on squeezing your shoulder blades together as you pull the band apart. This ensures that you engage the muscles of your upper back effectively.
-
Keep Arms Straight but Not Locked: Maintain straight arms during the movement, but avoid locking your elbows to protect your joints and maximize muscle engagement.
-
Core Engagement: Keep your core tight to prevent arching your back as you pull the band apart. A stable core helps maintain proper posture and prevents compensations.
-
Controlled Movement: Perform the movement slowly and with control, both when pulling the band apart and when returning to the starting position. Avoid jerking or using momentum.
-
Breathing: Exhale as you pull the band apart and inhale as you return to the starting position. Proper breathing helps maintain focus and control.
Muscle group:
Tips
-
Keep your wrist neutral throughout the movement to prevent strain.
-
Use a light resistance band to prioritize control and full range of motion.
-
Place a rolled-up towel under your elbow to improve muscle activation and prevent compensation.
-
Focus on high reps (12-20) with slow, controlled movement rather than heavy resistance.
-
Maintain even tension in the band throughout the motion to avoid jerky movements.
Strength25 min
Goal: Use your highest-level pull-up progression with max intent and volume control.
Structure:
-
Superset A (4 rounds): A1 + A2, rest 2 minutes
-
Set B (2 sets): Performed alone, rest 45 sec
🟦 Superset A:
-
A1: Your highest progression:
→ Regular Pull-Up (if possible)
→ Band-Assisted Pull-Up
→ Slow Negative Pull-Up
Perform 3–5 high-quality reps
-
A2: Tuck Front Lever Row or BW Row with Elevated Feet – 6–8 reps
→ Rest 2 minutes between rounds
🟩 Set B:
-
Scapula Pull-Ups or Hanging Hold (active or passive) – 40 sec
→ Rest 45 sec between sets
Go all-in on quality here. This is your “graduation set”—put everything you’ve built into these final reps.
Tips
-
Keep your wrists neutral to avoid unnecessary strain.
-
Squeeze your glutes and engage your core to maintain body control.
-
Try a slight pause at the top to increase time under tension and improve muscle engagement.
-
Start the pulling motion by first engaging your scapulas before bending your arms.
-
Wrap your thumbs around the bar and use chalk or gloves for better hold.
-
If struggling with full reps, focus on negative pull-ups to build strength.
Tips
-
Keep your knees tucked tightly to reduce unnecessary movement.
-
Squeeze your glutes and core to maintain a rigid body line.
-
Use a controlled tempo to maximize strength gains—especially on the eccentric phase.
-
Adjust the angle of your body (pushing your knees further away from your chest into an advanced tuck front lever) to find an appropriate difficulty level.
-
Breathe steadily and avoid holding your breath, as it can cause unnecessary tension.
-
If grip is an issue, try wrapping your thumbs around the bar or rings for extra security.
You can also perform it on a pull-up bar.
Alternative exercise: Hanging Hold (active or passive)
Tips
-
Keep Arms Straight – Do not bend your elbows; the movement should come only from the scapula.
-
Engage Your Core – Helps prevent excessive body movement or swinging.
-
Control the Descent – Avoid dropping too fast; lower with control.
-
Breathe Properly – Inhale while lowering, exhale while pulling your scapula together.
-
Use a Full Range of Motion – Ensure you fully depress and retract your scapula.
HIIT FInisher10 min
Goal: Challenge core and upper-body stamina to end the program on a high.
Format: 4 rounds – 45 sec work / 15 sec rest
→ Alternate:
-
Push-Ups
-
Elbow Plank
→ 4 rounds = 10 minutes
Muscle groups:
Tips
-
Body Alignment: Keep your body in a straight line from head to heels. Engage your core and glutes to prevent your hips from dropping or rising.
-
Hand Placement: Your hands should be positioned just outside of shoulder-width for optimal stability. Moving them closer or wider will target different muscles.
-
Elbow Positioning: Keep your elbows at about a 45-degree angle from your body, not flaring out too far to avoid shoulder strain.
-
Breathing: Inhale as you lower yourself, and exhale as you push back up. Controlled breathing improves strength and endurance.
-
Controlled Movements: Lower yourself slowly to build strength, then push back up with a smooth, steady motion.
Tips
-
Straight Body Line: Ensure your body forms a straight line from your head to your heels. Avoid raising or lowering your hips too much, as this can compromise form.
-
Core Engagement: Keep your core muscles tight throughout the entire exercise. This helps stabilize your spine and prevents your hips from sagging or arching.
-
Elbow Positioning: Your elbows should be directly under your shoulders, creating a strong base of support. This will also help engage your shoulders and reduce strain.
-
Steady Breathing: Focus on controlled, deep breaths. Inhale through your nose and exhale through your mouth, which helps stabilize your core and manage endurance.
-
Avoid Tension in the Neck: Keep your neck neutral by looking down at the floor to prevent any tension or strain in the neck.