
Full-Body Home Workout Plan for Beginners - No Equipment
Are you brand new to fitness and looking for the perfect starting point? Welcome to our Level 1 Calisthenics Workout Plan for Beginners, carefully designed just for you! In only 30 minutes per session, this beginner-friendly routine helps you build foundational strength in pulling, pushing, leg exercises, and core stability—everything you need to confidently tackle more advanced workouts down the road - and all this without any equipment needed!
The program takes you step-by-step through four weeks of progressive training, consisting of three workouts per week.
❤️ Enjoying this free program? You can support Calisthenics.com at no extra cost by shopping through our Amazon links. Every purchase helps us create more free workout plans, exercise videos, and training tools for you.
Each session introduces simple yet effective bodyweight exercises that gradually increase in difficulty as your strength and stability improve. From wall push-ups and assisted squats to planks and foundational pulling exercises, you’ll experience balanced full-body training that feels both achievable and rewarding. By the end of these four weeks, you’ll be proud to perform a full bodyweight push-up and a full-depth squat with confidence.
Ideally, you’ll leave at least one rest day between workouts—for example, training on Monday, Wednesday, and Friday—to ensure your muscles recover properly and keep you feeling motivated and energized throughout the program.
Remember, fitness progress is personal, and it’s perfectly normal if you need a bit more time. Feel free to repeat any workout or even the entire week if it helps you master the movements fully. Your goal is sustainable progress, not speed. I’d love to hear how the plan is working for you, so please share your feedback, progress, or questions in the comments below!
The equipment in our videos is from GORNATION (get 10% off with code CS10. Free shipping in EU/UK/CH - minimum order value applies)
Ready to become stronger, healthier, and more active? Let’s get started!
FEEDBACK WANTED: We’d love to hear any ideas you have to improve the program or make the layout easier to use - your feedback helps us make it better for everyone. Please send your ideas to: tips@calisthenics.com
Week 1: Building the Foundation
- Workout #1
- Workout #2
- Workout #3
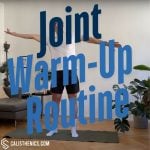
Joint Warm-Up5 min
Warming up your joints properly is essential to prepare your body for intense workouts, helping you stay injury-free and perform at your best. This quick and effective 5-6 minute joint warm-up routine is perfect for getting your body ready, whether you're about to dive into calisthenics, strength training, or any physical activity.


No muscle groups found for this post.
Tips
-
Move slowly and deliberately to avoid sudden movements.
-
Keep circles smooth and controlled—avoid jerky motions.
-
Breathe steadily and deeply to maximize relaxation and blood flow.
-
Gradually increase the range of motion as your joints warm up.
-
Perform each movement for 15-20 seconds, or until joints feel loosened.
-
Customize your routine slightly based on the specific demands of your workout.
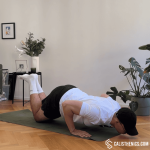
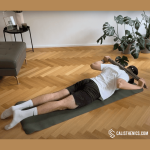
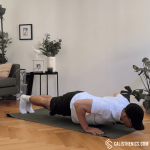
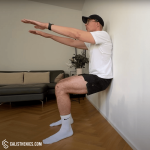
Main: Wall to Good Morning30 min
Let’s start the week with foundational exercises to build your strength safely.
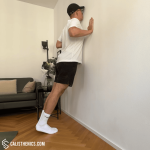
We’ll begin with wall push-ups, gently introducing your upper body to pushing movements and activating your chest, shoulders, and arms.
Next, bench-assisted squats will help you confidently build strength in your legs and glutes while mastering correct squat form.
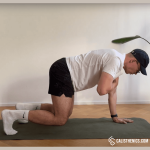
We’ll follow up with knee planks, developing your core stability by holding a steady, controlled position.
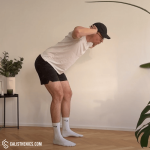
We’ll finish with good mornings, targeting your lower back and hamstrings, enhancing posture and flexibility.
Execution: SUPERSET (perform the exercises back-to-back with minimal or no rest in between)
Rest time: 1-2 min (after each superset)

Muscle groups:


- How it fits: Strengthens the chest, shoulders, and triceps. A good starting point for push-up progression.
- Scale up: Incline Push-ups
- Scale down: Decrease reps or move closer to the wall.
Tips
-
Core Engagement: Keep your core tight throughout the movement to maintain proper alignment and avoid straining your lower back.
-
Hand Placement: Your hands should be slightly wider than shoulder-width apart to allow for better chest engagement. If you feel shoulder discomfort, adjust the position of your hands slightly.
-
Elbow Positioning: Keep your elbows close to your body or at a slight angle to prevent shoulder strain and engage the triceps more effectively.
-
Body Angle: The further you stand from the wall, the more challenging the exercise becomes. Adjust your distance from the wall based on your fitness level.
-
Controlled Movement: Lower yourself slowly and push back up with control. Avoid rushing through the movement, as this reduces the effectiveness of the exercise.
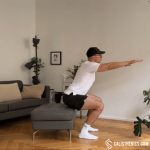


- How it fits: Targets the lower body, specifically quads, hamstrings, and glutes.
- Scale up: Add a pause at the bottom for 2-3 seconds before sitting down.
Tips
-
Maintain an Upright Posture: Keep your chest lifted and back straight throughout the entire movement to avoid leaning forward and straining your lower back.
-
Knee Alignment: Ensure your knees are tracking over your toes and do not collapse inward. This helps prevent unnecessary strain on your knees.
-
Use the Bench as a Guide: Gently touch the bench with your glutes, but avoid fully sitting down. The goal is to use the bench as a cue for depth without completely unloading the muscles.
-
Weight on Heels: Keep your weight distributed on your heels, not your toes. You should be able to wiggle your toes slightly when you’re at the bottom of the squat.
-
Control the Descent: Move slowly and with control, especially as you lower toward the bench. This ensures proper muscle engagement and prevents “plopping” onto the bench.
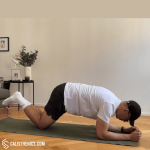


- How it fits: Builds core stability and overall body control.
- Scale up: Regular plank or increase hold time.
- Scale down: Reduce hold time.
Tips
-
Core Engagement: Make sure to keep your core muscles tight throughout the exercise. Imagine bracing your abdominals as if someone is about to push against your stomach.
-
Avoid Arching or Sagging: Keep your body in a straight line from shoulders to knees. Don’t allow your hips to sag or your back to arch, as this can put strain on your lower back.
-
Elbow or Hand Position: You can perform the knee plank with your arms straight (hands on the ground) or in a forearm plank position (elbows on the ground), depending on your comfort level.
-
Breathing: Maintain steady breathing throughout the plank. Inhale deeply through your nose and exhale through your mouth to help keep your core engaged and prevent fatigue.

Muscle groups:


- How it fits: Strengthens the hamstring and lower back
- Scale up: Slow down the tempo and pause at bottom.
- Scale down: Bend forward only as much as comfortable.
Tips
-
Back Positioning: Maintain a neutral spine during the entire movement. Avoid arching or rounding your back, as this can lead to strain or injury.
-
Core Engagement: Keep your core tight throughout the exercise to stabilize your spine and prevent your lower back from rounding.
-
Controlled Movement: Perform the movement slowly and with control, focusing on the hip hinge and keeping the motion smooth.
-
Knee Position: Keep a slight bend in your knees, but avoid excessive bending. The movement should come primarily from the hips, not the knees.
-
Breathing: Inhale as you lower your torso and exhale as you return to the starting position, keeping your breath steady to help with control and stabilization.
Joint Warm-Up5 min
Warming up your joints properly is essential to prepare your body for intense workouts, helping you stay injury-free and perform at your best. This quick and effective 5-6 minute joint warm-up routine is perfect for getting your body ready, whether you're about to dive into calisthenics, strength training, or any physical activity.
No muscle groups found for this post.
Tips
-
Move slowly and deliberately to avoid sudden movements.
-
Keep circles smooth and controlled—avoid jerky motions.
-
Breathe steadily and deeply to maximize relaxation and blood flow.
-
Gradually increase the range of motion as your joints warm up.
-
Perform each movement for 15-20 seconds, or until joints feel loosened.
-
Customize your routine slightly based on the specific demands of your workout.
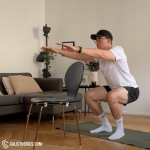
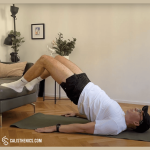
Main: Row, Lunge & Hold30 min
Here’s our second bodyweight workout I created to hit some of the most important muscle groups.
First, doorway rows help you build strength in your back and biceps, which is great for posture and pulling strength.
Then we have elevated lunges—by raising your front foot, you’ll feel extra engagement in your glutes, quads, and hamstrings, helping you develop balance and lower-body strength.
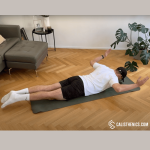
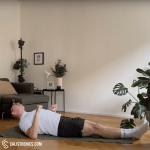
Next is the tuck hollow body hold, one of my favorite core exercises because it challenges your abs with an isometric hold, giving you better core control.
Finally, the glute bridge finishes things off by activating your glutes and lower back, which is key for posture and injury prevention.
Execution: SUPERSET (perform the exercises back-to-back with minimal or no rest in between)
Rest time: 1-2 min (after each superset)
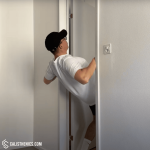


- How it fits: In preparation for pull-ups we need to strengthen the back muscles.
- Scale up: Slow down the tempo and pause close to the doorframe
- Scale down: Decrease the angle.
Tips
-
Core Engagement: Keep your core tight to support your spine and prevent any sagging or arching during the movement.
-
Squeeze Your Shoulder Blades: Focus on squeezing your shoulder blades together as you pull yourself toward the door frame. This helps target the upper back muscles more effectively.
-
Elbow Positioning: Keep your elbows close to your body during the rowing movement to avoid placing unnecessary strain on your shoulders.
-
Grip Strength: Ensure you have a firm grip on the door frame for stability. Use both hands evenly to maintain balance throughout the movement.
-
Breathing: Inhale as you extend your arms and lean back, and exhale as you pull your body toward the door frame. Proper breathing helps maintain control and power during the exercise.

- How it fits: Targets quads, hamstrings, and glutes, while also improving balance.
- Scale up: Add a pause or speed up the tempo.
- Scale down: Perform stationary lunges with less range of motion.
Tips
-
Core Engagement: Keep your core muscles tight throughout the movement to help maintain balance and proper posture.
-
Knee Alignment: Ensure that your front knee stays directly above your ankle as you lunge. Avoid letting your knee track too far forward past your toes to reduce strain on your knee joint.
-
Control the Descent: Lower yourself slowly and with control, focusing on maintaining balance and engaging the muscles of your front leg.
-
Breathing: Inhale as you lower your body and exhale as you push back up. Controlled breathing helps stabilize your core and maintain focus.
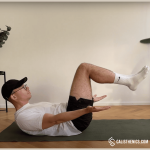

- How it fits: Strengthens to core by working the abs. Improves stability for more advanced exercises.
- Scale up: Move the knees away from your chest.
- Scale down: Bring the knees closer to your chest.
Tips
-
Core Engagement: Press your lower back into the ground and engage your core throughout the exercise. This is key to maintaining proper form and maximizing the benefits of the hold.
-
Neck Position: Keep your head and neck in a neutral position. Avoid straining your neck by looking too far forward or back. Keep your gaze toward the ceiling or slightly toward your legs.
-
Avoid Arching the Back: One of the most important aspects of this exercise is preventing your lower back from arching off the ground. If you notice this happening, focus on re-engaging your core and adjusting your position.
-
Controlled Breathing: Inhale deeply through your nose and exhale through your mouth while maintaining the hold. Controlled breathing helps keep your core stable and your muscles engaged.

Muscle groups:
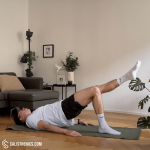
- How it fits: Strengthens the posterior chain, namely hamstring, glutes and lower back. Important for stability.
- Scale up: Go faster up, increase hold and slowly down.
- Scale down: Decrease reps.
Tips
-
Core Engagement: Keep your core muscles engaged throughout the movement to prevent your lower back from arching. This helps protect your spine and enhances the effectiveness of the exercise.
-
Push Through Your Heels: Pressing through your heels activates the glutes more effectively. Avoid pushing through the balls of your feet or letting your toes lift off the floor.
-
Squeeze at the Top: At the top of the movement, fully squeeze your glutes to maximize muscle activation. Ensure that your body forms a straight line from your shoulders to your knees.
-
Avoid Overextension: Be mindful not to hyperextend your lower back at the top of the movement. Focus on lifting with your glutes, not your lower back.
-
Breathing: Inhale as you lower your hips and exhale as you lift them. Proper breathing enhances core engagement and control.
Joint Warm-Up5 min
Warming up your joints properly is essential to prepare your body for intense workouts, helping you stay injury-free and perform at your best. This quick and effective 5-6 minute joint warm-up routine is perfect for getting your body ready, whether you're about to dive into calisthenics, strength training, or any physical activity.
No muscle groups found for this post.
Tips
-
Move slowly and deliberately to avoid sudden movements.
-
Keep circles smooth and controlled—avoid jerky motions.
-
Breathe steadily and deeply to maximize relaxation and blood flow.
-
Gradually increase the range of motion as your joints warm up.
-
Perform each movement for 15-20 seconds, or until joints feel loosened.
-
Customize your routine slightly based on the specific demands of your workout.
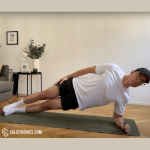
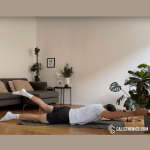
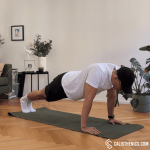
Main: Push, Squat, Stabilize30 min
Here is the third workout of the week, building naturally on the exercises we’ve done previously.
Earlier this week, we worked wall push-ups, so today we’re advancing to incline push-ups, gradually increasing upper-body strength by adding more intensity.
Our last leg exercise was the bench-assisted squats, and today we’re progressing to half squats, lowering slightly deeper to improve lower-body strength and mobility.
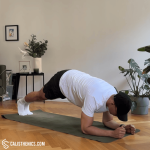
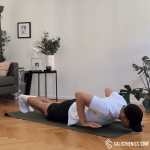
After mastering the knee plank, we’re now introducing the knee side plank to further engage your core muscles, especially those on the sides, enhancing stability from another angle.
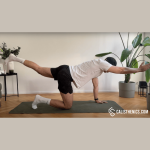
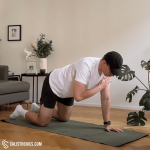
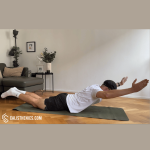
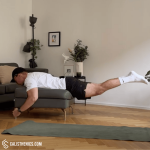
Finally, we’re adding bird dog reach kickbacks—a step up from previous stability exercises—targeting your glutes, lower back, and core together for improved balance and functional strength.
Execution: SUPERSET (perform the exercises back-to-back with minimal or no rest in between)
Rest time: 1-2 min (after each superset)


Muscle groups:
Tips
-
Core Engagement: Keep your core tight to prevent your hips from sagging or rising too high. This ensures proper body alignment and protects your lower back.
-
Hand Placement: Your hands should be placed directly under your shoulders. Adjust the width based on comfort, but ensure that your elbows don’t flare out too much.
-
Body Positioning: Ensure that your body forms a straight line from your head to your heels throughout the exercise. Engage your glutes and quads to maintain this alignment.
-
Controlled Movement: Lower yourself slowly to engage your muscles fully and avoid rushing through the reps.
-
Breathing: Inhale as you lower yourself and exhale as you push back up. Proper breathing helps maintain strength and stability.

Muscle group:
Tips
-
Maintain an Upright Posture: Keep your chest up and back straight throughout the movement. Avoid leaning too far forward, as this can put unnecessary strain on your lower back.
-
Knee Alignment: Ensure that your knees track over your toes and do not collapse inward. Proper alignment helps protect your knees from injury.
-
Weight on Heels: Keep the weight distributed on your midfoot and heels. You should be able to wiggle your toes slightly as you lower into the squat.
-
Breathe Correctly: Inhale as you lower into the squat and exhale as you stand back up. Controlled breathing will help maintain core stability.
-
Use a Mirror for Feedback: Performing the squat in front of a mirror can help you monitor your form and ensure proper depth and alignment.

Muscle group:
Tips
-
Engage Your Core: Keep your core tight throughout the exercise to stabilize your body and prevent your hips from sagging.
-
Maintain a Straight Line: Ensure your body forms a straight line from your shoulders to your knees. Avoid letting your hips drop or rotate.
-
Shoulder Alignment: Your shoulder should be directly above your elbow to avoid straining your shoulder joint.
-
Controlled Breathing: Breathe steadily throughout the movement. Inhale deeply through your nose and exhale through your mouth to help stabilize your core and prevent fatigue.

Muscle groups:
Tips
-
Core Engagement: Keep your core tight throughout the entire exercise to stabilize your spine and prevent excessive movement of the hips or lower back.
-
Neutral Spine: Maintain a neutral spine by avoiding arching your back or letting it round. Your body should remain in a straight line during the extension.
-
Controlled Movement: Move slowly and with control, focusing on extending your arm and leg fully without swinging or jerking.
-
Hip and Shoulder Alignment: Keep your hips and shoulders level. Avoid letting your hips tilt or your body rotate as you extend your limbs.
-
Breathing: Exhale as you extend your arm and leg, and inhale as you return to the starting position. Proper breathing helps stabilize your core and keep the movement fluid.
Week 2: Progressing Movements
- Workout #4
- Workout #5
- Workout #6
Joint Warm-Up5 min
Warming up your joints properly is essential to prepare your body for intense workouts, helping you stay injury-free and perform at your best. This quick and effective 5-6 minute joint warm-up routine is perfect for getting your body ready, whether you're about to dive into calisthenics, strength training, or any physical activity.
No muscle groups found for this post.
Tips
-
Move slowly and deliberately to avoid sudden movements.
-
Keep circles smooth and controlled—avoid jerky motions.
-
Breathe steadily and deeply to maximize relaxation and blood flow.
-
Gradually increase the range of motion as your joints warm up.
-
Perform each movement for 15-20 seconds, or until joints feel loosened.
-
Customize your routine slightly based on the specific demands of your workout.
Main: Squat Deep, Rock Strong30 min
We’ll start by making our incline push-ups more challenging—try doing more reps or slightly lowering your incline to boost the intensity and further build your upper-body strength.
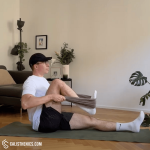
Next, we’ll progress from half squats to negative squats. Go as deep as you comfortably can, using a chair or desk for extra support, focusing on slow and controlled lowering to develop strength and mobility in your legs.
For the core, we’ll move from static holds to tuck hollow body rocks, adding movement to challenge your stability dynamically and further engage your abdominal muscles.
Finally, let’s revisit good mornings with a slower tempo, pausing briefly at the bottom to deepen your hamstring stretch and strengthen your lower back.
Execution: SUPERSET (perform the exercises back-to-back with minimal or no rest in between)
Rest time: 1-2 min (after each superset)
Muscle groups:
Tips
-
Core Engagement: Keep your core tight to prevent your hips from sagging or rising too high. This ensures proper body alignment and protects your lower back.
-
Hand Placement: Your hands should be placed directly under your shoulders. Adjust the width based on comfort, but ensure that your elbows don’t flare out too much.
-
Body Positioning: Ensure that your body forms a straight line from your head to your heels throughout the exercise. Engage your glutes and quads to maintain this alignment.
-
Controlled Movement: Lower yourself slowly to engage your muscles fully and avoid rushing through the reps.
-
Breathing: Inhale as you lower yourself and exhale as you push back up. Proper breathing helps maintain strength and stability.

Tips
-
Focus on the Descent: The main benefit of negative squats is the slow, controlled lowering phase. Focus on taking 3-5 seconds to descend, which maximizes muscle engagement.
-
Core Engagement: Keep your core tight throughout the movement to support your lower back and maintain proper posture.
-
Knee Alignment: Make sure your knees track over your toes and avoid letting them collapse inward. This helps prevent strain on your knees and ensures better muscle engagement.
-
Keep Weight in Heels: Ensure your heels stay planted on the ground throughout the movement to activate the glutes and hamstrings more effectively.
-
Use the Chair for Assistance Only: While the chair provides support, try to rely on it only during the ascent phase. Focus on using your legs to control the movement as much as possible.
Tips
-
Core Engagement: Keep your core tight throughout the exercise. This is key to maintaining the hollow body position and preventing your lower back from arching.
-
Rounded Body: Your body should remain in a rounded, C-shape throughout the movement. Avoid letting your back flatten or your shoulders and hips touch the floor.
-
Small, Controlled Rocks: The movement should be controlled, not excessive. Avoid big swings; focus on maintaining a steady, small rocking motion.
-
Breathing: Exhale as you rock forward and inhale as you rock back. Breathing helps you stay focused and maintain control during the exercise.
Muscle groups:
Tips
-
Back Positioning: Maintain a neutral spine during the entire movement. Avoid arching or rounding your back, as this can lead to strain or injury.
-
Core Engagement: Keep your core tight throughout the exercise to stabilize your spine and prevent your lower back from rounding.
-
Controlled Movement: Perform the movement slowly and with control, focusing on the hip hinge and keeping the motion smooth.
-
Knee Position: Keep a slight bend in your knees, but avoid excessive bending. The movement should come primarily from the hips, not the knees.
-
Breathing: Inhale as you lower your torso and exhale as you return to the starting position, keeping your breath steady to help with control and stabilization.
Joint Warm-Up5 min
Warming up your joints properly is essential to prepare your body for intense workouts, helping you stay injury-free and perform at your best. This quick and effective 5-6 minute joint warm-up routine is perfect for getting your body ready, whether you're about to dive into calisthenics, strength training, or any physical activity.
No muscle groups found for this post.
Tips
-
Move slowly and deliberately to avoid sudden movements.
-
Keep circles smooth and controlled—avoid jerky motions.
-
Breathe steadily and deeply to maximize relaxation and blood flow.
-
Gradually increase the range of motion as your joints warm up.
-
Perform each movement for 15-20 seconds, or until joints feel loosened.
-
Customize your routine slightly based on the specific demands of your workout.
Main: Reverse & Raise30 min
Today, we’re adding fresh exercises to build on your progress from last week.
We’ll start with WTY raises to activate your upper back and shoulders, improving your posture and shoulder health—take it slow and controlled, emphasizing good form.
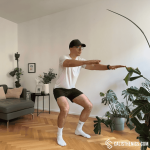
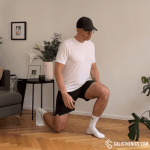
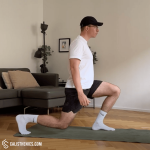
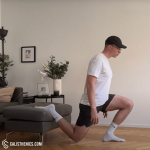
Next, we’ll introduce reverse lunges, stepping back into the lunge to further challenge your stability and lower-body strength.
Then, we’ll move to kneeling shoulder taps, a dynamic upgrade from your knee plank and side plank, which will enhance your core strength and stability by requiring controlled movements.
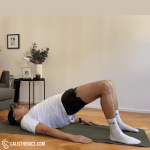
We’ll finish strong with glute bridges, focusing on slow, deliberate movements and a pause at the top to engage your glutes and lower back muscles even more effectively.
Execution: SUPERSET (perform the exercises back-to-back with minimal or no rest in between)
Rest time: 1-2 min (after each superset)


Tips
-
Core and Glute Engagement: Keep your core and glutes engaged throughout the exercise to support your lower back and maintain proper body alignment.
-
Focus on Shoulder Blades: The key to WTY raises is squeezing your shoulder blades together during each raise to engage the muscles of the upper back.
-
Control the Movement: Perform each raise slowly and with control, avoiding any jerky movements. Focus on quality over speed.
-
Neck Alignment: Keep your neck in a neutral position by looking down at the floor. Avoid lifting your head too high, which could strain your neck.
-
Breathing: Inhale as you prepare to lift your arms and exhale as you squeeze your shoulder blades together and raise your arms. Steady breathing helps maintain control and focus.

Tips
-
Maintain an Upright Posture: Keep your chest up and back straight throughout the movement. Avoid leaning forward or arching your lower back.
-
Knee Alignment: Ensure your front knee tracks directly over your ankle and does not extend past your toes. Your back knee should be bent at about a 90-degree angle, hovering just above the ground.
-
Control Your Step: Step back in a controlled manner, ensuring a steady and balanced movement. Avoid rushing or letting your back leg collapse.
-
Push Through the Heel: As you return to the starting position, push through the heel of your front foot to activate the glutes and quads.
-
Use Your Core for Stability: Engage your core muscles to maintain balance and prevent wobbling during the movement.

Move your knees slightly farther from your hands to increase difficulty.
Tips
-
Core Engagement: Keep your core tight throughout the movement to prevent your hips from swaying side to side. This is key for maintaining stability and maximizing the effectiveness of the exercise.
-
Controlled Movement: Perform each tap slowly and with control. Avoid rushing through the exercise, as this can lead to instability and compromise form.
-
Maintain Neutral Spine: Ensure that your back stays flat, with a straight line from your head to your knees. Avoid arching or rounding your back.
-
Knee and Hand Positioning: Keep your knees slightly behind your hips and your hands under your shoulders for proper alignment and stability.
-
Breathing: Exhale as you lift your hand to tap your shoulder, and inhale as you return your hand to the ground. Steady breathing helps maintain control and focus during the movement.
Muscle groups:
Tips
-
Core Engagement: Keep your core muscles engaged throughout the movement to prevent your lower back from arching. This helps protect your spine and enhances the effectiveness of the exercise.
-
Push Through Your Heels: Pressing through your heels activates the glutes more effectively. Avoid pushing through the balls of your feet or letting your toes lift off the floor.
-
Squeeze at the Top: At the top of the movement, fully squeeze your glutes to maximize muscle activation. Ensure that your body forms a straight line from your shoulders to your knees.
-
Avoid Overextension: Be mindful not to hyperextend your lower back at the top of the movement. Focus on lifting with your glutes, not your lower back.
-
Breathing: Inhale as you lower your hips and exhale as you lift them. Proper breathing enhances core engagement and control.
Joint Warm-Up5 min
Warming up your joints properly is essential to prepare your body for intense workouts, helping you stay injury-free and perform at your best. This quick and effective 5-6 minute joint warm-up routine is perfect for getting your body ready, whether you're about to dive into calisthenics, strength training, or any physical activity.
No muscle groups found for this post.
Tips
-
Move slowly and deliberately to avoid sudden movements.
-
Keep circles smooth and controlled—avoid jerky motions.
-
Breathe steadily and deeply to maximize relaxation and blood flow.
-
Gradually increase the range of motion as your joints warm up.
-
Perform each movement for 15-20 seconds, or until joints feel loosened.
-
Customize your routine slightly based on the specific demands of your workout.
Main: Super Side Strength30 min
Let’s wrap up the week by progressing our strength and stability even further.
We’ll begin with knee push-ups, taking our incline push-ups closer to the floor to further challenge your chest, shoulders, and triceps.
Next up are doorframe squats—hold onto a doorframe or sturdy support to help you squat deeper than before, enhancing your lower-body mobility and strength.
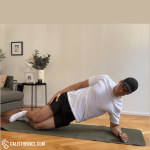
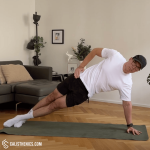
We’re also stepping up your core game with elbow side planks, progressing from knee side planks to fully engage your obliques and improve overall core stability.
Lastly, we’ll introduce Superman raises, strengthening your lower back and glutes, helping balance out your core training and improve posture.
Execution: SUPERSET (perform the exercises back-to-back with minimal or no rest in between)
Rest time: 1-2 min (after each superset)

Muscle groups:

Tips
-
Core Engagement: Keep your core tight and maintain a straight line from your head to your knees. Avoid sagging or arching your lower back.
-
Hand Placement: Your hands should be placed directly under your shoulders or slightly wider for a balanced position.
-
Controlled Movement: Lower yourself in a controlled manner, avoiding jerky or fast motions. Control helps build strength and reduces the risk of injury.
-
Breathing: Inhale as you lower your body, exhale as you push up. Controlled breathing supports overall stability.


Tips
-
Core Engagement: Keep your core tight throughout the movement to support your lower back and maintain good posture.
-
Knee Alignment: Ensure your knees track in line with your toes during the squat. Avoid allowing your knees to collapse inward, which can place strain on the joints.
-
Use the Doorframe for Balance, Not for Lifting: While the doorframe provides support, focus on using your legs to perform the squat. The doorframe should be used primarily for balance, not to pull yourself up.
-
Keep Your Weight in Your Heels: Press through your heels as you stand up, engaging your glutes and hamstrings. This helps protect your knees and ensures proper muscle activation.
-
Breathing: Inhale as you lower your body into the squat, and exhale as you stand back up. Controlled breathing helps maintain focus and control during the movement.

Tips
-
Shoulder Alignment: Ensure your shoulder is directly over your elbow to avoid unnecessary strain on the shoulder joint. This helps distribute your weight evenly and supports proper form.
-
Core Engagement: Keep your core muscles tight throughout the exercise to stabilize your body and prevent your hips from sagging.
-
Maintain a Straight Line: Keep your body in a straight line from your head to your feet. Don’t allow your hips to dip or lift too high.
-
Steady Breathing: Breathe steadily throughout the hold. Inhale deeply through your nose and exhale through your mouth to maintain focus and core engagement.

Muscle groups:
Tips
-
Core Engagement: Keep your core muscles tight throughout the movement to support your lower back and avoid excessive arching of the spine.
-
Lift with Control: Focus on lifting your arm and leg slowly and with control. Avoid swinging your limbs, as this can reduce the effectiveness of the exercise and strain your lower back.
-
Small, Effective Range of Motion: You don’t need to lift your arm and leg very high. A few inches off the ground is sufficient to engage the muscles properly.
-
Neck Position: Keep your head in a neutral position by looking down at the floor. Avoid lifting your head too high, which can cause neck strain.
-
Breathing: Exhale as you lift your arm and leg, and inhale as you lower them back down. Proper breathing helps maintain focus and control during the movement.
Week 3: Introducing More Challenging Variations
- Workout #7
- Workout #8
- Workout #9
Joint Warm-Up5 min
Let’s kick things off by our usual joint prep routine—it’s key to safely preparing your body for today’s workout. This quick and easy 5–6-minute routine will gently mobilize your joints, helping you move better, perform stronger, and significantly reduce the risk of injury.
It's not just for warming up for a calisthenics workout. You can repeat this routine every morning before you start your day.
No muscle groups found for this post.
Tips
-
Move slowly and deliberately to avoid sudden movements.
-
Keep circles smooth and controlled—avoid jerky motions.
-
Breathe steadily and deeply to maximize relaxation and blood flow.
-
Gradually increase the range of motion as your joints warm up.
-
Perform each movement for 15-20 seconds, or until joints feel loosened.
-
Customize your routine slightly based on the specific demands of your workout.
Main: Pull, Push & Lunge30 min
We’re stepping things up in Week 3 by adding more challenging movements to build balanced strength.
We’ll begin with lying towel pull-downs, a smart pull-up regression—working on your back muscles to prepare you for more advanced pulling exercises.
Next up, scapula push-ups will target your shoulder stability and upper back strength, laying a strong foundation for healthier shoulders and stronger push movements.
We’ll then move into walking lunges, building on previous lunge exercises to enhance lower-body strength and balance.
Finally, we’ll finish with elevated glute bridges, intensifying glute and lower-back activation to further develop your strength and stability.
Execution: SUPERSET (perform the exercises back-to-back with minimal or no rest in between)
Rest time: 1-2 min (after each superset)

Tips
-
Squeeze the Shoulder Blades: Focus on squeezing your shoulder blades together as you pull the towel down. This ensures you engage the upper back and lat muscles effectively.
-
Keep Core Tight: Maintain core engagement throughout the exercise to prevent your lower back from arching excessively. This helps protect your spine and stabilize your body.
-
Controlled Movement: Perform the exercise slowly and with control, especially when returning to the starting position. Avoid rushing through the movement.
-
Elbow Position: As you pull the towel down, make sure your elbows stay wide and level with your shoulders, simulating the proper mechanics of a pull-up or lat pull-down.
-
Breathing: Exhale as you pull the towel down, and inhale as you return to the starting position. Proper breathing helps maintain focus and control.

Tips
-
Focus on Shoulder Blade Movement: The goal of this exercise is to isolate the movement of the scapula. Ensure your elbows remain locked and focus on squeezing and spreading your shoulder blades.
-
Core Engagement: Keep your core and glutes engaged to maintain proper body alignment and avoid unwanted movement in the hips or lower back.
-
Controlled Movements: Perform the exercise slowly and with control to fully engage the muscles of the shoulder girdle and prevent injury.
-
Breathing: Inhale as you retract your scapula (lowering your chest) and exhale as you protract your scapula (pushing through your hands and rounding your back).
Tips
-
Maintain Upright Posture: Keep your torso upright and chest lifted throughout the movement. Avoid leaning forward or arching your back.
-
Step with Control: Focus on controlled, deliberate steps. Rushing the movement can lead to poor form and injury.
-
Knee Alignment: Ensure that your front knee stays aligned with your toes and doesn’t go past your toes as you lunge.
-
Push Through the Heel: When you push off to bring your back leg forward, drive through the heel of your front foot to engage your glutes and hamstrings effectively.
-
Engage Your Core: Keep your core engaged to help with balance and stability as you move forward.
-
Avoid Overstriding: Taking too large a step can cause your back leg to overstretch and may place unnecessary stress on your joints.

Muscle groups:
Tips
Joint Warm-Up5 min
Let’s kick things off by our usual joint prep routine—it’s key to safely preparing your body for today’s workout. This quick and easy 5–6-minute routine will gently mobilize your joints, helping you move better, perform stronger, and significantly reduce the risk of injury.
It's not just for warming up for a calisthenics workout. You can repeat this routine every morning before you start your day.
No muscle groups found for this post.
Tips
-
Move slowly and deliberately to avoid sudden movements.
-
Keep circles smooth and controlled—avoid jerky motions.
-
Breathe steadily and deeply to maximize relaxation and blood flow.
-
Gradually increase the range of motion as your joints warm up.
-
Perform each movement for 15-20 seconds, or until joints feel loosened.
-
Customize your routine slightly based on the specific demands of your workout.
Main: Control and Hold30 min
Today’s session is focused on controlled strength and endurance.
We’ll start with negative push-ups, lowering your body slowly and with full control to strengthen your chest, shoulders, and triceps.
Next, the wall sit will challenge your leg strength and endurance—hold steady, feeling your quads and glutes activate fully.
Then, we’ll move into an elbow plank, advancing your core stability by holding a steady position on your forearms, deeply engaging your abs and lower back.
Finally, superman pulses will activate your posterior chain, strengthening your lower back and glutes, and improving your posture through controlled, rhythmic movements.
Execution: SUPERSET (perform the exercises back-to-back with minimal or no rest in between)
Rest time: 1-2 min (after each superset)

Muscle group:
Tips
-
Focus on Eccentric Movement: The primary focus is on the slow lowering (eccentric) phase. Aim for 3-5 seconds of controlled lowering to maximize muscle engagement.
-
Core Engagement: Keep your core tight throughout the movement to maintain proper body alignment and prevent sagging hips.
-
Elbow Positioning: Keep your elbows close to your body or at a slight 45-degree angle. This will reduce strain on the shoulders and engage the triceps more effectively.
-
Controlled Movements: Don’t rush the descent. The slower the movement, the greater the benefit for building muscle strength.
-
Breathing: Inhale as you lower your body slowly, and exhale as you reset to the starting position.

Tips
-
Knee Alignment: Ensure your knees are directly over your ankles, forming a 90-degree angle. Avoid letting your knees cave inward or extend past your toes, which can put stress on the knees.
-
Back Against the Wall: Keep your entire back, especially your lower back, pressed firmly against the wall. This helps maintain proper posture and reduces strain on your spine.
-
Weight Distribution: Distribute your weight evenly across your feet, with a slight emphasis on your heels to engage your glutes and quads more effectively.
-
Breathing: Maintain steady breathing throughout the hold. Inhale deeply through your nose and exhale through your mouth to help stay relaxed and focused.

Tips
-
Straight Body Line: Ensure your body forms a straight line from your head to your heels. Avoid raising or lowering your hips too much, as this can compromise form.
-
Core Engagement: Keep your core muscles tight throughout the entire exercise. This helps stabilize your spine and prevents your hips from sagging or arching.
-
Elbow Positioning: Your elbows should be directly under your shoulders, creating a strong base of support. This will also help engage your shoulders and reduce strain.
-
Steady Breathing: Focus on controlled, deep breaths. Inhale through your nose and exhale through your mouth, which helps stabilize your core and manage endurance.
-
Avoid Tension in the Neck: Keep your neck neutral by looking down at the floor to prevent any tension or strain in the neck.

Muscle group:
Tips
-
Core Engagement: Keep your core muscles tight throughout the exercise to protect your lower back and maintain proper form.
-
Small, Controlled Movements: The pulses should be small and controlled. Focus on raising and lowering your limbs just a few inches with each pulse to engage the muscles without losing control.
-
Neck Position: Keep your neck in a neutral position, looking down at the floor. Avoid lifting your head too high, which can strain your neck.
-
Squeeze Your Glutes: Actively engage your glutes during the pulses to maximize the benefits for your lower back and posterior chain.
-
Breathing: Breathe steadily throughout the movement. Exhale as you pulse upwards and inhale as you lower slightly.
Joint Warm-Up5 min
Let’s start by our usual joint prep routine—it’s key to safely preparing your body for today’s workout. This quick and easy 5–6-minute routine will gently mobilize your joints, helping you move better, perform stronger, and significantly reduce the risk of injury.
It's not just for warming up for a calisthenics workout. You can repeat this routine every morning before you start your day.
No muscle groups found for this post.
Tips
-
Move slowly and deliberately to avoid sudden movements.
-
Keep circles smooth and controlled—avoid jerky motions.
-
Breathe steadily and deeply to maximize relaxation and blood flow.
-
Gradually increase the range of motion as your joints warm up.
-
Perform each movement for 15-20 seconds, or until joints feel loosened.
-
Customize your routine slightly based on the specific demands of your workout.
Main: Pulse and Progress30 min
We’ll close Week 3 by progressing previous exercises with more dynamic movements and longer holds.
We’ll start with seated towel rows, progressing from lying towel pull-downs to further develop your back and arm strength through a more upright position and increased resistance.
Next, reverse lunge pulses will advance your reverse lunges by adding small, controlled pulses to deepen lower-body strength and endurance.
We’ll continue with side plank pulses, taking your side planks a step further by adding subtle movement to intensify the engagement of your obliques and core stability.
Lastly, we’ll wrap up with the superman hold—progressing from pulses to a steady isometric hold, challenging your lower back and glutes to build greater endurance and improve your overall posture.
Execution: SUPERSET (perform the exercises back-to-back with minimal or no rest in between)
Rest time: 1-2 min (after each superset)

Tips
-
Core Engagement: Keep your core tight throughout the exercise to support your lower back and maintain good posture.
-
Squeeze Your Shoulder Blades: Focus on squeezing your shoulder blades together as you pull the towel toward your body. This helps engage the upper back muscles more effectively.
-
Controlled Movement: Perform the exercise slowly and with control, avoiding jerky movements. Both the pulling and the resistance from the leg should be steady.
-
Leg Resistance: Your leg should push forward gently but with enough force to create resistance. The goal is to mimic the effect of pulling against a resistance band or weight.
-
Breathing: Exhale as you pull the towel toward you, and inhale as you extend your arms back to the starting position. Proper breathing helps maintain focus and control.

Tips
-
Core Engagement: Keep your core tight throughout the exercise to maintain balance and prevent your lower back from arching.
-
Knee Alignment: Ensure your front knee stays directly above your ankle and doesn’t move past your toes. This helps protect your knees and ensures proper muscle engagement.
-
Small Movements: Focus on small, controlled pulses. Avoid making the pulses too large, as this can shift the emphasis away from the muscles you are trying to target.
-
Keep the Chest Up: Maintain an upright posture with your chest lifted and shoulders back. Avoid leaning forward or hunching over, which can reduce the effectiveness of the exercise.
-
Breathing: Inhale as you lower your back knee and exhale as you pulse upward. Steady breathing helps you maintain focus and control.

Muscle groups:
Tips
-
Core Engagement: Keep your core tight throughout the exercise to stabilize your body and prevent your hips from sagging or rotating.
-
Shoulder Stability: Ensure that your supporting shoulder stays directly above your wrist and remains engaged. Avoid letting your shoulder collapse inward.
-
Small, Controlled Movements: Focus on small, controlled pulses. You don’t need to lower your hips too far—just a few inches to engage the obliques and glutes.
-
Breathing: Inhale as you lower your hips and exhale as you lift them. Proper breathing helps maintain rhythm and control during the pulses.
-
Neck Alignment: Keep your neck in line with your spine, looking straight ahead. Avoid looking down or arching your neck, which can cause strain.

Muscle group:
Tips
-
Avoid Overextending: Lift your arms and legs only as high as your flexibility allows. Overextending or lifting too high can lead to lower back strain.
-
Neck Position: Keep your neck in line with your spine by looking down at the floor during the movement. Avoid lifting your head, which can cause neck strain.
-
Core Engagement: Keep your core engaged to support your lower back and prevent excessive strain. This helps you maintain control and balance throughout the movement.
-
Breathing: Inhale as you prepare for the lift and exhale as you hold the position. Maintain steady breathing throughout the hold to stay relaxed and focused.
Week 4: Push for Strength and Stamina
- Workout #10
- Workout #11
- Workout #12
Joint Warm-Up5 min
Let’s start by our usual joint prep routine—it’s key to safely preparing your body for today’s workout. This quick and easy 5–6-minute routine will gently mobilize your joints, helping you move better, perform stronger, and significantly reduce the risk of injury.
It's not just for warming up for a calisthenics workout. You can repeat this routine every morning before you start your day.
No muscle groups found for this post.
Tips
-
Move slowly and deliberately to avoid sudden movements.
-
Keep circles smooth and controlled—avoid jerky motions.
-
Breathe steadily and deeply to maximize relaxation and blood flow.
-
Gradually increase the range of motion as your joints warm up.
-
Perform each movement for 15-20 seconds, or until joints feel loosened.
-
Customize your routine slightly based on the specific demands of your workout.
Main: Strength and Stability30 min
Welcome to Week 4—let’s build on your progress with more advanced movements.
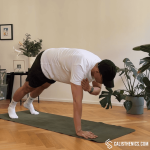
We’ll start with regular push-ups, a progression from knee and negative push-ups, fully engaging your chest, shoulders, and triceps.
Next, the squat hold will challenge your leg strength and endurance by maintaining a controlled, deep squat position, progressing from previous squatting exercises.
We’ll continue with plank shoulder taps, adding dynamic movement to the plank to further develop your core stability .
Finally, single-leg glute bridges will intensify your glute and lower-back activation by introducing a balance challenge, building from previous bridge variations.
Execution: SUPERSET (perform the exercises back-to-back with minimal or no rest in between)
Rest time: 1-2 min (after each superset)
Muscle groups:
Tips
-
Body Alignment: Keep your body in a straight line from head to heels. Engage your core and glutes to prevent your hips from dropping or rising.
-
Hand Placement: Your hands should be positioned just outside of shoulder-width for optimal stability. Moving them closer or wider will target different muscles.
-
Elbow Positioning: Keep your elbows at about a 45-degree angle from your body, not flaring out too far to avoid shoulder strain.
-
Breathing: Inhale as you lower yourself, and exhale as you push back up. Controlled breathing improves strength and endurance.
-
Controlled Movements: Lower yourself slowly to build strength, then push back up with a smooth, steady motion.

Tips
-
Maintain an Upright Posture: Keep your chest up and back straight during the entire hold. Avoid letting your lower back round, which can put strain on the spine.
-
Knee and Toe Alignment: Ensure that your knees track over your toes and do not collapse inward. Your knees should be at a 90-degree angle or slightly less.
-
Keep Your Heels Down: Ensure that your weight is distributed evenly across your feet, with your heels pressed firmly into the ground. You should be able to wiggle your toes slightly.
-
Engage Your Core: Tighten your abdominal muscles to help stabilize your lower back and maintain proper form throughout the hold.
-
Breathe Consistently: Don’t hold your breath! Breathe deeply and consistently to stay relaxed and focused.

Tips
-
Core Engagement: Keep your core tight throughout the entire movement. This is key to minimizing any rotation or movement in your hips and torso as you lift each hand.
-
Hip Stability: Focus on keeping your hips level and preventing them from swaying side to side. A wider stance with your feet can provide better stability as you progress.
-
Slow and Controlled: Perform the shoulder taps slowly and with control to maximize core engagement and prevent losing form.
-
Breathing: Breathe steadily throughout the exercise. Inhale as you prepare to lift your hand, and exhale as you tap your shoulder. Controlled breathing will help stabilize your core and prevent fatigue.

Muscle groups:
Tips
-
Core Engagement: Keep your core tight throughout the exercise to prevent your lower back from arching and to stabilize your hips.
-
Drive Through the Heel: Press through the heel of the working leg to activate the glutes and hamstrings more effectively. Avoid pushing through the toes, as this can place strain on the knees.
-
Keep Hips Level: Focus on keeping your hips level throughout the movement. Avoid letting one hip drop or rotate during the lift.
-
Controlled Movement: Perform the exercise slowly and with control, especially during the lowering phase, to maximize muscle engagement.
-
Breathing: Inhale as you lower your hips, and exhale as you lift them. Proper breathing helps maintain core stability and rhythm.
Joint Warm-Up5 min
Let’s start by our usual joint prep routine—it’s key to safely preparing your body for today’s workout. This quick and easy 5–6-minute routine will gently mobilize your joints, helping you move better, perform stronger, and significantly reduce the risk of injury.
It's not just for warming up for a calisthenics workout. You can repeat this routine every morning before you start your day.
No muscle groups found for this post.
Tips
-
Move slowly and deliberately to avoid sudden movements.
-
Keep circles smooth and controlled—avoid jerky motions.
-
Breathe steadily and deeply to maximize relaxation and blood flow.
-
Gradually increase the range of motion as your joints warm up.
-
Perform each movement for 15-20 seconds, or until joints feel loosened.
-
Customize your routine slightly based on the specific demands of your workout.
Main: Power and Precision30 min
Let’s push your progress further today with some challenging yet rewarding exercises.
We’ll kick things off with floor-slide pull-ups, building directly from towel rows—lying face-down, you’ll mimic the pull-up movement, engaging your upper back muscles and improving your pulling strength.
Next up, Bulgarian split squats will elevate your lunges by placing your back foot on an elevated surface, increasing balance demands and significantly strengthening your legs and glutes.
We’ll continue with reverse elbow push-ups, a progression from scapula push-ups that intensely targets your triceps, shoulders, and upper back.
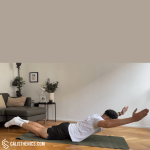
Finally, we’ll perform Superman rocks (also known as arch rocks), taking previous Superman exercises up a notch by introducing dynamic movements to enhance your lower back strength.
Execution: SUPERSET (perform the exercises back-to-back with minimal or no rest in between)
Rest time: 1-2 min (after each superset)


Tips
-
Squeeze Your Shoulder Blades: As you pull yourself up, focus on squeezing your shoulder blades together to maximize engagement of your upper back muscles.
-
Core Engagement: Keep your core tight to protect your lower back and stabilize your torso during the movement. This will prevent excessive arching or strain.
-
Keep Elbows Close: As you pull, ensure that your elbows stay close to your body, similar to the form used in a traditional pull-up or lat pull-down.
-
Controlled Movement: Perform the movement slowly and with control, especially when returning to the starting position. Avoid using momentum to slide.
-
Breathing: Exhale as you pull your body forward and inhale as you return to the starting position. Proper breathing helps you maintain rhythm and focus.

Tips
-
Core Engagement: Keep your core engaged throughout the movement to maintain balance and prevent your torso from leaning too far forward.
-
Knee Alignment: Ensure that your front knee tracks in line with your toes and does not extend past your toes. This helps protect your knees and maximizes muscle engagement.
-
Control the Descent: Lower yourself slowly and with control, especially as your back knee approaches the ground. This helps engage your muscles more effectively and reduces the risk of injury.
-
Weight in the Front Heel: Focus on driving through your front heel when you push back up to engage your glutes and hamstrings properly.
-
Breathing: Inhale as you lower into the squat and exhale as you push up. Proper breathing helps you maintain control and stability.

Tips
-
Engage the Upper Back: Focus on engaging your rear delts, rhomboids, and upper back muscles as you push your body off the ground. Avoid using momentum or relying on your lower body.
-
Squeeze the Shoulder Blades: Actively squeeze your shoulder blades together during the lift to fully engage the muscles in your upper back.
-
Controlled Movement: Perform the exercise slowly, especially when lowering yourself back down. This increases muscle engagement and helps you build strength more effectively.
-
Keep Hips Stable: Ensure that your hips and lower back remain on the ground throughout the movement. The focus should be on the upper body, driven by your elbows and back muscles.
-
Breathing: Exhale as you push your body up with your elbows and inhale as you lower back down. Proper breathing helps maintain control and stability during the exercise.
Muscle group:
Tips
-
Maintain a Strong Arch: Focus on keeping your chest and legs lifted off the ground throughout the movement. Your body should remain in a solid arch shape, with tension in your back, glutes, and shoulders.
-
Engage Your Core: Although this exercise primarily targets the posterior chain, keeping your core engaged will help stabilize your body and maintain balance during the rocking motion.
-
Controlled Movement: Avoid jerking or using momentum. The rocking should be slow and controlled, driven by muscle engagement rather than swinging
-
Breathing: Breathe steadily throughout the movement. Exhale as you rock forward and inhale as you rock backward. This will help you maintain control and endurance.
Joint Warm-Up5 min
Let’s start by our usual joint prep routine—it’s key to safely preparing your body for today’s workout. This quick and easy 5–6-minute routine will gently mobilize your joints, helping you move better, perform stronger, and significantly reduce the risk of injury.
It's not just for warming up for a calisthenics workout. You can repeat this routine every morning before you start your day.
No muscle groups found for this post.
Tips
-
Move slowly and deliberately to avoid sudden movements.
-
Keep circles smooth and controlled—avoid jerky motions.
-
Breathe steadily and deeply to maximize relaxation and blood flow.
-
Gradually increase the range of motion as your joints warm up.
-
Perform each movement for 15-20 seconds, or until joints feel loosened.
-
Customize your routine slightly based on the specific demands of your workout.
Main: Finish Strong!30 min
Congrats—you’re at the final workout of this plan! Today, we’ll combine challenging moves that showcase all your hard-earned progress.
We’ll start with hand-release push-ups, taking your mastered regular push-up to a new level by briefly lifting your hands off the ground, maximizing chest and upper-body activation.
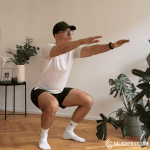
Next, straight-arm squats will advance your squatting form, keeping arms overhead or in front of your body for added intensity.
We’ll then progress to off-knees quadruped shoulder taps, further enhancing your core strength and coordination by balancing on hands and toes instead of knees.
Lastly, reverse hyperextensions will powerfully engage your glutes and lower back, building upon your previous Superman variations and rounding out your training with improved posterior strength and stability.
Execution: SUPERSET (perform the exercises back-to-back with minimal or no rest in between)
Rest time: 1-2 min (after each superset)

Muscle groups:
Tips
-
Full Body Control: Engage your core and glutes to maintain a straight line from your head to your heels during both the lowering and lifting phases.
-
Elbow Positioning: Keep your elbows close to your body to reduce shoulder strain and to focus on the triceps and chest.
-
Hand Release Focus: Ensure you fully lift your hands off the ground at the bottom of each rep to reset and engage the muscles from the start of each push-up.
-
Breathing: Inhale as you lower yourself, and exhale as you push back up. Controlled breathing helps maintain stability and power throughout the movement.
-
Consistent Tempo: Perform the movement slowly and with control, focusing on the full range of motion rather than rushing through the reps.
Tips
-
Keep Arms Extended: Maintain straight, extended arms throughout the entire movement. This helps to stabilize your upper body and keep your torso upright.
-
Chest Up, Back Straight: Focus on keeping your chest lifted and your back flat as you squat. Avoid rounding your lower back, which can put strain on your spine.
-
Knee Alignment: Ensure that your knees track over your toes and do not collapse inward. Proper knee alignment protects your joints and promotes better muscle engagement.
-
Weight on Heels: Keep your weight on your midfoot and heels, not your toes. You should be able to wiggle your toes slightly as you lower into the squat.
-
Breathe Correctly: Inhale as you lower into the squat and exhale as you push back up. Proper breathing will help you maintain core stability and rhythm.

Tips
-
Core Engagement: Keep your core engaged throughout the movement to stabilize your torso and prevent your hips from swaying.
-
Minimize Hip Movement: The primary focus of this exercise is to keep your hips and torso as stable as possible. The shoulder tap should be the only movement.
-
Controlled Movement: Perform each tap slowly and with control. Avoid rushing through the exercise, as this can lead to instability and reduce its effectiveness.
-
Breathing: Exhale as you lift your hand to tap your shoulder and inhale as you return to the quadruped position. Steady breathing helps maintain focus and stability.
-
Hand and Knee Alignment: Ensure your hands are directly under your shoulders and your knees remain close to the floor throughout the exercise to maintain proper form.

Muscle group:
Tips
-
Engage the Glutes and Lower Back: Focus on using your glutes and lower back muscles to lift your legs, rather than relying on momentum or swinging.
-
Maintain Core Stability: Keep your core tight throughout the movement to stabilize your spine and prevent excessive arching of your lower back.
-
Controlled Movements: Perform the exercise slowly, especially during the lowering phase, to maximize muscle engagement and avoid injury.
-
Leg Height: Avoid lifting your legs too high, as overextending can strain your lower back. The goal is to raise your legs to the level of your body or slightly higher.
-
Breathing: Exhale as you lift your legs, and inhale as you lower them. Proper breathing helps maintain rhythm and control during the movement.